ChevyParts
My Garage
My Account
Cart
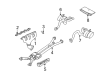
OEM 2003 Chevrolet Corvette Exhaust Manifold
Engine Exhaust Manifold- Select Vehicle by Model
- Select Vehicle by VIN
Select Vehicle by Model
orMake
Model
Year
Select Vehicle by VIN
For the most accurate results, select vehicle by your VIN (Vehicle Identification Number).
2 Exhaust Manifolds found

 Product Specifications
- Other Name: Manifold, Engine Exhaust Manifold; Manifold
- Position: Driver Side
- Item Weight: 14.40 Pounds
- Item Dimensions: 18.2 x 15.2 x 6.4 inches
- Condition: New
- Fitment Type: Direct Replacement
- SKU: 12561255
- Warranty: This genuine part is guaranteed by GM's factory warranty.
- Product Specifications
- Other Name: Manifold, Engine Exhaust Manifold; Manifold
- Position: Passenger Side
- Item Weight: 14.40 Pounds
- Item Dimensions: 18.2 x 15.3 x 6.4 inches
- Condition: New
- Fitment Type: Direct Replacement
- SKU: 12561256
- Warranty: This genuine part is guaranteed by GM's factory warranty.
2003 Chevrolet Corvette Exhaust Manifold
With a comprehensive array of OEM 2003 Chevrolet Corvette Exhaust Manifold, from fuel pumps to door handles, our website is a one-stop-shop for your needs. All our genuine 2003 Chevrolet Corvette Exhaust Manifold are backed by the manufacturer's warranty and are offered at competitive prices in the market. Rest assured, you can shop with complete confidence.
2003 Chevrolet Corvette Exhaust Manifold Parts Questions & Experts Answers
- Q: How to replace the left exhaust manifold on 2003 Chevrolet Corvette?A: Start the left Exhaust Manifold replacement process by taking out the fuel rail cover along with the generator followed by lifting and supporting the vehicle. Start by taking off the Exhaust Manifold nuts and also removing the connector position assurance (CPA) lock along with disconnecting both the Oxygen Sensor electrical connector and the Oxygen Sensor connector clip from the body. The Oxygen Sensor needs removal before lowering the vehicle. You need to remove the Air Hose from the pipe by first detaching the hose clamp installed at the secondary air injection (AIR) pipe. Sever the hose clamps of right and left check valves to disconnect the air injection pipe components and from the corresponding check valves and extract the air pipe. Extreme care should be exercised before removing check valves from the air pipe. Loosen the air pipe holding bolts while taking off the air pipe equipment and old gasket for disposal. To commute the Exhaust Manifold start by removing the Brake Booster Vacuum Hose followed by ignition coil bracket studs and ignition coil bracket before extracting both spark plugs and Exhaust Manifold bolts for manifold removal with the existing gasket. When needed you should first uninstall Exhaust Manifold heat shield bolts before removing the heat shield. Start by installing the Exhaust Manifold heat shield followed by its bolts and tighten them to 9 nm torque values (80 inch lbs.). Position the Exhaust Manifold Gasket onto the bolts and apply a 5 mm (0.2 inch) widest threadlock gm p/n 12345493 (Canadian P/N 10953489) around their threads before installing the Exhaust Manifold. Start by applying thread-locking compound gm p/n 12345493 (Canadian P/N 10953489) to all Exhaust Manifold bolt threads. Following this, install the bolts beginning with the central pair then moving alternately between sides. Tighten the bolts in two steps: first to 15 nm (11 ft. Lbs.) focusing on the center points before finishing at 25 nm (18 ft. Lbs.) using the same side-to-side pattern. Bend the exposed part of the Exhaust Manifold Gasket at the cylinder head rear section before placing spark plugs and ignition coil bracket. Install the coil bracket studs after applying threadlock gm p/n 12345382 (Canadian P/N 10953489) then tighten them to 12 nm (106 inch lbs.). You need to reattach the Brake Booster Vacuum Hose followed by the installation of an air pipe with check valve and new gasket before tightening the air pipe bolts to 20 nm (15 ft. Lbs.). Place the air pipe and connect the air injection pipe hoses to function with their check valves after installing the hose clamps at both points. Reinstall the Air Hose to its position on the air pipe and install the corresponding hose clamp. The Oxygen Sensor threads need gm p/n 12377953 or equivalent anti-seize compound before installing the Oxygen Sensor by torqueing it to 42 nm (30 ft. Lbs.). Finish the procedure by attaching the Oxygen Sensor clip together with the electrical connection while installing the cpa lock before applying torque of 20 nm (15 ft. Lbs.) to the Exhaust Manifold nuts. The last step involves lowering the vehicle before reinstallation of the generator and fuel rail cover.
Related 2003 Chevrolet Corvette Parts
 2003 Chevrolet Corvette Air Inject Check Valve
 2003 Chevrolet Corvette Catalytic Converter
 2003 Chevrolet Corvette Diverter Valve
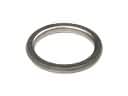 2003 Chevrolet Corvette Exhaust Flange Gasket
 2003 Chevrolet Corvette Exhaust Heat Shield
 2003 Chevrolet Corvette Exhaust Manifold Gasket
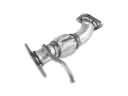 2003 Chevrolet Corvette Exhaust Pipe
 2003 Chevrolet Corvette Muffler
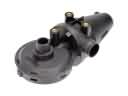 2003 Chevrolet Corvette PCV Valve
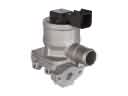 2003 Chevrolet Corvette Secondary Air Injection Check Valve
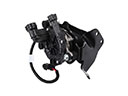 2003 Chevrolet Corvette Secondary Air Injection Pump
 2003 Chevrolet Corvette Vapor Canister