
Popular OEM Chevrolet Corvette Parts
- Body & Hardware Parts View More >
- Steering Parts View More >
- Electrical Parts View More >
- Air & Fuel Delivery Parts View More >
- Charging & Starting Parts View More >
- Engine Parts View More >
- Belts & Cooling Parts View More >
- Suspension Parts View More >
- Driveline & Axles Parts View More >
- Emission Control & Exhaust Parts View More >
- Transmission Parts View More >
- Brakes Parts View More >


Why Buy Genuine Chevrolet Corvette Parts From ChevyPartsGiant.com
Looking for real Chevrolet Corvette parts? ChevyPartsGiant.com may be a better choice to find genuine parts at wallet-friendly prices. We sell only OEM Chevrolet Corvette parts, ensuring perfect fit, reliability, and long-term performance. With our website, you can easily get access to the same parts found at local Chevrolet stores. All components are produced by Chevrolet and are exclusively fitted on Chevrolet Corvette automobiles. By shopping at our store, you can enjoy the quality of the Chevrolet factory without the high prices of brick-and-mortar facilities. We achieve this because we are an online store operating at lower costs, which we pass on to you. We also have a user-friendly platform where you can find and order genuine Chevrolet Corvette parts swiftly. We are here to make your process of restoring a Chevrolet Corvette or dealing with simple repairs quick and inexpensive. We also make it easy to obtain Chevrolet Corvette parts at competitive shipping prices and a team of knowledgeable staff ready to take your order. Choose ChevyPartsGiant.com to save time and money, as well as keep your Chevrolet Corvette in the good condition.
Since its first appearance Chevrolet Corvette has experienced eight evolutions as a celebrated representation of American automotive innovation and performance excellence. The newest Chevrolet Corvette model made between 2020 and 2022 features a V8 6.2 liter engine capable of producing 490 horsepower in tandem with 470 lb-ft of torque and working in conjunction with an eight speed dual clutch automatic transmission. Through the transmission system users manage their vehicle performance by controlling paddle shifters available on the steering wheel for stability. With an electronic limited-slip differential and aggressive braking system combined with summer tires the Chevrolet Corvette delivers outstanding performance such that it needs only 2.8 seconds to go from zero to sixty mph and 11.2 seconds at 122 mph to complete the quarter mile. Historical development of the Chevrolet Corvette brought the first generation forward from its original inline 6 and 265 cu in V8 design until the eighth generation adopted its mid-engine structure on a completely new chassis. The vehicle combines its aerodynamic structure with dimensions that stretch to 4475mm in length and reach 1928mm in width. Chevrolet conducts comprehensive engineering tests and evaluations of every Corvette part to verify its performance capabilities along with resistance to damage and reliability standards. Customers who seek authentic Chevrolet Corvette components have access to original equipment manufacturer parts which ensure product quality and perfect fitment for maintaining the vehicle's performance heritage.
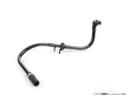
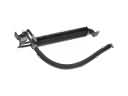
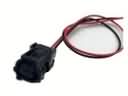
The issues of the Chevrolet Corvette fall into three systems, namely security ignition, secondary air injection, and engine sealing. In the Chevrolet Corvette, a raised chip key signal loss or electrical loss will not start the car and illuminate the security lamp. Damaged steering column wires to the ignition lock cylinder disconnect the reader circuit, so change the ignition lock cylinder and program the keys. During weak secondary air flow on the Chevrolet Corvette, restricted check valves lock and increase emissions. Replace no. 1 and no. 2 air injection check valves, check the pump output on a cold start, and clear codes. The oil at the 2nd intake manifold union on the Chevrolet Corvette indicates a bad gasket. The cooling system can be pressure tested, fit a new intake manifold gasket, and fasteners can be evenly torqued. Finally, check to make sure the Corvette is clean and sealed with idle tests and a good road test. Get the security of the address in hand then emissions then sealing into a good start and seal for the Corvette. Verifying theft deterrent data with a scan tool, viewing starter enable signals, and monitoring oxygen sensor switching during cold starts and warm soaks on the Corvette.
Chevrolet Corvette Parts Questions & Answers
- Q: How to replace the emblem/nameplate on the front fender on Chevrolet Corvette?A:Before placing the new fender emblem you need to cover and tape the mounting area then use additional tape for precise placement. Apply the Heat Gun (J 25070) 152 mm (6 in) from the surface to heat the emblem/nameplate for 30 seconds while moving in a circular pattern. Avoid damage when you take off the panel surface emblem/nameplate with a plastic flat-tip tool. Before placing the component ensure to wipe clean the target area with a lint-free cloth followed by VMP naphtha or a 50/50 mix of isopropyl alcohol and water. Afterwards dry the surface thoroughly. When tagging the parts install the ZO6 emblem/nameplate as follows: place one end 216.5 mm (8.50 in) from the fender top, align the other end 212.74 mm (8.40 in) from the top and set the back 158.51 mm 6.24 in) from the rear fender edge. Heat the logo area with the Heat Gun (J25070) until it reaches 27-41°C (80-105°F) while keeping the emblem/nameplate near 29-32°C (85-90°F). Press the emblem/nameplate against the mounting area and peel off the protective liner from its back side without touching the sticky surface. Line up the part according to the reference points then push the item securely to the mount area with balanced force. Take off the protective tape from where the emblem will go.
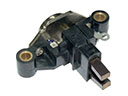
- Q: How to replace an alternator on Chevrolet Corvette?A:Proceeding to change the generator requires belt removal and negative cable disconnect. The process begins with disconnecting the generator electrical connector followed by taking off the battery feed terminal nut and the battery feed cable. First disconnect the generator's electrical connector before you remove the generator mounting bolts to pull the generator out. Position the generator onto the mounting bracket then put on the generator bolts and torque them at 50 n.m (37 lb ft). Install the battery feed cable followed by the battery feed terminal nut while securing it to 13 n.m (10 lb ft). Complete the installation by adding the Drive Belt and restoring the negative battery connection.
- Q: How to replace the Center Console on Chevrolet Corvette?A:To replace the console, take off the folding top stowage compartment lid extension panel (convertible) and open the console door. Pull up the rear of the electronic traction control, ride control switch to release the retaining clips; If not released properly, get into the recess at the back of the switch with the end of a screwdriver and apply a gentle pull upward. Pull off the electrical connector and the LED connector from the wiring harness connector and now remove the switch. With a small flat-bladed screwdriver, remove the console retaining nut covers, the nuts retaining front and rear of the console and the IP accessory trim plate. Lift the rear of the console slightly and pull it rearward to separate the front from under the IP accessory trim plate, and disconnect the electrical connector for the electrical accessory plug as well as unscrew the console electrical accessory plug retainer from the plug housing attached to the console. The electrical accessory plug housing must be removed and the electrical connector removed from the fuel door release, rear lift window release (export) switch then the switch is removed by turning the console over and using small flat bladed screwdriver to release the switch tabs. To install the new console first install the fuel door release, rear lift window release (export) switch to console by aligning and securing, then connection of the electrical connector at the switch. Install the elect. accessory plug housing, with the cover plug in place and screw elect. accessory plug retainer to hrsg until firm. Connect the electrical connector to the electrical accessory plug in such a way that the front of the console must be fixed under the rear of the IP accessory trim plate; then, fixing the front of the console under the trim plate, loosely fit console retaining nuts. Mount the console closest to optimum appearance with the IP accessory trim plate and the floor extension carpet, giving the retaining nuts a tight 10 N.m (89 lb in). Connect the electrical connector to electronic traction control, ride control switch and the LED connector to the wiring harness connector . Insert the electronic traction control, ride control switch front retaining tab under the edge of the IP accessory trim plate, lower rear of switch to position while exerting force to ensure retention clips. Finally, close the console door and replace the folding top stowage compartment lid extension panel (convertible).
- Q: How to service and repair the steering wheel on Chevrolet Corvette?A:To service and repairing Steering Wheel begin by taking out the Steering Wheel inflator module, and horn electrical connector. Then, fitting the steering column lock pin (J 42640) into the steering column, remove and dispose of the Steering Wheel set nut. Continue to attach the Steering Wheel puller legs (J 42120) and the Steering Wheel puller (J 1859-A) to the Steering Wheel. Tighten the puller centre fast against the column shaft of the steering. When the bowel comes off the Steering Wheel, that is the time you stop. Lastly, pull off the Steering Wheel puller legs (J 42120) and the Steering Wheel puller (J 1859-A) from the Steering Wheel.


