ChevyParts
My Garage
My Account
Cart
OEM 2003 GMC Sonoma Distributor
Ignition Distributor- Select Vehicle by Model
- Select Vehicle by VIN
Select Vehicle by Model
orMake
Model
Year
Select Vehicle by VIN
For the most accurate results, select vehicle by your VIN (Vehicle Identification Number).
1 Distributor found


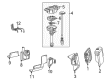
2003 GMC Sonoma Distributor Assembly Part Number: 12598210
Product Specifications- Other Name: Distributor; Distributor, Ignition
- Replaces: 01104057, 01104078, 01104050, 1104050, 1104078, 1104057, 93441559
- Item Weight: 2.60 Pounds
- Item Dimensions: 15.8 x 8.3 x 5.2 inches
- Condition: New
- Fitment Type: Direct Replacement
- SKU: 12598210
- Warranty: This genuine part is guaranteed by GM's factory warranty.
2003 GMC Sonoma Distributor
With a comprehensive array of OEM 2003 GMC Sonoma Distributor, from fuel pumps to door handles, our website is a one-stop-shop for your needs. All our genuine 2003 GMC Sonoma Distributor are backed by the manufacturer's warranty and are offered at competitive prices in the market. Rest assured, you can shop with complete confidence.
2003 GMC Sonoma Distributor Parts and Q&A
- Q: How to replace the distributor on 2003 GMC Sonoma?A: Initiate Distributor replacement by turning off ignition then extracting the air cleaner assembly. Start by pulling the Distributor Cap's boot 1/2 turn while twisting it away from its base in order to disconnect the Spark Plug Wires. First remove the Distributor's electrical connector from its base and use a screwdriver to remove and discard the two screws holding the Distributor Cap to its housing. Note the rotor's position using a grease pencil on both the Distributor housing and Intake Manifold before removing the Distributor Cap. Before proceeding with Distributor removal, loosen the holding bolt on the mounting clamp and extract the Distributor component after observing the rotor's counter-clockwise rotation of approximately 42 degrees. The second Distributor mark should be added at its base to assist with rotor alignment when reinstallation happens. Installation procedure 1 requires new Distributor housing users to replicate original marks and position rotor against the second mark before guiding the Distributor into its engine slot and aligning the hold-down base hole with the Intake Manifold mounting hole. Install the Distributor while the rotor rotates clockwise 42 degrees then check for correct rotor segment alignment with the Distributor base mark when its properly seated. The Distributor requires removal and reinstall because its misaligned position. The installation process requires tightening the Distributor clamp bolt to 25 n.m (18 lb ft) followed by mounting the Distributor Cap with two new screws at 2.4 n.m (21 lb in) torque. Reconnect the electrical connector then connect the Spark Plug Wires and ignition coil wire maintaining correct wire boot orientation. After installation the Distributor is incorrectly installed when the malfunction indicator lamp (MIL) activates with dtc p1345. When performing installation procedure 2, turn the crankshaft balancer clockwise until engine front cover tabs match Distributor alignment marks while the number 1 Piston rests at compression stroke top dead center. A white paint mark on the Distributor's stem must align with an indent hole to set the correct rotor segment for either v6 or v8 engines. Insert a long screwdriver to position the oil pump drive shaft directly against the Distributor's drive tab. Then guide the Distributor into the engine block while ensuring both spark plug towers remain perpendicular to the centerline. Check that the rotor segment points to the Distributor base pointer. Repeat the maneuver if necessary. If misaligned, repeat the procedure. After installing the Distributor clamp bolt to 25 n.m (18 lb ft) torque, use two new screws to join the Distributor Cap with 2.4 n.m (21 lb in) tightening. Then reconnect electrical connections and position Spark Plug Wires and ignition coil wire while maintaining proper wire boot alignment. You must retrace all steps of installation procedure 2 whenever the mil indicator stays on.
Related 2003 GMC Sonoma Parts
 2003 GMC Sonoma Air Charge Temperature Sensor
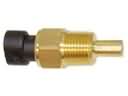 2003 GMC Sonoma Coolant Temperature Sensor
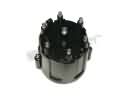 2003 GMC Sonoma Distributor Cap
 2003 GMC Sonoma Engine Control Module
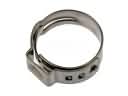 2003 GMC Sonoma Fuel Line Clamps
 2003 GMC Sonoma Igniter
 2003 GMC Sonoma Ignition Coil
 2003 GMC Sonoma Ignition Control Module
 2003 GMC Sonoma MAP Sensor
 2003 GMC Sonoma Oxygen Sensor
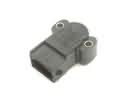 2003 GMC Sonoma Throttle Position Sensor
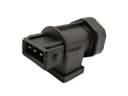 2003 GMC Sonoma Vehicle Speed Sensor