ChevyParts
My Garage
My Account
Cart
OEM 2004 Chevrolet Classic Fan Shroud
Radiator Fan Shroud- Select Vehicle by Model
- Select Vehicle by VIN
Select Vehicle by Model
orMake
Model
Year
Select Vehicle by VIN
For the most accurate results, select vehicle by your VIN (Vehicle Identification Number).
1 Fan Shroud found

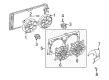
2004 Chevrolet Classic Fan Shroud Part Number: 88957397
Product Specifications- Other Name: Shroud Kit, Engine Electrical Coolant Fan; Cooling Fan Assembly; Shroud; Shroud Kit, Radiator Fan Shroud
- Item Weight: 3.40 Pounds
- Item Dimensions: 37.3 x 22.1 x 5.7 inches
- Condition: New
- Fitment Type: Direct Replacement
- SKU: 88957397
- Warranty: This genuine part is guaranteed by GM's factory warranty.
2004 Chevrolet Classic Fan Shroud
With a comprehensive array of OEM 2004 Chevrolet Classic Fan Shroud, from fuel pumps to door handles, our website is a one-stop-shop for your needs. All our genuine 2004 Chevrolet Classic Fan Shroud are backed by the manufacturer's warranty and are offered at competitive prices in the market. Rest assured, you can shop with complete confidence.
2004 Chevrolet Classic Fan Shroud Parts and Q&A
- Q: How to replace the fan shroud on 2004 Chevrolet Classic?A: To change the fan shroud, collect the tools and disassemble the battery and tray. Turn the A/C system on, empty the cooling system and take out different hoses and connectors. Disassemble the radiator, fan and condenser, and then remove the cooling fan motor and brackets. Install again, making sure the components are well tightened and finish it off with installing the battery.
Related 2004 Chevrolet Classic Parts
 2004 Chevrolet Classic A/C Condenser Fan
 2004 Chevrolet Classic Coolant Pipe
 2004 Chevrolet Classic Coolant Reservoir Cap
 2004 Chevrolet Classic Daytime Running Light Relay
 2004 Chevrolet Classic Fuel Pump Relay
 2004 Chevrolet Classic Radiator
 2004 Chevrolet Classic Radiator Cap
 2004 Chevrolet Classic Radiator Hose
 2004 Chevrolet Classic Radiator fan
 2004 Chevrolet Classic Thermostat Housing
 2004 Chevrolet Classic Variable Timing Sprocket
 2004 Chevrolet Classic Water Pump