ChevyParts
My Garage
My Account
Cart
OEM 2004 GMC Savana 1500 Oil Pan
Oil Drain Pan- Select Vehicle by Model
- Select Vehicle by VIN
Select Vehicle by Model
orMake
Model
Year
Select Vehicle by VIN
For the most accurate results, select vehicle by your VIN (Vehicle Identification Number).
2 Oil Pans found

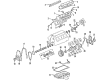
2004 GMC Savana 1500 Oil Pan Part Number: 12579273
$313.43 MSRP: $538.29You Save: $224.86 (42%)Ships in 1-2 Business DaysProduct Specifications- Other Name: Pan, Engine Oil; Engine Oil Pan
- Replaces: 12573695, 12560393
- Item Weight: 22.50 Pounds
- Item Dimensions: 28.3 x 18.9 x 18.2 inches
- Condition: New
- Fitment Type: Direct Replacement
- SKU: 12579273
- Warranty: This genuine part is guaranteed by GM's factory warranty.

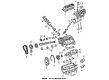
2004 GMC Savana 1500 Oil Pan Part Number: 12555653
Product Specifications- Other Name: Pan, Engine Oil
- Item Weight: 14.90 Pounds
- Item Dimensions: 21.4 x 20.6 x 13.3 inches
- Condition: New
- Fitment Type: Direct Replacement
- SKU: 12555653
- Warranty: This genuine part is guaranteed by GM's factory warranty.
2004 GMC Savana 1500 Oil Pan
With a comprehensive array of OEM 2004 GMC Savana 1500 Oil Pan, from fuel pumps to door handles, our website is a one-stop-shop for your needs. All our genuine 2004 GMC Savana 1500 Oil Pan are backed by the manufacturer's warranty and are offered at competitive prices in the market. Rest assured, you can shop with complete confidence.
2004 GMC Savana 1500 Oil Pan Parts and Q&A
- Q: How to replace the oil pan on 2004 GMC Savana 1500?A: The first step for replacing the Oil Pan should begin with removing inner axle housing nuts and washers from the bracket if your vehicle has all wheel drive (AWD) and supporting the front drive axle with a suitable jack. When replacing the Oil Pan and awd system is present, remove both mounting bolts and nuts of the differential carrier before lowering the front drive axle. Start by unlinking transmission cover bolts and crossbar bolts and removing the crossbar. Afterwards dismantling transmission cover bolt and its cover. Empty the engine oil from the system before extracting the engine Oil Filter then tighten the Drain Plug and Oil Filter until they reach proper engagement. When working with 4l60-e automatic transmissions first remove both the right side transmission bolt and stud and the left side bottom bolt. 4l80-e transmission users should next take off their converter cover bolts as part of the sequence. You must perform these steps in order: disable the oil level sensor electrical connector then remove the battery cable channel bolt after moving the channel pin out of the Oil Pan tab and finally the positive battery cable clip bolt. The procedure continues by removing the Oil Pan bolts while keeping foreign material out of the oil passages. Drilling and removing all rivets which hold the Oil Pan Gasket will be required before extracting the gasket from the pan. Discard both the gasket and rivets. After proper inspection of the engine Oil Pan proceed with cleaning it as needed. Sealant gm p/n 12378190 should be applied as a 5 mm (0.20 inch) bead onto the tabs of front and rear cover gaskets that extend into the Oil Pan surface at the engine block. Properly position the oil gallery in both components before installing the gasket between the engine block and Oil Pan. Keep the Oil Pan Gasket under the pan as you pass the bolts through the gasket. Use the engine block to mount the Oil Pan and bolts with the gasket. Tighten all pan bolts into place but avoid torque overkill. Mount converter cover bolts until tight on vehicles equipped with the 4l80-e automatic transmission. When using the 4l60-e automatic transmission, begin by installing its transmission bolt and right-side stud until they are tight before proceeding with the left-side bottom bolt. Tighten Oil Pan-to-front cover bolts to 25 nm (18 ft. Lbs.) and Oil Pan-to-rear cover bolts to 12 nm (106 inch lbs.). Use 50 nm (37 ft. Lbs.) for converter cover and transmission bolts/stud torque. Place the positive battery cable clip bolt at 9 nm torque (80 inch lbs.), then insert the channel pin into the Oil Pan tab followed by the battery cable channel bolt installation. Torque the bolt to 12 nm (106 inch lbs.). First connect the oil level sensor electrical connector before you install the transmission cover with bolt and tighten it to 12 nm (106 inch lbs.). Continue by installing the crossbar and crossbar bolts while you tighten them to 100 nm (74 ft. Lbs.). To complete installation install the transmission cover bolt and tighten it to 12 nm (106 inch lbs.) then position the front drive axle and install awd differential carrier upper and lower mounting hardware snugly without tightening before finally tightening both bolts to 100 nm (75 ft. Lbs.). Place inner axle housing washers onto the bracket before tightening its nuts to 100 nm (75 ft. Lbs.). After removing the jack supporting the front drive axle, replace it with fresh engine oil and a new Oil Filter.
Related 2004 GMC Savana 1500 Parts
 2004 GMC Savana 1500 Camshaft Bearing
 2004 GMC Savana 1500 Coolant Filter
 2004 GMC Savana 1500 Crankshaft
 2004 GMC Savana 1500 Crankshaft Thrust Washer Set
 2004 GMC Savana 1500 Dipstick Tube
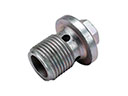 2004 GMC Savana 1500 Drain Plug
 2004 GMC Savana 1500 Oil Drain Plug Gasket
 2004 GMC Savana 1500 Oil Pump
 2004 GMC Savana 1500 Piston
 2004 GMC Savana 1500 Piston Ring
 2004 GMC Savana 1500 Timing Chain
 2004 GMC Savana 1500 Valve Cover Grommet