ChevyParts
My Garage
My Account
Cart
OEM 2005 Cadillac CTS Headlight Bulb
Headlamp Bulb- Select Vehicle by Model
- Select Vehicle by VIN
Select Vehicle by Model
orMake
Model
Year
Select Vehicle by VIN
For the most accurate results, select vehicle by your VIN (Vehicle Identification Number).
4 Headlight Bulbs found


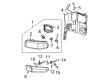
2005 Cadillac CTS Signal Lamp Bulb, Front Part Number: 9442399
$4.16 MSRP: $7.42You Save: $3.26 (44%)Ships in 1-3 Business DaysProduct Specifications- Other Name: Bulb, Front Turn Signal Lamp; Turn Signal Bulbs; Tail Light Bulbs; Car Bulbs; Bulbs for Parking, Marker, High Mount, Exterior, License, Turn Signal, Chassis, Courtesy, Headlamp, Tail
- Position: Front
- Item Weight: 0.40 Pounds
- Item Dimensions: 4.2 x 4.3 x 4.3 inches
- Condition: New
- Fitment Type: Direct Replacement
- SKU: 9442399
- Warranty: This genuine part is guaranteed by GM's factory warranty.


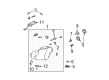
2005 Cadillac CTS Headlamp Bulb Part Number: 25735602
$23.31 MSRP: $43.78You Save: $20.47 (47%)Ships in 1-2 Business DaysProduct Specifications- Other Name: Bulb, Headlamp (Low Beam); Headlight Bulbs; Car Bulbs; Lower Beam Bulb; Bulb, Capsule/Headlamp/Fog Lamp
- Item Weight: 0.30 Pounds
- Item Dimensions: 4.2 x 2.2 x 2.2 inches
- Condition: New
- Fitment Type: Direct Replacement
- SKU: 25735602
- Warranty: This genuine part is guaranteed by GM's factory warranty.

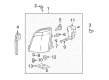
2005 Cadillac CTS Headlamp Bulb Part Number: 25735601
$14.00 MSRP: $26.31You Save: $12.31 (47%)Ships in 1 Business DayProduct Specifications- Other Name: Bulb, Headlamp (High Beam); Car Bulbs; High Beam Bulb; Bulb, Capsule/Headlamp/Fog Lamp
- Item Weight: 0.30 Pounds
- Item Dimensions: 4.3 x 2.2 x 2.2 inches
- Condition: New
- Fitment Type: Direct Replacement
- SKU: 25735601
- Warranty: This genuine part is guaranteed by GM's factory warranty.

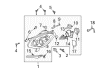
2005 Cadillac CTS Hid Bulb Part Number: 25735604
Product Specifications- Other Name: Bulb; Headlight Bulbs; Car Bulbs; Headlamp Bulb; Lower Beam Bulb
- Replaces: 12335923, 25735603
- Item Weight: 0.50 Pounds
- Item Dimensions: 4.2 x 2.2 x 2.2 inches
- Condition: New
- Fitment Type: Direct Replacement
- Require Quantity: 2
- SKU: 25735604
- Warranty: This genuine part is guaranteed by GM's factory warranty.
2005 Cadillac CTS Headlight Bulb
With a comprehensive array of OEM 2005 Cadillac CTS Headlight Bulb, from fuel pumps to door handles, our website is a one-stop-shop for your needs. All our genuine 2005 Cadillac CTS Headlight Bulb are backed by the manufacturer's warranty and are offered at competitive prices in the market. Rest assured, you can shop with complete confidence.
2005 Cadillac CTS Headlight Bulb Parts and Q&A
- Q: How to Replace the Headlight Bulb on 2005 Cadillac CTS?A: The process of changing the headlamp bulb starts with properly elevating the vehicle for work access. Access to the fascia extension retainers becomes possible after removing the push-pin retainers installed on the air deflector. Then unlock the hood. Use a pair of pliers to remove all push-pin retainers that join the grille and fascia to the top tie bar but keep the first retainer past the center flexible. Disassemble the front fascia extension by first removing bolt which holds the front fascia to the fender and secondly loosening bolt securing the front fascia to the fender. Guide the front fascia to position its studs at the enlarged hole section inside the fender key slot before pulling it downward to separate it from the fender. Unfasten the three headlamp bolts then unplug the headlamp washer hose (if present) before straight pulling the headlamp forward to release the fender socket from the ball stud. The operator should disconnect the front lamp electrical connector while pulling the grille assembly slightly forward to pull out the lamp assembly from its position. First remove the headlamp bulb cover together with the bulb from the assembly while following strict halogen bulb safety guidelines. You should first install the new bulb inside the assembly then reinstall the cover. Install the assembly by reconnecting its electrical connectors which are located behind. Push the headlamp assembly toward the fender until the front ball stud creates a connection with the socket then fasten it by tightening bolts to 6 n.m (53 lb in). Push the fascia to insert its studs into fender key slots followed by pulling it toward the rental to attach it while using bolts (1, 2) that need tightening to 9 n.m (80 lb in). Fasten the front fascia extension in place before putting push-pin retainers on the upper front fascia and grille to the upper tie bar. Then shut the hood and lower the car. Finish the installation by placing the air deflector properly then fasten it with push-pin retainers before setting the vehicle to ground level.
Related 2005 Cadillac CTS Parts
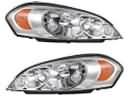 2005 Cadillac CTS Headlight
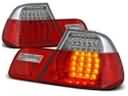 2005 Cadillac CTS Tail Light
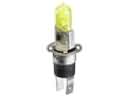 2005 Cadillac CTS Fog Light Bulb
 2005 Cadillac CTS Back Up Light
 2005 Cadillac CTS Fog Light
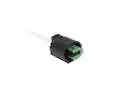 2005 Cadillac CTS Forward Light Harness Connector
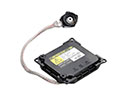 2005 Cadillac CTS Hid Bulb Ballast
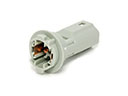 2005 Cadillac CTS Light Socket
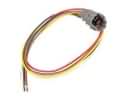 2005 Cadillac CTS Rear Light Harness Connector