ChevyParts
My Garage
My Account
Cart
OEM 2006 Buick Terraza CV Joint
CV Joint Axle- Select Vehicle by Model
- Select Vehicle by VIN
Select Vehicle by Model
orMake
Model
Year
Select Vehicle by VIN
For the most accurate results, select vehicle by your VIN (Vehicle Identification Number).
1 CV Joint found

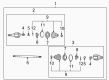
2006 Buick Terraza Axle Assembly Part Number: 88967242
Product Specifications- Other Name: Shaft Kit, Rear Axle Drive; CV Axle Assembly; Axle Shaft; CV Joint; CV Axle; Inner CV Joint; Outer CV Joint; Joint Kit, Rear Axle Universal Joint.
- Position: Rear
- Replaces: 10424907, 88891077
- Item Weight: 16.50 Pounds
- Item Dimensions: 35.0 x 6.5 x 6.0 inches
- Condition: New
- Fitment Type: Direct Replacement
- SKU: 88967242
- Warranty: This genuine part is guaranteed by GM's factory warranty.
2006 Buick Terraza CV Joint
With a comprehensive array of OEM 2006 Buick Terraza CV Joint, from fuel pumps to door handles, our website is a one-stop-shop for your needs. All our genuine 2006 Buick Terraza CV Joint are backed by the manufacturer's warranty and are offered at competitive prices in the market. Rest assured, you can shop with complete confidence.
2006 Buick Terraza CV Joint Parts and Q&A
- Q: How to replace the rear outer CV Joint and seal on 2006 Buick Terraza?A: Begin the project of wheel drive shaft outer joint and seal replacement at the rear by acquiring two necessary tools: Two types of pliers needed for replacement work are Drive Axle Seal Clamp Pliers (J 35566) and Drive Shaft Seal Clamp Pliers (J 42572). Drive Axle Seal Clamp Pliers (J 35566) and Drive Shaft Seal Clamp Pliers (J 42572). First cut out the small seal clamp from the wheel drive shaft bar by using side cutters and dispose of it. When using side cutters to remove the large seal clamp from the tripot joint please do not cut into the wheel drive shaft trilobal tripot bushing. The wheel drive shaft outboard seal becomes separated from the trilobal tripot bushing after which the seal travels away from the joint along the wheel drive shaft bar trajectory. Identify the precise position of the tripot spider on the wheel drive shaft bar before removing the housing and the tripot joint spider and wheel drive shaft bar. Keep the 60-degree offset alignment between inner and outer tripot spiders exactly as it was originally positioned. A brass drift and hammer must compress the barrel retaining ring on the wheel drive shaft bar through careful circular tapping of the tripot spider face until the tripot spider can be extracted, discarding the barrel retaining ring afterward. Remove the wheel drive shaft bar joint seal to assess damage and wear on the outboard shaft seal including the tripot joint spider assembly and its housing and trilobal bushing. Position the new small seal clamp onto the joint seal's small end and join both pieces onto the wheel drive shaft bar while placing its small end inside the joint seal groove. Use the J 42572 to install a small seal retaining clamp on the joint seal but ensure you torque it to 136 Nm (100 ft. lbs.). New barrel retaining rings must get installed on the wheel drive shaft bar with direct matching between the tripot spider reference mark and wheel drive shaft bar reference alignment at 60 degrees. Reinstall the tripot spider using a flat-bladed tool to compress the barrel retaining ring. Position the beveled trimpot spider edge facing the wheel drive shaft bar during assembly. The installation requires verification that the wheel drive shaft bar connects properly with the tripot spider while both components are correctly situated against the housing face for full trilobal tripot bushing contact. Spread grease from the service kit between the wheel drive shaft outboard seal and inside the housing then fill the rest into the housing cavity. Slide the trilobal tripot bushing inside the housing before mounting the spring onto the tripot housing. Hold the parts in position by applying grease from the housing. Use housing grease to attach the guide to the spring for retention. Position the housing by sliding it over the wheel drive shaft bar holding the tripot joint spider assembly and the larger new seal retaining clamp positioned on the outboard wheel drive shaft seal. Press the wheel drive shaft outboard seal into position through the larger clamp which rests on the trilobal tripot bushing. Make sure the seal's lip sits in the correct groove without becoming damaged or distorted. Assemble the joint to the correct vehicle dimension while aligning the wheel drive shaft outboard seal together with the tripot housing and large seal retaining clamp before locking the assembly into place. Secure the large seal retaining clamp with the J 35566 while making sure both latching tangs enter the large seal clamp band completely. To distribute grease throughout tripot spider bearings rotate the outer tripot housing four or five times.
Related 2006 Buick Terraza Parts
 2006 Buick Terraza Axle Shaft
 2006 Buick Terraza Ball Joint
 2006 Buick Terraza Coil Spring Insulator
 2006 Buick Terraza Control Arm
 2006 Buick Terraza Crossmember Bushing
 2006 Buick Terraza Lateral Arm
 2006 Buick Terraza Ride Height Sensor
 2006 Buick Terraza Shock And Strut Mount
 2006 Buick Terraza Spare Wheel
 2006 Buick Terraza Sway Bar Link
 2006 Buick Terraza Wheel Cover
 2006 Buick Terraza Wheel Hub