ChevyParts
My Garage
My Account
Cart
OEM 2007 Buick Terraza CV Joint
CV Joint Axle- Select Vehicle by Model
- Select Vehicle by VIN
Select Vehicle by Model
orMake
Model
Year
Select Vehicle by VIN
For the most accurate results, select vehicle by your VIN (Vehicle Identification Number).
1 CV Joint found

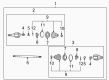
2007 Buick Terraza Axle Assembly Part Number: 88967242
Product Specifications- Other Name: Shaft Kit, Rear Axle Drive; CV Axle Assembly; Axle Shaft; CV Joint; CV Axle; Inner CV Joint; Outer CV Joint; Joint Kit, Rear Axle Universal Joint.
- Position: Rear
- Replaces: 10424907, 88891077
- Item Weight: 16.50 Pounds
- Item Dimensions: 35.0 x 6.5 x 6.0 inches
- Condition: New
- Fitment Type: Direct Replacement
- SKU: 88967242
- Warranty: This genuine part is guaranteed by GM's factory warranty.
2007 Buick Terraza CV Joint
With a comprehensive array of OEM 2007 Buick Terraza CV Joint, from fuel pumps to door handles, our website is a one-stop-shop for your needs. All our genuine 2007 Buick Terraza CV Joint are backed by the manufacturer's warranty and are offered at competitive prices in the market. Rest assured, you can shop with complete confidence.
2007 Buick Terraza CV Joint Parts and Q&A
- Q: What Tools Are Required to Service and Repair the CV Joint Boot for the Wheel Drive Shaft Inner Joint and Seal Replacement on 2007 Buick Terraza?A: In servicing and repairing the constant velocity joint boot particularly for the wheel drive shaft inner joint and seal change for the constant velocity joint boot is as below the following tools are necessary. Snap ring pliers (J 8059 ) , drive axle seal clamp pliers (J 35910 ), torque wrench ,breaker bar and side cutters. Start by detaching the swage ring from the halfshaft bar using a hand grinder while carefully preventing it from damaging the halfshaft bar. Use side cutters to remove the large seal retaining clamp from the tripot joint; dispose of it. Remove the inboard seal off the trilobal tripot bushing towards the big diameter, then move the seal across the halfshaft bar. Take out the housing from the tripot joint spider and the halfshaft bar. Use snap ring pliers (J 8059) to spread the spacer ring, extract the spacer ring, spider assembly, and tripot boot, but throw the boot and rings away. Scrub the halfshaft bar with a wire brush and wipe out all rust from the area where the boot mounts and check the needle rollers, needle bearings, and trunnion to see if any of them are broken and repair damaged pieces with the relevant kit. In order to install, mount the halfshaft into a vise with a towel into it. Take the new small eared clamp and position it to the small end of the joint seal and slide it both onto the halfshaft bar putting the small end of the joint seal to the joint seal groove. Crimp the eared clamp using drive axle seal clamp pliers (J 35910), torque, wrench, breaker-bar. Equip it and install the spacer ring into the groove of the halfshaft bar using snap ring pliers (J 8059) and slide the tripot joint spider assembly onto the halfshaft bar. Recuperate approximately half of the grease from the service kit into the halfshaft inboard seal and use the rest to repack the housing with the trilobal tripot bushing flush on the face of the housing. Mount the trilobal tripot bushing in the housing and align the larger new seal retaining clamp to the halfshaft inboard seal. Slide the housing over the tripot joint spider assembly and ensure the lip of the seal goes into the groove. While positioning the joint assembly at the precise vehicle dimension of 106mm (4.00 in), take a thin flat blunt tool and gently force it between the large seal opening and the trilobal tripot bushing to equilibrate the pressure before taking the tool out. Reposition the halfshaft inboard seal, tripot housing, and large seal retaining clamp and crimp the seal retaining clamp to 176 n.m (130 lb ft) using drive axle seal clamp pliers (J 35910), and add the breaker bar and torque wrench if needed. Verify the gap dimension at the clamp ear, continue to tighten until the segment dimension of 2.6 mm (0.102 in) is achieved and fully stroke the joint numerous times by distributing about the grease.
Related 2007 Buick Terraza Parts
 2007 Buick Terraza Axle Shaft
 2007 Buick Terraza Ball Joint
 2007 Buick Terraza Coil Spring Insulator
 2007 Buick Terraza Control Arm
 2007 Buick Terraza Crossmember Bushing
 2007 Buick Terraza Lateral Arm
 2007 Buick Terraza Ride Height Sensor
 2007 Buick Terraza Shock And Strut Mount
 2007 Buick Terraza Spare Wheel
 2007 Buick Terraza Sway Bar Link
 2007 Buick Terraza Wheel Cover
 2007 Buick Terraza Wheel Hub