ChevyParts
My Garage
My Account
Cart
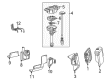
OEM 2006 Chevrolet Silverado 1500 Distributor
Ignition Distributor- Select Vehicle by Model
- Select Vehicle by VIN
Select Vehicle by Model
orMake
Model
Year
Select Vehicle by VIN
For the most accurate results, select vehicle by your VIN (Vehicle Identification Number).
1 Distributor found


 Product Specifications
- Other Name: Distributor; Distributor, Ignition
- Replaces: 01104057, 01104078, 01104050, 1104050, 1104078, 1104057, 93441559
- Item Weight: 2.60 Pounds
- Item Dimensions: 15.8 x 8.3 x 5.2 inches
- Condition: New
- Fitment Type: Direct Replacement
- SKU: 12598210
- Warranty: This genuine part is guaranteed by GM's factory warranty.
2006 Chevrolet Silverado 1500 Distributor
With a comprehensive array of OEM 2006 Chevrolet Silverado 1500 Distributor, from fuel pumps to door handles, our website is a one-stop-shop for your needs. All our genuine 2006 Chevrolet Silverado 1500 Distributor are backed by the manufacturer's warranty and are offered at competitive prices in the market. Rest assured, you can shop with complete confidence.
2006 Chevrolet Silverado 1500 Distributor Parts Questions & Experts Answers
- Q: How to replace the distributor on 2006 Chevrolet Silverado 1500?A: The Distributor replacement process begins with air cleaner outlet resonator removal and removal of electrical connectors for the camshaft position (CMP) sensor and fuel pump/oil pressure sensor. Start by taking off the Ignition Coil wire from its coil and the Distributor Cap. Proceed to detach Spark Plug Wires from the Distributor Cap through a 1/2 turn boot twist followed by wire boot pull. Remove the Distributor Cap after you discard its screws. Apply a grease pencil to note both the rotor position versus Distributor housing alignment and the Distributor housing intakes manifold relation. Extract the Distributor by removing the hold down bolt while tracking that the rotor rotates counterclockwise by 42 degrees. The base of the Distributor needs a second mark for easier rotor alignment when reinstalling the vehicle. Two marks should be placed on new Distributor housing similar to where the original markings were. Place the Distributor into position while making sure the hole in the Distributor hold-down clamp matches with the Intake Manifold hole. Then line up the Distributor with the second mark before installation. Watch the Distributor rotor rotate clockwise 42 degrees when installed before it reaches the mark on the base. During final position, the rotor should align precisely with the Distributor mark. Misalignment requires you to uninstall the Distributor before reinstallation. Follow these installation steps: tighten the Distributor hold down bolt to 25 n.m (18 lb ft) but install the Distributor Cap with new screws set to 2.4 n.m (21 lb in) and then connect the cmp sensor and fuel pump/oil pressure sensor. Mount the Ignition Coil wire by directing its nipple between 35 and 60 degrees behind engine centerline perpendicular orientation. A malfunction indicator lamp (MIL) along with dtc p1345 indicates improper Distributor installation. To execute installation procedure 2 you must turn cylinder number 1 until it reaches top dead center compression stroke alignment with engine front cover tabs and crankshaft balancer marks. Set the Distributor's white paint mark on its bottom stem to match the pre-drilled hole found on the bottom of the gear. Mark down Distributor parts during assembly to maintain proper reinstallation. Insert a long screwdriver to the oil pump drive shaft and use it to guide the Distributor into the engine space until the spark plug towers match the engine centerline perpendicular to it. When correctly installed the rotor segment must position itself with reference to the Distributor base pointer. Repetitions of this procedure should be performed to correct alignment problems. Begin by securing the Distributor hold down bolt at 25 n.m (18 lb ft) torque while installing the new Distributor Cap screws to 2.4 n.m (21 lb in) torque. Reconnect the cmp sensor and fuel pump/oil pressure sensor before finalizing your installation with correct Ignition Coil wire placement. Follow installation procedure 2 once again if the mil remains activated. Replace the air cleaner outlet resonator unless the mil remains illuminated.
Related 2006 Chevrolet Silverado 1500 Parts
 2006 Chevrolet Silverado 1500 Ignition Coil
 2006 Chevrolet Silverado 1500 Camshaft Position Sensor
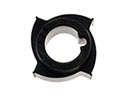 2006 Chevrolet Silverado 1500 Distributor Reluctor
 2006 Chevrolet Silverado 1500 Engine Control Module
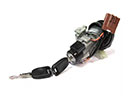 2006 Chevrolet Silverado 1500 Igniter
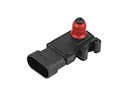 2006 Chevrolet Silverado 1500 MAP Sensor
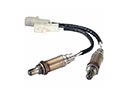 2006 Chevrolet Silverado 1500 Oxygen Sensor
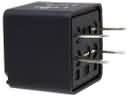 2006 Chevrolet Silverado 1500 Relay
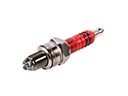 2006 Chevrolet Silverado 1500 Spark Plug
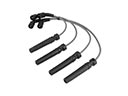 2006 Chevrolet Silverado 1500 Spark Plug Wires
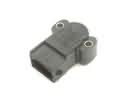 2006 Chevrolet Silverado 1500 Throttle Position Sensor
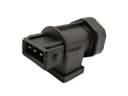 2006 Chevrolet Silverado 1500 Vehicle Speed Sensor