ChevyParts
My Garage
My Account
Cart
OEM 2007 Buick Terraza Oil Pan
Oil Drain Pan- Select Vehicle by Model
- Select Vehicle by VIN
Select Vehicle by Model
orMake
Model
Year
Select Vehicle by VIN
For the most accurate results, select vehicle by your VIN (Vehicle Identification Number).
1 Oil Pan found

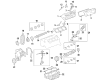
2007 Buick Terraza Oil Pan Part Number: 12603201
$190.70 MSRP: $299.93You Save: $109.23 (37%)Ships in 1-3 Business DaysProduct Specifications- Other Name: Pan, Engine Oil; Engine Oil Pan
- Item Weight: 14.10 Pounds
- Item Dimensions: 19.0 x 12.5 x 11.2 inches
- Condition: New
- Fitment Type: Direct Replacement
- SKU: 12603201
- Warranty: This genuine part is guaranteed by GM's factory warranty.
2007 Buick Terraza Oil Pan
With a comprehensive array of OEM 2007 Buick Terraza Oil Pan, from fuel pumps to door handles, our website is a one-stop-shop for your needs. All our genuine 2007 Buick Terraza Oil Pan are backed by the manufacturer's warranty and are offered at competitive prices in the market. Rest assured, you can shop with complete confidence.
2007 Buick Terraza Oil Pan Parts and Q&A
- Q: How to replace the oil pan on 2007 Buick Terraza?A: Engine support fixture (J42305-B) must be installed before removing the right front tire and wheel as well as the right front splash shield. Follow Drain Plug removal to remove the crankcase oil before tightening the plug to its proper position. Remove engine harness clips from the right lower Control Arm before discarding the lower Ball Joint castle nut cotter pin then remove the lower Ball Joint castle nut. Install the Ball Joint separator tool (J 41820) to split the ball stud from its connection with the Steering Knuckle. Start by unscrewing the a/c compressor front bolt and attached nut with a socket set and wrench. Then remove the rear bolt so you can set the compressor aside. Remove engine block/Oil Pan bolts along with transaxle brace to engine block/Oil Pan bolts and transaxle bolts and transaxle brace. Separate the Starter by disconnecting the oil level sensor's engine harness electrical connector and removing the engine harness clip from the Oil Pan. Begin by removing the Engine Mount before you install adjustable jack stands beneath the frame to loosen and remove the left side frame bolts and remove the right side frame bolts. Move the right side of the frame downwards to access the Oil Pan while you begin by removing the Oil Pan side bolts and Oil Pan bolts . Once this is done you can remove both the Oil Pan and its gasket. All surfaces of the Oil Pan flanges alongside the Oil Pan rail and front cover and rear main bearing cap must receive cleaning along with the threaded holes. The crankshaft rear main bearing cap installation requires putting sealer onto both of its sides then inserting it into place with a putty knife tool. Put the Oil Pan Gasket and Oil Pan into place followed by installing the Oil Pan bolts to 25 n.m (18 lb ft) and the Oil Pan side bolts to 50 n.m (37 lb ft). Lift the frame's right side into position then install and securely tighten all frame bolts starting with the front ones set at 130 n.m (96 lb ft) followed by rear bolts at 240 n.m (177 lb ft). Place the adjustable jack stands aside while you install the engine mounting bracket then attach the engine harness clip into the Oil Pan position. Connect the engine harness electrical connector to the oil level sensor before installing the Starter while positioning the transaxle brace to mount onto both the transaxle and Oil Pan. The transaxle brace should be mounted onto transaxle bolts and Oil Pan bolts at 43 n.m (32 lb ft). Place the transaxle brace against both the transaxle and engine block/Oil Pan before fastening transaxle bolts and engine block/Oil Pan bolts to a torque specification of 43 n.m (32 lb ft). Screw the a/c compressor front bolt followed by the nut until torque reaches 50 n.m (37 lb ft). Install the a/c compressor rear bolt and torque it to 50 n.m (37 lb ft). After fitting the lower Ball Joint to the Steering Knuckle, torque the lower Ball Joint castle nut to 55 n.m (40 lb ft) without fleetening the nut to adjust slot alignment. Align one of the slots with the Ball Joint stud pin hole by slowly tightening the castle nut whenever needed before installing a new cotter pin between the Ball Joint stud and the castle nut. Bend the cotter pin ends following the displayed illustration. Finish the installation by adding engine harness clips to the right lower Control Arm before moving onto the right front splash shield and right front tire and wheel then remove the engine support fixture before adding new oil into the crankcase.
Related 2007 Buick Terraza Parts
 2007 Buick Terraza Camshaft
 2007 Buick Terraza Camshaft Bearing
 2007 Buick Terraza Dipstick Tube
 2007 Buick Terraza Engine Mount
 2007 Buick Terraza Exhaust Valve
 2007 Buick Terraza Head Gasket
 2007 Buick Terraza Intake Valve
 2007 Buick Terraza Oil Filler Cap
 2007 Buick Terraza Oil Pan Gasket
 2007 Buick Terraza Piston Ring
 2007 Buick Terraza Timing Chain
 2007 Buick Terraza Valve Cover Gasket