ChevyParts
My Garage
My Account
Cart
OEM Buick Terraza Oil Pan
Oil Drain Pan- Select Vehicle by Model
- Select Vehicle by VIN
Select Vehicle by Model
orMake
Model
Year
Select Vehicle by VIN
For the most accurate results, select vehicle by your VIN (Vehicle Identification Number).
2 Oil Pans found

Buick Terraza Oil Pan Part Number: 12603201
$190.70 MSRP: $299.93You Save: $109.23 (37%)Ships in 1-3 Business Days
Buick Terraza Oil Pan Part Number: 12593455
$140.49 MSRP: $220.95You Save: $80.46 (37%)Ships in 1-3 Business Days
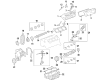
Buick Terraza Oil Pan
Want to cut long-term maintenance and repair costs? Choose OEM Oil Pan. Those parts deliver top durability you can trust. On our site, you'll find a huge catalog of genuine Buick Terraza parts. Prices are unbeatable, so you can keep more in your pocket. Every OEM Buick Terraza Oil Pan includes a manufacturer's warranty. You can also get an easy return policy that keeps buying risk free. Fast delivery, get your car on the road quickly. It's simple to search, compare, and order. Stop guessing about quality or fit. Order today and save with parts that last.
The Buick Terraza Oil Pan is one of the vital parts that define the credibility and efficiency of Buick's progressive minivan. Used for storing the engine oil that is effective for lubrication of the Terraza models' engines, the Oil Pan guarantees the proper operation of the car across models manufactured between 2005 and 2007. The Oil Pan includes a wet sump system so that the oil pump can easily draw the oil and ensures that no oil starves the engine thus enhancing the structure of the engine. Also, it is worth to mention that early Terraza models equipped stamped steel Oil Pans while later models are fitted with cast aluminum Oil Pans providing better performance and durability. This evolving process of the construction of the Oil Pan is seen as the vision of Buick to come up to these standards of quality and efficiency to make Terraza stand out in the market. Thus, the role of the Oil Pan is not only limited to a container that holds oil but also ensures the car's safety from oil leakage, which could result in major mechanical breakdown of the car's engine. In addition, this Buick Terraza Oil Pan can accommodate different configurations of the engines like the 3.5 L or 3.9 L of V6 and this make versatility. As a component that blends ingenious engineering with great design the Buick Terraza Oil Pan not only improves the cars performance, but it also strengthens Buick's commitment to providing consumers with safe reliable automobiles- making it a part and parcel of the Terraza.
Buick Terraza Oil Pan Parts Questions & Experts Answers
- Q: How to replace the oil pan on Buick Terraza?A:Replacement of an Oil Pan begins with disconnecting the negative Battery Cable before installing the engine support fixture. After vehicle support lift the vehicle and empty the crankcase fluid. Insert the following sequence of steps to begin pan replacement: remove the right front tire and wheel after you perform splash shield removal on that same side. Begin by disconnecting the wheel speed sensor harness at the right suspension support. Then disconnect the right front Ball Joint, bolt, and nut to split the Ball Joint from the Steering Knuckle. Start by removing the lower closeout panel along with A/C Compressor bolts before setting the compressor to the side. To proceed begin by removing braces that support the engine toward the transmission and Starter then disconnect the oil level sensor. First disconnect the retainers that secure the Brake Line to the frame and remove right Engine Mount nuts and bolts. Afterward loosen left cradle bolts and take out frame bolts from the right front and rear locations. First remove the Oil Pan side bolts and Oil Pan bolts then remove the Oil Pan alongside its gasket. Clean all flange surfaces on the Oil Pan as well as the Oil Pan rail and front cover and rear main bearing cap and threaded holes. The installation requires placing a new gasket with gm p/n 1052080 (Canadian P/N 10953480) or equivalent sealant on the Oil Pan gasket tabs when installing the rear main bearing cap. Fasten the Oil Pan bolts to 25 nm (18 ft. Lbs.) while the Oil Pan side bolts require 50 nm (37 ft. Lbs.). Start by replacing the Starter then install the flywheel inspection cover and A/C Compressor onto the engine. Begin installing frame bolts on the right side while adding Engine Mount bolts and nuts and Steering Knuckle Ball Joint on to the right side. Install the right front antilock brake system (ABS) wheel speed sensor harness then install retainers for the Brake Line and engine-to-transmission braces. Secure the right front splash shield together with the tire and wheel assembly and then the lower closeout panel. Lower the vehicle before removing the engine support fixture then fill the crankcase with engine oil before reconnecting the negative cable.

Related Buick Terraza Parts
 Buick Terraza Camshaft
 Buick Terraza Camshaft Bearing
 Buick Terraza Dipstick Tube
 Buick Terraza Engine Mount
 Buick Terraza Exhaust Valve
 Buick Terraza Head Gasket
 Buick Terraza Intake Valve
 Buick Terraza Oil Filler Cap
 Buick Terraza Oil Pan Gasket
 Buick Terraza Piston Ring
 Buick Terraza Timing Chain
 Buick Terraza Variable Timing Sprocket