ChevyParts
My Garage
My Account
Cart
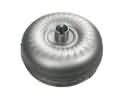
OEM 2009 Chevrolet Malibu Automatic Transmission Filter
AT Filter- Select Vehicle by Model
- Select Vehicle by VIN
Select Vehicle by Model
orMake
Model
Year
Select Vehicle by VIN
For the most accurate results, select vehicle by your VIN (Vehicle Identification Number).
1 Automatic Transmission Filter found


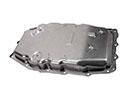
2009 Chevrolet Malibu Filter, Green Line Part Number: 24221762
$40.89 MSRP: $73.03You Save: $32.14 (45%)Ships in 1-3 Business DaysProduct Specifications- Other Name: Filter Kit, Automatic Transmission Fluid; Hydraulic Filter; Transmission Filter Kit.; Filter Kit, Transmission Oil Suction Tube; Filter, Transmission Oil Suction Tube; Filter Kit
- Replaces: 08685185, 24203770, 8685185
- Item Weight: 1.10 Pounds
- Item Dimensions: 14.4 x 9.3 x 1.8 inches
- Condition: New
- Fitment Type: Direct Replacement
- SKU: 24221762
- Warranty: This genuine part is guaranteed by GM's factory warranty.
2009 Chevrolet Malibu Automatic Transmission Filter
With a comprehensive array of OEM 2009 Chevrolet Malibu Automatic Transmission Filter, from fuel pumps to door handles, our website is a one-stop-shop for your needs. All our genuine 2009 Chevrolet Malibu Automatic Transmission Filter are backed by the manufacturer's warranty and are offered at competitive prices in the market. Rest assured, you can shop with complete confidence.
2009 Chevrolet Malibu Automatic Transmission Filter Parts Questions & Experts Answers
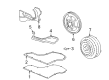
- Q: How to replace the Automatic Transmission Filter and seal on 2009 Chevrolet Malibu?A: Start by hoisting the vehicle for support then positioning it correctly before raising it slowly while having a drain pan ready under the transaxle Oil Pan for fluid collection. Received bolts on the front and side of the Oil Pan yet the bolts at the rear needed only four turns of looseness. The proper technique to free the Oil Pan requires light prying motions to prevent damage to the transaxle case while leaving the sealing surfaces undamaged followed by rubber mallet tapping to start the fluid drainage process. Check the fluid color of the air before you disassemble the rest of the Oil Pan bolts and remove the Oil Pan together with its gasket. Proceed to eliminate the oil level control valve and the Oil Filter along with the filter neck seal o-ring yet avoid damaging the transaxle case at filter removal. You should indent the top of the filter neck seal with a chisel to achieve relaxed press fit before removing it and disposing the material while cleaning residue from the previous gasket. Use solvent to clean the transaxle case as well as Oil Pan Gasket surfaces before air drying both components. Installation requires petroleum jelly for component lubrication followed by inserting a new filter neck seal through large socket or mallet strikes then coating the o-ring seal of the new filter with petroleum jelly before placing the filter into the case by pushing straight down on the center of the oil level control valve to stop damage. Tighten the Oil Pan Gasket and Oil Pan together followed by installing the oil level control valve while starting bolts by hand before tightening them to 12 nm (9 lb ft). Fill the transaxle with dexron(R) vi until it reaches its specified capacity at 6.5 l (6.9 qt) for bottom pan removal and 9 l (9.5 qt) for complete overhaul while the dry capacity requires 12.2 l (12.9 qt). Verify the engine operation while the transaxle heats then check for fluid leaks and ensure adequate fluid level.