ChevyParts
My Garage
My Account
Cart
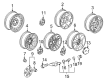
OEM 2010 Cadillac CTS TPMS Sensor
Tire Pressure Monitoring System Sensor- Select Vehicle by Model
- Select Vehicle by VIN
Select Vehicle by Model
orMake
Model
Year
Select Vehicle by VIN
For the most accurate results, select vehicle by your VIN (Vehicle Identification Number).
7 TPMS Sensors found


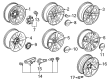
2010 Cadillac CTS Tire Pressure Sensor, Black Part Number: 13598909
$11.19 MSRP: $21.02You Save: $9.83 (47%)Ships in 1-2 Business DaysProduct Specifications- Other Name: Valve Kit, Tire Valve And Cover Lock; TPMS Sensor Service Kit; TPMS Sensor; Valve Stem; Repair Kit; Tire Sensor Valve; TPMS Sensor Valve Assembly; Tire Valve Kit; Vehicle Security & Safety.
- Replaces: 15263240, 19368646
- Item Weight: 0.40 Pounds
- Item Dimensions: 6.2 x 4.2 x 4.2 inches
- Condition: New
- Fitment Type: Direct Replacement
- SKU: 13598909
- Warranty: This genuine part is guaranteed by GM's factory warranty.


2010 Cadillac CTS TPMS Sensor, Gray; Silver Part Number: 20925924
$79.54 MSRP: $154.38You Save: $74.84 (49%)Ships in 1-3 Business DaysProduct Specifications- Other Name: Sensor, Tire Pressure Indicator; Tire Pressure Monitoring System (TPMS) Sensor; TPMS Capteur; Tire Pressure Sensor; Tire Sensor; Sensor; Sensor, Vehicle Security & Safety; Sensor, Tire Pressure
- Replaces: 10394110, 15268606, 15921013
- Item Weight: 2.30 Pounds
- Item Dimensions: 9.2 x 6.2 x 2.1 inches
- Condition: New
- Fitment Type: Direct Replacement
- SKU: 20925924
- Warranty: This genuine part is guaranteed by GM's factory warranty.


2010 Cadillac CTS TPMS Sensor Part Number: 20925925
$47.96 MSRP: $131.82You Save: $83.86 (64%)Ships in 1-2 Business DaysProduct Specifications- Other Name: Sensor, Tire Pressure; Tire Pressure Sensor; Sensor
- Replaces: 22959746, 92186507
- Item Weight: 0.40 Pounds
- Item Dimensions: 3.6 x 2.9 x 1.0 inches
- Condition: New
- Fitment Type: Direct Replacement
- SKU: 20925925
- Warranty: This genuine part is guaranteed by GM's factory warranty.


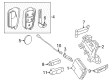
2010 Cadillac CTS Valve Stem Part Number: 19117460
$4.02 MSRP: $6.62You Save: $2.60 (40%)Ships in 1-2 Business DaysProduct Specifications- Other Name: Valve Kit, Tire; TPMS Sensor Service Kit; TPMS Sensor; TPMS Sensor Valve Assembly; Valve Kit, Tire Valve And Cover Lock; Valve Kit, Vehicle Security & Safety
- Item Weight: 0.60 Pounds
- Item Dimensions: 3.7 x 2.9 x 1.0 inches
- Condition: New
- Fitment Type: Direct Replacement
- SKU: 19117460
- Warranty: This genuine part is guaranteed by GM's factory warranty.

2010 Cadillac CTS Control Module Part Number: 20803736
$70.29 MSRP: $193.25You Save: $122.96 (64%)Ships in 1-3 Business DaysProduct Specifications- Other Name: Receiver, Door Lock Remote Control Inside; Receiver; Receiver, Door Electric And Vacuum Locks; Module, Tire Pressure; Harness, Dome Lamp
- Replaces: 15807815, 15857830, 25896540, 15946937, 25857326, 25856131, 25808836
- Item Weight: 0.40 Pounds
- Item Dimensions: 3.3 x 2.9 x 1.6 inches
- Condition: New
- Fitment Type: Direct Replacement
- SKU: 20803736
- Warranty: This genuine part is guaranteed by GM's factory warranty.

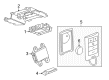
2010 Cadillac CTS Receiver Part Number: 20803737
$91.17 MSRP: $162.80You Save: $71.63 (44%)Ships in 1-3 Business DaysProduct Specifications- Other Name: Receiver Assembly-Remote Control Door Lock; Receiver, Door Lock Remote Control Inside; Receiver, Door Electric And Vacuum Locks; Module, Tire Pressure
- Replaces: 25856316, 25938218
- Item Weight: 0.40 Pounds
- Item Dimensions: 3.4 x 3.2 x 3.1 inches
- Condition: New
- Fitment Type: Direct Replacement
- SKU: 20803737
- Warranty: This genuine part is guaranteed by GM's factory warranty.

2010 Cadillac CTS TPMS Sensor, Black Part Number: 13540600
$57.19 MSRP: $111.00You Save: $53.81 (49%)Ships in 1-2 Business DaysProduct Specifications- Other Name: Sensor Assembly-Tire Pressure Indicator; Tire Pressure Sensor; Tire Sensor; Pressure Sensor; Sensor; Sensor, Vehicle Security & Safety; Sensor, Tire Pressure
- Replaces: 13598771, 15254101, 25799331, 13586335, 15825475, 15922396, 20923680, 23445327, 25920615, 22853741
- Condition: New
- SKU: 13540600
- Warranty: This genuine part is guaranteed by GM's factory warranty.
2010 Cadillac CTS TPMS Sensor
With a comprehensive array of OEM 2010 Cadillac CTS TPMS Sensor, from fuel pumps to door handles, our website is a one-stop-shop for your needs. All our genuine 2010 Cadillac CTS TPMS Sensor are backed by the manufacturer's warranty and are offered at competitive prices in the market. Rest assured, you can shop with complete confidence.
2010 Cadillac CTS TPMS Sensor Parts Questions & Experts Answers
- Q: How to replace the TPMS Sensor on 2010 Cadillac CTS?A: In order to replace the Tire Pressure Indicator Sensor, raise the vehicle on a convenient support. Pop off the tire/wheel assembly from the vehicle, making sure to put the caps and the valves of the sensor on a clean surface to prevent corrosion, which is aluminum throughout the cap and a nickel-plated valve. When breaking the tire bead from the wheel, set the bead breaking fixture at 90° angle to the valve stem then insert the tire iron or pry bar just minimal clockwise to the sensor body while lifting the tire bead up over the mounting/dismounting head. The use of the tire machine to rotate the tire/wheel assembly clockwise when moving the tire bead to the outside of the wheel rim and do the same again for the inner bead. Once you have removed the tire from the wheel, make sure the tires have any tire sealant wiped off the inside. Unscrew the tire pressure sensor nut and then the sensor itself. Clean off any dirt from the grommet sealing area and insert the new sensor into the wheel hole with the air passage outward. Make sure you have the correct part number, ensure all that required coatings are as it is specified to prevent any effects on torque and operation. Mount the sensor nut with the sensor body parallel to the car wheel face and tighten the nut to 7 Nm (62 lb in). While reinstalling the tire, place the mounting/dismounting head 180 degrees away from the valve stem and the bead transition region 45 degrees counterclockwise away from the valve stem. Rotate the tire/wheel assembly clockwise when moving the tire bet to the inside of the wheel rim, and repeat it for the outer. Mount the tire onto the wheel while paying attention to the fact that a service replacement tire pressure sensor is supplied in OFF mode, and it should be spun at a speed of more than 32 km/h (20 mph) for at least 10 seconds for it to become active. Lastly, fit the tire/wheel assembly on the car, the lower the car, and learn the tire pressure sensors.
Related 2010 Cadillac CTS Parts
 2010 Cadillac CTS Body Control Module
 2010 Cadillac CTS Camshaft Position Sensor
 2010 Cadillac CTS Mass Air Flow Sensor
 2010 Cadillac CTS Window Regulator
 2010 Cadillac CTS Antenna
 2010 Cadillac CTS Air Bag Clockspring
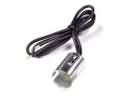 2010 Cadillac CTS Dome Light Connector
 2010 Cadillac CTS Fuel Pump Gasket
 2010 Cadillac CTS Fuel Pump Relay
 2010 Cadillac CTS Headlight Switch
 2010 Cadillac CTS Seat Belt
 2010 Cadillac CTS Spark Plug Wires