ChevyParts
My Garage
My Account
Cart
OEM Cadillac CTS TPMS Sensor
Tire Pressure Monitoring System Sensor- Select Vehicle by Model
- Select Vehicle by VIN
Select Vehicle by Model
orMake
Model
Year
Select Vehicle by VIN
For the most accurate results, select vehicle by your VIN (Vehicle Identification Number).
16 TPMS Sensors found


Cadillac CTS Valve Stem Part Number: 19117460
$4.02 MSRP: $6.62You Save: $2.60 (40%)Ships in 1-2 Business Days


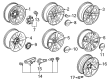
Cadillac CTS Tire Pressure Sensor, Black Part Number: 13598909
$11.19 MSRP: $21.02You Save: $9.83 (47%)Ships in 1-2 Business Days


Cadillac CTS TPMS Sensor Part Number: 25774006
$85.65 MSRP: $156.38You Save: $70.73 (46%)Ships in 1-2 Business Days


Cadillac CTS TPMS Sensor Part Number: 25740352
$75.18 MSRP: $136.08You Save: $60.90 (45%)Ships in 1-2 Business Days


Cadillac CTS TPMS Sensor Part Number: 20925925
$47.96 MSRP: $131.82You Save: $83.86 (64%)Ships in 1-2 Business Days


Cadillac CTS TPMS Sensor, Gray; Silver Part Number: 20925924
$79.54 MSRP: $154.38You Save: $74.84 (49%)Ships in 1-3 Business Days


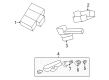
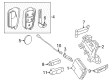
Cadillac CTS Wheel Nut Part Number: 15234846
$7.26 MSRP: $13.64You Save: $6.38 (47%)Ships in 1-3 Business Days

Cadillac CTS TPMS Sensor Valve Part Number: 13581557
$4.86 MSRP: $9.12You Save: $4.26 (47%)Ships in 1-2 Business Days
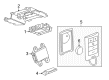
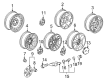
Cadillac CTS Receiver Part Number: 20803737
$91.17 MSRP: $162.80You Save: $71.63 (44%)Ships in 1-3 Business Days
Cadillac CTS Control Module Part Number: 20803736
$70.29 MSRP: $193.25You Save: $122.96 (64%)Ships in 1-3 Business Days
Cadillac CTS TPMS Sensor Part Number: 13540601
$56.06 MSRP: $108.80You Save: $52.74 (49%)
Cadillac CTS TPMS Sensor, Black Part Number: 13540600
$57.19 MSRP: $111.00You Save: $53.81 (49%)Ships in 1-2 Business Days
Cadillac CTS TPMS Sensor Part Number: 13540599
$105.26 MSRP: $206.08You Save: $100.82 (49%)Ships in 1-3 Business Days
Cadillac CTS TPMS Sensor Part Number: 13540598
$101.05 MSRP: $197.84You Save: $96.79 (49%)Ships in 1-3 Business Days


Cadillac CTS TPMS Sensor Part Number: 20964159
$67.74 MSRP: $120.96You Save: $53.22 (44%)
Cadillac CTS Control Module Part Number: 15866242
Cadillac CTS TPMS Sensor
Want to cut long-term maintenance and repair costs? Choose OEM TPMS Sensor. Those parts deliver top durability you can trust. On our site, you'll find a huge catalog of genuine Cadillac CTS parts. Prices are unbeatable, so you can keep more in your pocket. Every OEM Cadillac CTS TPMS Sensor includes a manufacturer's warranty. You can also get an easy return policy that keeps buying risk free. Fast delivery, get your car on the road quickly. It's simple to search, compare, and order. Stop guessing about quality or fit. Order today and save with parts that last.
Thus, TPMS Sensor is an essential system for Cadillac CTS vehicles, which is an example of reliable and high-performance automobiles. This TPMS Sensor is an advanced one and is responsible for ensuring tire pressure is as required by monitoring times when it tends to go low or high to the extent of causing deflation or over inflation. Designed for Cadillac CTS cars made between 2003-2019, the TPMS Sensor has a clamp-in, screw-in, or snap-in option for more customer satisfaction. Cadillac CTS has installed two types of TPMS systems; the Direct TPMS (dTPMS) and the Indirect TPMS (iTPMS) with the dTPMS being more beneficial as its measures the tire pressure in real-time. This TPMS Sensor is useful in helping one to drive safely, therefore, consistent check-ups as well as replacements of this gadget is advisable. Cadillac CTS an executive car with openly acclaimed for its handling and build quality receives dramatic boosts from the integration of the TPMS Sensor in improving the general performance of the car. However, TPMS Sensor shocks the automotive market as a result of its efficiency in determination and reliability and should be an additional for Cadillac CTS vehicle proprietor. However, TPMS Sensor prioritizing tire health enhances fuel mileage and it makes the car more durable, endorsing Cadillac company's safety and innovation policies.
Cadillac CTS TPMS Sensor Parts Questions & Experts Answers
- Q: How to replace the TPMS Sensor on Cadillac CTS?A:Vehicle elevation on a proper support begins the process for Tire Pressure Indicator Sensor replacement. The tire/wheel assembly needs removal. The sensor's cap and valve must go on a clean area following removal due to their aluminum and nickel-plated construction which protects against corrosion. To separate the tire bead from the wheel use the bead breaking fixture at a 90-degree angle to the valve stem and insert a tire iron or pry bar just ahead of the sensor body when pulling over the bead onto the mounting/dismounting head. Apply the tire machine to turn the tire/wheel assembly clockwise during bead transfer to the wheel rim's exterior before performing the same procedure for the inner bead. Pull the tire away from the wheel while you clean all inside surfaces free of leftover tire sealant. Separate your efforts by removing the tire pressure sensor nut followed by removing the sensor itself. During installation wipe away dirt from the grommet sealing spot before putting the sensor wheel-hole first and double-check the part numbers match. Position the sensor body parallel to wheel surface inside before tightening the sensor nut to 7 Nm (62 lb in). When installing the tire position the mounting/dismounting head facing 180 degrees away from the valve stem while keeping the bead transition area at a 45 degree counterclockwise angle relative to the valve stem. Rotate the tire/wheel assembly clockwise as you move each tire bead inside the wheel rim and repeat for the outer bead. When putting the tire on the wheel use caution because the service replacement tire pressure sensor arrives in the OFF state which requires at least 10 seconds at more than 32 km/h (20 mph) wheel speed to turn it ON. Place the tire/wheel assembly onto the vehicle before lowering it then learn the tire pressure sensors.

Related Cadillac CTS Parts
 Cadillac CTS Body Control Module
 Cadillac CTS Camshaft Position Sensor
 Cadillac CTS Window Regulator
 Cadillac CTS Antenna
 Cadillac CTS Air Bag Clockspring
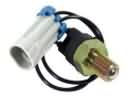 Cadillac CTS Back Up Light Switch
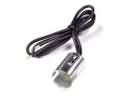 Cadillac CTS Dome Light Connector
 Cadillac CTS Fuel Pump Gasket
 Cadillac CTS Fuel Pump Relay
 Cadillac CTS Headlight Switch
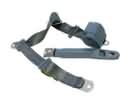 Cadillac CTS Seat Belt
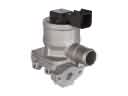 Cadillac CTS Secondary Air Injection Check Valve