ChevyParts
My Garage
My Account
Cart
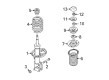
OEM 2010 Chevrolet Aveo Control Arm Bushing
Suspension Arm Bushing- Select Vehicle by Model
- Select Vehicle by VIN
Select Vehicle by Model
orMake
Model
Year
Select Vehicle by VIN
For the most accurate results, select vehicle by your VIN (Vehicle Identification Number).
2 Control Arm Bushings found


2010 Chevrolet Aveo Strut Nut Part Number: 94515070
$1.32 MSRP: $2.19You Save: $0.87 (40%)Ships in 1-2 Business DaysProduct Specifications- Other Name: Nut, Front Suspension Strut; Lower Ball Joint Nut, Steering Knuckle, Front & Rear, Transmission, Shock, Stabilizer, Engine Mounting
- Position: Front
- Item Weight: 0.70 Pounds
- Item Dimensions: 3.2 x 2.3 x 1.1 inches
- Condition: New
- Fitment Type: Direct Replacement
- SKU: 94515070
- Warranty: This genuine part is guaranteed by GM's factory warranty.

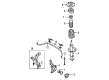
2010 Chevrolet Aveo Stabilizer Bar Bushing Part Number: 42589352
$5.16 MSRP: $8.19You Save: $3.03 (37%)Ships in 1-2 Business DaysProduct Specifications- Other Name: Insulator, Stabilizer Shaft; Suspension Stabilizer Bar Bushing Kit; Stabilizer Bushing Kit; Sway Bar Bushing; Bushings; Bushing, Upper Control Arm Shaft; Bushing, Stabilizer Shaft
- Position: Front
- Replaces: 96870461, 96535092, 96653351, 96435292
- Item Weight: 0.40 Pounds
- Item Dimensions: 5.6 x 4.0 x 1.7 inches
- Condition: New
- Fitment Type: Direct Replacement
- SKU: 42589352
- Warranty: This genuine part is guaranteed by GM's factory warranty.
2010 Chevrolet Aveo Control Arm Bushing
With a comprehensive array of OEM 2010 Chevrolet Aveo Control Arm Bushing, from fuel pumps to door handles, our website is a one-stop-shop for your needs. All our genuine 2010 Chevrolet Aveo Control Arm Bushing are backed by the manufacturer's warranty and are offered at competitive prices in the market. Rest assured, you can shop with complete confidence.
2010 Chevrolet Aveo Control Arm Bushing Parts Questions & Experts Answers
- Q: How to replace the front lower control arm bushing on 2010 Chevrolet Aveo?A: You will need various tools to replace the front lower control arm bushing: Front Control Arm Rear Bushing Replacer (CH-48358), Remover/Installer (KM-158), Removal Plate (KM-307-B), Control Arm Bushing Remover/Installer (KM-508-A). The necessary replacement tools for front control arm bushings are a Front Control Arm Rear Bushing Replacer (CH-48358), Remover/Installer (KM-158), Removal Plate (KM-307-B), and Control Arm Bushing Remover/Installer (KM-508-A). Start by taking off the front lower control arm assembly and write down where the arrow marks the rear bushing in relation to the arm's dot stamp along with how the front bushing has its plus signs. Follow the CH-48358 kit procedure by mounting CH-48358-2 to a press and installing the control arm assembly into position followed by aligning the rear bushing correctly on CH-48358-2. You should now place the CH-48358-1 component on the front control arm rear bushing followed by using the press to remove the bushing. Place the KM-307-B on a press before cleaning the rear bushing hole from any present dirt or burrs. Next put the KM-508-4 from the KM-508-A kit onto the KM-307-B while placing the control arm assembly onto the press for alignment with the front bushing. Put the KM-158-5 component from the KM-158 kit on the front bushing before pressing it out using the kit. The CH-48358-4 must be placed on the press followed by the control arm positioning itself on the tool. Next align the arrow on the rear bushing with the dot on the control arm and install the fresh rear bushing into place. Install the rear bushing with the CH-48358-3 then place the KM-307-B on a press and set in position the KM-508-4 which will accept the control arm with the final attachment of the KM-508-2. Apply lubrication to both the front bushing exterior and its internal hole before positioning it into the KM-508-2 so the front bushing faces the control arm with its plus signs in alignment. Install the KM-508-3 onto your front bushing and operate the press until the bushing is correctly positioned before you reattach the front lower control arm assembly.