ChevyParts
My Garage
My Account
Cart
OEM Buick LeSabre Piston
Engine Pistons- Select Vehicle by Model
- Select Vehicle by VIN
Select Vehicle by Model
orMake
Model
Year
Select Vehicle by VIN
For the most accurate results, select vehicle by your VIN (Vehicle Identification Number).
9 Pistons found

Buick LeSabre Piston Part Number: 22527482
$41.02 MSRP: $58.70You Save: $17.68 (31%)
Buick LeSabre Pistons Part Number: 12539085
$119.61 MSRP: $163.76You Save: $44.15 (27%)Ships in 1-3 Business Days
Buick LeSabre Pistons Part Number: 12537198
$62.19 MSRP: $124.87You Save: $62.68 (51%)
Buick LeSabre Piston Part Number: 25533097
Buick LeSabre Piston Part Number: 22527481
Buick LeSabre Piston Part Number: 22506658

Buick LeSabre Piston Part Number: 25527178

Buick LeSabre Piston Part Number: 22527479

Buick LeSabre Pistons Part Number: 19299371
Buick LeSabre Piston
Want to cut long-term maintenance and repair costs? Choose OEM Piston. Those parts deliver top durability you can trust. On our site, you'll find a huge catalog of genuine Buick LeSabre parts. Prices are unbeatable, so you can keep more in your pocket. Every OEM Buick LeSabre Piston includes a manufacturer's warranty. You can also get an easy return policy that keeps buying risk free. Fast delivery, get your car on the road quickly. It's simple to search, compare, and order. Stop guessing about quality or fit. Order today and save with parts that last.
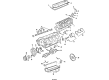
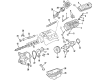
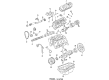
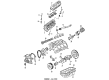
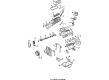
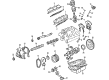
The Piston is one of the main stay of the car company due to the role it has to provide in translating the combustion power to kinetic energy of the car. A major sub-assembly of the Buick LeSabre's internal combustion engine, Piston plays a crucial role in transmitting force to the crankshaft while boosting the vehicle's performance. Using aluminum alloys, the Piston is both versatile in the driving conditions is can handle and adaptable to the different LeSabre models through 1959 to 2005. This compatibility makes the Piston important in ensuring the vehicle is performing optimally while at the same time enhancing its safety. One of the longest-produced cars is the Buick LeSabre, which comes equipped with such novelties as the Piston, which lightweight construction helps save on fuel and provides maximum performance. Other options, like the EyeCue headlights and the StabiliTrak system add to its pleasure when driving and this is why most large car lovers prefer the Buick LeSabre. Thanks to the Piston, Buick LeSabre's reliability as a car is evinced as a quiet and safe runner on the road. Due to its impressive and consistent production and due to its updates, the Piston is highly remarkable in the market of automobiles as it signifies quality and performance of the Buick LeSabre as part of its elements and heritage.
Buick LeSabre Piston Parts and Q&A
- Q: How to service and repair the piston rod bearing on Buick LeSabre?A:In order to service and repair the connecting rod bearing, the process can only start after disconnecting the negative Battery Cable. Take away the Cylinder Head, oil level sensor, Oil Pan, and oil pump pipe and screen. If there is a distinct ridge at the top of the piston travel, it must be removed with the cylinder ridge reamer (J 24270). Mark the connecting rod cap and the rod to ensure proper reassembly and then remove the connecting rod bolts and cap. Permanently attach the connecting rod guide (J 41507) to the connecting rod assembly, and with hand pressure, force the assembly upward within the cylinder to force the piston and connecting rod assembly out. For installation, first place the Piston Rings on the piston so that the ring gaps are staggered. A: turn the Crankshaft to the bottom dead center, apply lubrication to the cylinder, install the connecting rod bearing. Apply the use of the Piston Ring compressor (J 8037) to assemble the piston and connecting the rod with the ridges already facing the front of the engine. Lift up and hold the vehicle, making sure there is no risk of damaging the Crankshaft journal by the connecting rod bottom end, support it with connecting rod guide (J 41507), push the connecting rod through the cylinder name. Before installing the connecting rod cap and bolts, remove the guide continue to tighten bolts to 27nm (20 ft. Lbs.) measuring with the torque angle meter (J 36660-A) to turn the bolts an additional 50 degrees. Ultimately, replace the oil pump pipe and screen assembly, oil pan, oil level sensor, and Cylinder Head, and reattach the negative Battery Cable.

Related Buick LeSabre Parts
 Buick LeSabre Engine Mount
 Buick LeSabre Harmonic Balancer
 Buick LeSabre Cam Gear
 Buick LeSabre Crankshaft Pulley
 Buick LeSabre Crankshaft Thrust Washer Set
 Buick LeSabre Cylinder Head
 Buick LeSabre Exhaust Valve
 Buick LeSabre Motor And Transmission Mount
 Buick LeSabre Oil Pump
 Buick LeSabre Rocker Shaft Spring Kit
 Buick LeSabre Timing Chain Tensioner
 Buick LeSabre Timing Cover