ChevyParts
My Garage
My Account
Cart
OEM Buick Rainier Bumper
Bumper Fascia- Select Vehicle by Model
- Select Vehicle by VIN
Select Vehicle by Model
orMake
Model
Year
Select Vehicle by VIN
For the most accurate results, select vehicle by your VIN (Vehicle Identification Number).
2 Bumpers found

Buick Rainier Bumper Cover Part Number: 12335748
$482.26 MSRP: $724.26You Save: $242.00 (34%)
Buick Rainier Bumper Cover Part Number: 12335749
Buick Rainier Bumper
Want to cut long-term maintenance and repair costs? Choose OEM Bumper. Those parts deliver top durability you can trust. On our site, you'll find a huge catalog of genuine Buick Rainier parts. Prices are unbeatable, so you can keep more in your pocket. Every OEM Buick Rainier Bumper includes a manufacturer's warranty. You can also get an easy return policy that keeps buying risk free. Fast delivery, get your car on the road quickly. It's simple to search, compare, and order. Stop guessing about quality or fit. Order today and save with parts that last.
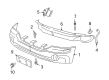
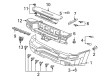
The essential characteristic of the Buick Rainier Bumper demonstrates how the brand stands by its promise of reliability and performance. The Rainier Bumper serves as a safety mechanism to distribute and absorb collision energy during incidental crashes which safeguards vital vehicle components and occupants together. The bumper suits multiple Rainier models to improve both safety parameters and enhance efficiency thus becoming essential for the entire vehicle combination. The Buick Rainier Bumper transformed as a result of the brand's continuous innovation into an advanced design that uses protective reinforcement bars covered in plastic. The design of Rainier Bumpers relies on aluminum, carbon steel and stainless steel compositions which deliver their own weight and durability and anti-corrosion properties to the bumper system. The rust-proof aluminum construct boasts light weight and the carbon steel variant retains extreme strength as its main characteristic but requires extra weight to maintain this strength. Stainless steel bumpers represent a pricier option but they excel in durability performance. As an integral part of the Buick Rainier the Bumper supports both safety features and design thetics to bring together form and function. The Rainier Bumper distinguishes itself in the automotive market because of its special features which improve impact absorption and connecting to advanced safety technologies. The Buick car part serves both as a protective feature and as evidence of brand legacy in quality and performance thereby making the model an attractive option for detail-oriented drivers.
Buick Rainier Bumper Parts Questions & Experts Answers
- Q: How to replace the front bumper fascia on Buick Rainier?A:Starting the front Bumper fascia replacement requires the uninstalling of the grille followed by removing the 2 fasteners which connect the top of the fascia to the headlamp housing panel. Begin by supporting the vehicle raised level then push out the three fascia support rods holding the fascia onto its two support rods. Begin by separately detaching the fog lamps and cornering lamps and air deflector which are attached to the fascia. You must pull the fascia directly toward the front after freeing its body side tabs. To install position the fascia on the vehicle while ensuring the body side attachment tabs reach full seam then secure it to the 2 fascia support rods using 3 push-pins. Put back the air deflector followed by reinstallation of cornering lamps and fog lamps before lowering the vehicle to its normal position. Fx uses the upper central position of the fascia to secure the push-pin. Secure the top fascia to the headlamp housing panel using 2 bolts which should be tightened to 10 n.m (89 lb in). Finally, reinstall the grille.

Related Buick Rainier Parts
 Buick Rainier Center Console
 Buick Rainier Center Console Base
 Buick Rainier Center Console Latch
 Buick Rainier Door Latch Assembly
 Buick Rainier Door Lock Actuator
 Buick Rainier Door Striker
 Buick Rainier Emblem
 Buick Rainier Floor Pan
 Buick Rainier Lift Support
 Buick Rainier Seat Heater Pad
 Buick Rainier Tailgate Handle
 Buick Rainier Window Motor