ChevyParts
My Garage
My Account
Cart
OEM Buick Rendezvous Rear Crossmember
Rear Suspension Crossmember- Select Vehicle by Model
- Select Vehicle by VIN
Select Vehicle by Model
orMake
Model
Year
Select Vehicle by VIN
For the most accurate results, select vehicle by your VIN (Vehicle Identification Number).
1 Rear Crossmember found

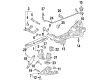
Buick Rendezvous Suspension Crossmember, Rear Part Number: 15127512
Buick Rendezvous Rear Crossmember
Want to cut long-term maintenance and repair costs? Choose OEM Rear Crossmember. Those parts deliver top durability you can trust. On our site, you'll find a huge catalog of genuine Buick Rendezvous parts. Prices are unbeatable, so you can keep more in your pocket. Every OEM Buick Rendezvous Rear Crossmember includes a manufacturer's warranty. You can also get an easy return policy that keeps buying risk free. Fast delivery, get your car on the road quickly. It's simple to search, compare, and order. Stop guessing about quality or fit. Order today and save with parts that last.
As an integral structural component the rear crossmember enhances reliability and performance in the Buick Rendezvous vehicle throughout the production period from 2002 to 2007. The Rear Crossmember functions as a crucial framework component which retains engine and transmission weight and thus improves vehicle stability when the vehicle operates. The integrated position helps the Buick Rendezvous chassis frame deliver proper alignment and handling thus enabling smooth driving performance. The Buick Rendezvous range includes different models where the Rear Crossmember helps increase efficiency at all times but specifically delivers peak performance when the optional Versatrak all-wheel-drive system enables reliable traction in harsh weather. The Buick Rendezvous rear suspension system benefits from the Rear Crossmember which enhances its luxurious driving experience because that system is renowned for Buick vehicles. The Rear Crossmember stands out through its sturdy construction which protects vehicles from daily driving conditions yet preserves the vehicle framework. This reliable structure puts the Buick Rendezvous Rear Crossmember in a distinctive position in the automotive market which maintains the Rendezvous as a preferred choice among families and consumers who want style combined with comfort and functionality. The Rear Crossmember stands essential for the automaker model because it supports the vehicle's dependable characteristics as a powerful mid-size crossover SUV.
Buick Rendezvous Rear Crossmember Parts Questions & Experts Answers
- Q: How to replace the Rear Crossmember in the rear suspension on Buick Rendezvous?A:Beginning the process requires suspension of the car with support before extracting the tire followed by the wheel for removal. A utility stand should support the rear carrier while you remove the rear suspension knuckle. Separate the wheel speed sensor harness from the lower Control Arm and Rear Crossmember and detach the four rivets which secure the park brake cable to the Rear Crossmember. After disconnecting the automatic level control (ALC) height sensor and its link from the crossmember bar and lower Control Arm, securely position the alc wiring harness away from the work area. Before removing the Rear Crossmember bolts, use a utility jack to stabilize the crossmember then lower it to the ground. Start by removing the rear stabilizer shaft after removing the rear axle upper and lower control arms and Tie Rods from the Rear Crossmember. Start your installation process by attaching the tie rods to the crossmember before moving onto the rear axle lower and upper control arms and the rear stabilizer shaft. Utilize guide pins through rail holes to align the raised Rear Crossmember before tightening Rear Crossmember mounting bolts to 130 n.m (96 lb ft). You should install the alc height sensor onto both crossmember and lower Control Arm and attach the Parking Brake Cable to the Rear Crossmember as well as connect the wheel speed sensor harness. After placing the rear suspension knuckle back in position with tire and wheel, lower the vehicle for alignment inspection followed by wheel adjustment as needed.

Related Buick Rendezvous Parts
 Buick Rendezvous Control Arm
 Buick Rendezvous Alignment Bolt
 Buick Rendezvous Axle Beam Mount
 Buick Rendezvous Coil Spring Insulator
 Buick Rendezvous Coil Springs
 Buick Rendezvous Lateral Arm
 Buick Rendezvous Ride Height Sensor
 Buick Rendezvous Shock Absorber
 Buick Rendezvous Sway Bar Bracket
 Buick Rendezvous Sway Bar Bushing
 Buick Rendezvous Sway Bar Kit
 Buick Rendezvous Trailing Arm