ChevyParts
My Garage
My Account
Cart
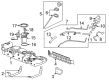
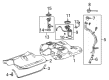
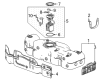
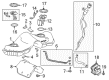
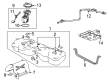
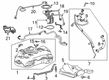
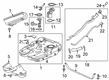
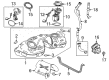
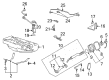
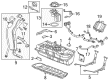
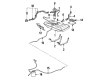
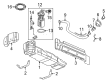
OEM Cadillac Fuel Tank Strap
Gas Tank Strap- Select Vehicle by Model
- Select Vehicle by VIN
Select Vehicle by Model
orMake
Model
Year
Select Vehicle by VIN
For the most accurate results, select vehicle by your VIN (Vehicle Identification Number).
43 Fuel Tank Straps found


Cadillac Tank Strap Part Number: 22928006
$37.77 MSRP: $61.10You Save: $23.33 (39%)Ships in 1-3 Business DaysProduct Specifications- Other Name: Strap, Fuel Tank; Fuel Tank Strap; Strap
- Replaces: 15745096, 22868153


Cadillac Tank Strap Part Number: 22755976
$6.38 MSRP: $8.31You Save: $1.93 (24%)Product Specifications- Other Name: Strap, Fuel Tank; Fuel Tank Strap
- Replaces: 20896572

Cadillac Tank Strap Part Number: 22868152
$27.86 MSRP: $43.62You Save: $15.76 (37%)Ships in 1-3 Business DaysProduct Specifications- Other Name: Strap, Fuel Tank; Fuel Tank Strap; Strap
- Replaces: 15745095

Cadillac Tank Strap Part Number: 84678126
$30.80 MSRP: $48.24You Save: $17.44 (37%)Ships in 1-3 Business DaysProduct Specifications- Other Name: Strap, Fuel Tank; Fuel Tank Strap

Cadillac Tank Strap Part Number: 23163165
$33.68 MSRP: $52.75You Save: $19.07 (37%)Ships in 1-3 Business DaysProduct Specifications- Other Name: Strap, Fuel Tank; Fuel Tank Strap

Cadillac Tank Strap, Driver Side Part Number: 84514818
$15.57 MSRP: $24.38You Save: $8.81 (37%)Ships in 1-3 Business DaysProduct Specifications- Other Name: Strap, Fuel Tank; Fuel Tank Strap
- Position: Driver Side

Cadillac Tank Strap, Driver Side Part Number: 23270360
$30.26 MSRP: $47.39You Save: $17.13 (37%)Ships in 1-3 Business DaysProduct Specifications- Other Name: Strap, Fuel Tank; Fuel Tank Strap
- Position: Driver Side
Cadillac Tank Strap Part Number: 84492497
$24.71 MSRP: $36.77You Save: $12.06 (33%)Ships in 1-3 Business DaysProduct Specifications- Other Name: Strap, Fuel Tank; Fuel Tank Strap
- Replaces: 23270359

Cadillac Tank Strap Part Number: 84056805
$30.08 MSRP: $44.76You Save: $14.68 (33%)Ships in 1-3 Business DaysProduct Specifications- Other Name: Strap, Fuel Tank; Fuel Tank Strap
Cadillac Tank Strap, Passenger Side Part Number: 84514817
$5.67 MSRP: $8.44You Save: $2.77 (33%)Ships in 1-3 Business DaysProduct Specifications- Other Name: Strap, Fuel Tank; Fuel Tank Strap
- Position: Passenger Side

Cadillac Tank Strap Part Number: 84032382
$13.09 MSRP: $19.47You Save: $6.38 (33%)Ships in 1-3 Business DaysProduct Specifications- Other Name: Strap, Fuel Tank; Fuel Tank Strap
- Replaces: 22924896
Cadillac Tank Strap Part Number: 84678127
$36.03 MSRP: $53.62You Save: $17.59 (33%)Ships in 1-3 Business DaysProduct Specifications- Other Name: Strap, Fuel Tank; Fuel Tank Strap
- Replaced by: 85557766


Cadillac Tank Strap, Driver Side Part Number: 20885540
Product Specifications- Other Name: Strap, Fuel Tank; Fuel Tank Strap; Fuel Tank Assembly Mount Strap; Fuel Tank Mount Strap; Strap
- Position: Driver Side
- Replaces: 25892643, 25642824

Cadillac Tank Strap Part Number: 25941312
$5.70 MSRP: $8.49You Save: $2.79 (33%)Product Specifications- Other Name: Strap, Fuel Tank; Fuel Tank Strap

Cadillac Fuel Tank Strap, Passenger Side Part Number: 10156972
Product Specifications- Other Name: Strap, Fuel Tank; Strap
- Position: Passenger Side

Cadillac Ground Cable Part Number: 12100787
Product Specifications- Other Name: Strap; Fuel Tank Strap; Strap, Fuel Tank Filler Neck; Strap, Fuel Tank Filler

Cadillac Mount Strap Part Number: 15721904
Product Specifications- Other Name: Strap, Fuel Tank; Fuel Tank Strap

Cadillac Fuel Tank Strap, Passenger Side Part Number: 22527498
Product Specifications- Other Name: Strap; Fuel Tank Mount Strap; Mount Strap; Strap, Fuel Tank
- Position: Passenger Side

Cadillac Fuel Tank Strap, Driver Side Part Number: 22527499
Product Specifications- Other Name: Strap; Fuel Tank Mount Strap; Mount Strap; Strap, Fuel Tank
- Position: Driver Side

Cadillac Fuel Tank Strap, Passenger Side Part Number: 22518121
Product Specifications- Other Name: Strap, Fuel Tank; Tank Assembly Mount Strap; Fuel Tank Mount Strap; Mount Strap
- Position: Passenger Side
| Page 1 of 3 |Next >
1-20 of 43 Results
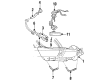
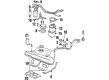
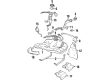
Cadillac Fuel Tank Strap
Choose OEM Fuel Tank Strap, you're making the optimal decision for superior quality and perfect performance. You can feel confident because each component goes through stringent quality checks. Every part is carefully built to comply with Cadillac's factory specifications. You'll enjoy a smooth, worry-free installation that fits just right. At ChevyPartsGiant.com, you'll find it easy to get top-quality OEM Cadillac Fuel Tank Strap. You can shop at highly competitive prices and protect your budget. All our genuine Cadillac parts include a dependable manufacturer's warranty. You'll also appreciate our straightforward return policy and swift delivery services for extra convenience.
The Cadillac Fuel Tank Strap will ensure that your valuable fuel tank remains attached to the chassis which will provide assurance on every voyage. Since its inception in 1902, Cadillac has established a tradition of fun and elegance, with its lines being clean and its performance brash, which makes every road trip an event. Cadillac drivers are fond of the soft cabins, intelligent glass roofs, and full width touchscreens which make commuting a restful drive. New electric hand built Celestiq sedan shows that Cadillac is still a futurist with an electric BEV3 foundation supplying the vehicle with the power to move smoothly against a background of serene luxury. The way such thoughtful engineering demonstrates how the brand perfects comfort, technology, and heritage to be ahead is remarkable. Fuel Tank Strap is a curved piece of steel that holds the tank, restrains vibrations and stops unsafe movement. It takes time but not higher technology to replace the strap at home. Stop on a flat surface and first park, turn off the brake, and remove the battery, which contains sparks. Place under support using a jack and a block and drain pressure and disconnect the hoses, wiring and the filler neck. As the tank is on the jack, unbolt the old Fuel Tank Strap hardware and push the band out of the way. Install the new Fuel Tank Strap around the tank, line up its mounts, and begin bolts manually and then ensure they are tightened evenly to permit the metal to lie flat. Lastly, reconnecting lines, lowering the jack, switching on the engine and inspecting leaks.
Related Cadillac Parts
 Cadillac Air Filter
 Cadillac Fuel Pump
 Cadillac Gas Cap
 Cadillac Fuel Tank
 Cadillac Air Intake Coupling
 Cadillac Cruise Control Switch
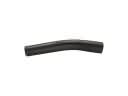 Cadillac Fuel Filler Hose
 Cadillac Fuel Pump Wiring Harness
 Cadillac Idle Control Valve
 Cadillac PCV Valve Hose
 Cadillac Throttle Body Gasket
 Cadillac Throttle Cable