ChevyParts
My Garage
My Account
Cart
OEM Cadillac Fuel Filler Hose
- Select Vehicle by Model
- Select Vehicle by VIN
Select Vehicle by Model
orMake
Model
Year
Select Vehicle by VIN
For the most accurate results, select vehicle by your VIN (Vehicle Identification Number).
117 Fuel Filler Hoses found


Cadillac Filler Neck Part Number: 84696025
$202.60 MSRP: $302.83You Save: $100.23 (34%)Ships in 1-3 Business DaysProduct Specifications- Other Name: Pipe Assembly-Fuel Tank Filler (W/Filler Hose); Fuel Tank Filler Neck; Fuel Filler Hose; Filler Pipe; Pipe, Fuel Tank Filler
- Replaces: 84315254, 84392894, 84090500, 84224654
Cadillac Filler Neck Part Number: 84695998
$202.60 MSRP: $302.83You Save: $100.23 (34%)Product Specifications- Other Name: Pipe Assembly-Fuel Tank Filler (W/Filler Hose); Fuel Tank Filler Neck; Fuel Filler Hose; Filler Pipe; Pipe, Fuel Tank Filler
- Replaces: 84315252, 84392892, 84090498, 84224656

Cadillac Filler Hose Part Number: 84630532
$45.72 MSRP: $81.64You Save: $35.92 (44%)Ships in 1-3 Business DaysProduct Specifications- Other Name: Hose, Fuel Tank Filler
- Replaces: 84565277

Cadillac Filler Hose Part Number: 42507406
$44.24 MSRP: $79.00You Save: $34.76 (44%)Ships in 1-3 Business DaysProduct Specifications- Other Name: Hose, Fuel Tank Filler; Fuel Filler Hose


Cadillac Filler Hose Part Number: 84362975
$30.96 MSRP: $55.26You Save: $24.30 (44%)Ships in 1-3 Business DaysProduct Specifications- Other Name: Hose, Fuel Tank Filler; Fuel Filler Hose
- Replaces: 23359272

Cadillac Filler Hose Part Number: 84164535
$29.89 MSRP: $53.38You Save: $23.49 (45%)Ships in 1-3 Business DaysProduct Specifications- Other Name: Hose, Fuel Tank Filler; Fuel Filler Hose
- Replaces: 23187550


Cadillac Upper Hose Part Number: 84692824
$35.29 MSRP: $55.29You Save: $20.00 (37%)Ships in 1-3 Business DaysProduct Specifications- Other Name: Hose, Fuel Tank Filler; Fuel Filler Hose; Fuel Hose

Cadillac Hose Part Number: 25750934
$21.27 MSRP: $33.31You Save: $12.04 (37%)Ships in 1-3 Business DaysProduct Specifications- Other Name: Hose, Fuel Tank Filler; Fuel Hose

Cadillac Lower Hose Part Number: 84564113
$23.58 MSRP: $36.93You Save: $13.35 (37%)Ships in 1-3 Business DaysProduct Specifications- Other Name: Hose, Fuel Tank Filler; Fuel Filler Hose; Fuel Hose

Cadillac Filler Neck Part Number: 85545881
$154.91 MSRP: $231.55You Save: $76.64 (34%)Ships in 1-3 Business DaysProduct Specifications- Other Name: Pipe Assembly-Fuel Tank Filler (W/Filler Hose); Filler Pipe
- Replaced by: 86819920

Cadillac Filler Neck Part Number: 85512438
$167.44 MSRP: $250.29You Save: $82.85 (34%)Product Specifications- Other Name: Pipe Assembly-Fuel Tank Filler; Fuel Tank Filler Neck; Fuel Filler Hose; Filler Pipe
- Replaces: 84731626

Cadillac Filler Neck Part Number: 84594364
$301.94 MSRP: $451.35You Save: $149.41 (34%)Ships in 1-3 Business DaysProduct Specifications- Other Name: Pipe Assembly-Fuel Tank Filler (W/Filler Hose); Fuel Tank Filler Neck; Fuel Filler Hose; Filler Pipe; Pipe, Fuel Tank Filler
- Replaced by: 84701749

Cadillac Filler Neck Part Number: 22933965
$174.41 MSRP: $260.70You Save: $86.29 (34%)Ships in 1-3 Business DaysProduct Specifications- Other Name: Pipe Assembly-Fuel Tank Filler; Fuel Tank Filler Neck; Fuel Filler Hose; Filler Pipe; Pipe, Fuel Tank Filler

Cadillac Filler Pipe Part Number: 84186598
$208.47 MSRP: $311.61You Save: $103.14 (34%)Ships in 1-3 Business DaysProduct Specifications- Other Name: Pipe Assembly-Fuel Tank Filler; Pipe, Fuel Tank Filler

Cadillac Filler Neck Part Number: 84696012
$202.60 MSRP: $302.83You Save: $100.23 (34%)Ships in 1-3 Business DaysProduct Specifications- Other Name: Pipe Assembly-Fuel Tank Filler (W/Filler Hose); Fuel Tank Filler Neck; Fuel Filler Hose; Filler Pipe; Pipe, Fuel Tank Filler
- Replaces: 84392893, 84224655, 84090497, 84315251

Cadillac Filler Pipe Part Number: 86790241
$181.99 MSRP: $272.04You Save: $90.05 (34%)Ships in 1-2 Business DaysProduct Specifications- Other Name: Pipe Assembly-Fuel Tank Filler (W/Filler Hose); Pipe, Fuel Tank Filler

Cadillac Filler Neck Part Number: 15077654
Product Specifications- Other Name: Pipe Assembly-Fuel Tank Filler; Fuel Tank Filler Neck; Fuel Filler Hose; Filler Pipe; Pipe, Fuel Tank Filler


Cadillac Filler Neck Part Number: 15749592
Product Specifications- Other Name: Pipe, Fuel Tank Filler; Fuel Tank Filler Neck; Fuel Filler Hose; Filler Pipe


Cadillac Filler Neck Part Number: 15124903
Product Specifications- Other Name: Pipe, Fuel Tank Filler; Fuel Tank Filler Neck; Fuel Filler Hose; Filler Pipe

Cadillac Filler Neck Part Number: 87864982
$146.19 MSRP: $218.52You Save: $72.33 (34%)Product Specifications- Other Name: Pipe Assembly-Fuel Tank Filler (W/Filler Hose); Filler Pipe; Pipe, Fuel Tank Filler
- Replaces: 84362952, 84233125, 84760198, 85554221, 84069551, 84734920, 84108468, 84376141, 84387385
| Page 1 of 6 |Next >
1-20 of 117 Results
Cadillac Fuel Filler Hose
Choose OEM Fuel Filler Hose, you're making the optimal decision for superior quality and perfect performance. You can feel confident because each component goes through stringent quality checks. Every part is carefully built to comply with Cadillac's factory specifications. You'll enjoy a smooth, worry-free installation that fits just right. At ChevyPartsGiant.com, you'll find it easy to get top-quality OEM Cadillac Fuel Filler Hose. You can shop at highly competitive prices and protect your budget. All our genuine Cadillac parts include a dependable manufacturer's warranty. You'll also appreciate our straightforward return policy and swift delivery services for extra convenience.
Cadillac Fuel Filler Hose Parts and Q&A
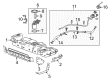
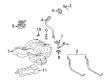
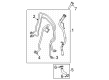
- Q: How to replace the fuel filler hose on Cadillac CTS?A:The procedure for fuel filler tube replacement starts with draining the Fuel Tank below the Fuel Filler Hose level while removing the fuel filler cap. Escape the fuel filler tube body bolts before proceeding to detach the right rear wheel and right rear wheelhouse liner. Start installation by unbolt the fuel filler tube brace and separate the Fuel Filler Hose from the Fuel Tank and loosen the evaporative emission (EVAP) hose from the filler vent tube respectively. The technician should complete these steps before taking the fuel filler tube off the vehicle. The new fuel filler tube must be positioned right before connecting its filler hose to the Fuel Tank with 3.5 nm (31 lb in) of torque utilizing a torque wrench. The fuel filler tube brace bolt requires installation after you connect the evap hose to the filler vent tube and tighten it to 9 nm (80 lb in). The fuel filler tube needs bolt installation to the body while using a torque of 3.5 nm (31 lb in). Afterward, replace the right rear wheelhouse liner and right rear wheel. Complete the fuel-up procedure by filling the Fuel Tank then check for leaks before installing the fuel filler cap.
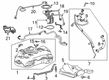
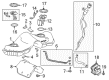
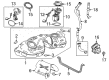
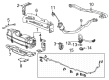
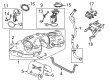
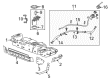
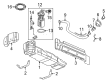
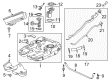
- Q: How to replace the fuel filler hose on Cadillac Escalade?A:Clean the fuel connections with the surrounding areas before removing the fuel fill cap and start the pipe replacement process. You should detach the fuel tank filler housing from the body through the process of unscrewing the torx(R) screws and retainer . Begin by removing both the spare tire stowage lock cylinder in addition to the spare tire if needed. Lift the vehicle before you remove the vent hose clip from the fill pipe while also detaching the air suspension hose at the fill pipe if needed. To begin remove the chassis wiring harness ground bolt along with the left rear lamp ground wire and fill pipe ground strap which are fastened to the frame. The technician should detach the fuel fill hose clamp before removing both the fuel fill hose and the fuel tank. A mechanic should loosen the fuel fill pipe vent hose clamp at the Fuel Tank Vent Valve before disconnecting the fuel fill pipe vent line quick connect fitting from the evaporative emission (EVAP) canister vent solenoid valve. The first step combines three tasks: bolt removal of the fuel fill pipe bracket (2, 4), covering both the fuel tank opening and evap vent line to prevent contamination, and removing the fuel fill pipe assembly. Removing any serviceable element of the fill pipe assembly requires disassembling its following components: the fuel tank filler vent hose and fuel tank fill pipe housing bolts alongside fuel tank fill pipe housing and fuel tank fill hose using a fuel tank fill pipe clip and fuel tank fill hose clamp and fuel tank fill hose while also including the evaporative emission hose and evaporative emission hose clamp. The installation requires tightening the following parts to the mentioned torque values: evaporative emission hose clamp to 2.5 nm (22 lb in) along with its hose and fuel tank fill hose clamp to 2.5 nm (22 lb in), while the hose needs tightening to 2.5 nm (22 lb in) then follow by fuel tank fill pipe clip , fuel tank fill hose , fuel tank fill pipe housing , and fuel tank fill pipe housing bolts to 2.3 nm (20 lb in). After uninstalling the caps from the evap vent line and fuel tank opening you can install the fuel fill hose to the fuel tank at a position that matches the hose notch to the fuel tank notch. Secure the fuel fill pipe bracket bolts (2, 4) to 12 nm (106 lb in) after installation of the tab on the fuel fill pipe to the frame notch. Secure the plastic connector of the fuel fill pipe vent line to the evap canister vent solenoid valve through a clamp that has been tightened to 2.5 nm (22 lb in). Position the fuel fill hose clamp at the Fuel Tank Vent Valve and hold it there with another clamp set to 2.5 nm (22 lb in). The fill pipe ground strap needs installation next to the left rear lamp ground wire before attaching them both to the frame and placing the lamp ground wire anti-rotation tab into the frame hole. Reinstall the air suspension hose only if needed then connect the rear axle vent hose clip to the fill pipe before tightening the chassis wiring harness ground bolt to 9 nm (80 lb in). Position the fuel tank filler housing onto the body frame while tightening the torx(R) screws together with the retainer to 2.3 nm (20 lb in). Reinstallation of the spare tire must be completed with the fuel fill cap and spare tire stowage lock cylinder if you need to use them.


Related Cadillac Parts
 Cadillac Fuel Pump
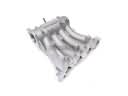 Cadillac Intake Manifold
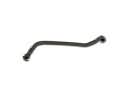 Cadillac Crankcase Breather Hose
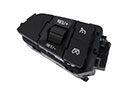 Cadillac Cruise Control Switch
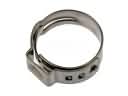 Cadillac Fuel Line Clamps
 Cadillac Fuel Pressure Sensor
 Cadillac Fuel Pump Seal
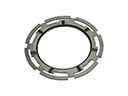 Cadillac Fuel Tank Lock Ring
 Cadillac Fuel Tank Strap
 Cadillac PCV Valve Hose
 Cadillac Throttle Body Gasket
 Cadillac Throttle Cable