ChevyParts
My Garage
My Account
Cart
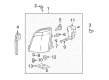
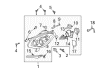
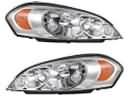
OEM Cadillac SRX Headlight Bulb
Headlamp Bulb- Select Vehicle by Model
- Select Vehicle by VIN
Select Vehicle by Model
orMake
Model
Year
Select Vehicle by VIN
For the most accurate results, select vehicle by your VIN (Vehicle Identification Number).
12 Headlight Bulbs found


Cadillac SRX Headlamp Bulb, Green Line Part Number: 13586977
$14.63 MSRP: $27.48You Save: $12.85 (47%)Ships in 1-2 Business Days


Cadillac SRX Bulb & Socket Part Number: 19257054
$14.11 MSRP: $25.22You Save: $11.11 (45%)Ships in 1-2 Business Days

Cadillac SRX Turn Signal Bulb, Amber, Front Part Number: 15862271
$12.60


Cadillac SRX Turn Signal Bulb Part Number: 13579188
$7.22 MSRP: $13.56You Save: $6.34 (47%)Ships in 1-3 Business Days


Cadillac SRX Bulb & Socket, Green Line Part Number: 9441732
$13.16 MSRP: $23.52You Save: $10.36 (45%)Ships in 1-3 Business Days


Cadillac SRX Headlamp Bulb Part Number: 25735602
$23.31 MSRP: $43.78You Save: $20.47 (47%)Ships in 1-2 Business Days

Cadillac SRX Headlamp Bulb Part Number: 1999437
$12.80 MSRP: $23.17You Save: $10.37 (45%)Ships in 1-2 Business Days

Cadillac SRX Headlamp Bulb Part Number: 13500813
$13.52 MSRP: $24.17You Save: $10.65 (45%)Ships in 1-3 Business Days
Cadillac SRX Headlamp Bulb Part Number: 92184172
$17.05 MSRP: $32.02You Save: $14.97 (47%)Ships in 1-2 Business DaysCadillac SRX Headlamp Bulb Part Number: 25735601
$14.00 MSRP: $26.31You Save: $12.31 (47%)Ships in 1 Business Day
Cadillac SRX Hid Bulb Part Number: 25735604

Cadillac SRX Hid Bulb Part Number: 13501591
Cadillac SRX Headlight Bulb
Want to cut long-term maintenance and repair costs? Choose OEM Headlight Bulb. Those parts deliver top durability you can trust. On our site, you'll find a huge catalog of genuine Cadillac SRX parts. Prices are unbeatable, so you can keep more in your pocket. Every OEM Cadillac SRX Headlight Bulb includes a manufacturer's warranty. You can also get an easy return policy that keeps buying risk free. Fast delivery, get your car on the road quickly. It's simple to search, compare, and order. Stop guessing about quality or fit. Order today and save with parts that last.
Headlight Bulb is one of the vital automotive parts that facilitates Cadillac SRX Headlights to provide operational efficiency and above all, added security during bluish conditions. Being one among the highly efficient Cadillac SRX spare parts, this product is available in Halogen and HID types of the Headlight Bulb depending on the SRX model's needs. Halogen bulbs are now improved and offer up to 50 % of extra brightness and better side to side vision and another option is the advanced LED headlight conversion kits that have better illumination and also has a longer life thus being a good option for Cadillac SRX drivers. Holders of Cadillac SRX manufactured 2003-2009 as well as Cadillac SRX manufactured 2010-2016 will be in a position to purchase and use these high quality headlight bulbs owing to compatibility across the two generations of SRX. The Headlight Bulb is an improved feature that adds efficiency and is very useful to emphasize on safety during operations on the roads, and helps the driver to overcome the obstacles amidst darkness. In the automotive market, a Headlight Bulb presents some special features including easy installation, a wider beam pattern among other interesting features which makes it to stand out making it a most preferable auto part to others in the market. Lastly, the Headlight Bulb encapsulates the primary idea of the Cadillac, which is luxury and safety, making the Cadillac one of the best choices for those thinking specifically about the car's lights.
Cadillac SRX Headlight Bulb Parts Questions & Experts Answers
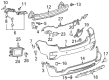
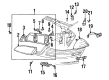
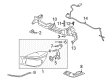
- Q: How to replace the front headlight bulb on Cadillac SRX?A:The first step to replace a headlamp bulb begins by removing push-pin retainers securing the upper fascia and grille assembly to the upper tie bar in order to bend the assembly forward. The installation starts with removing the bolt combined with the push-pin retainer which keeps the headlamp assembly fixed to the upper tie bar. The forward movement of the upper fascia and grille assembly provides access to the bolt at its bottom inboard headlamp side before the assembly can be pulled directly out to detach the snap-in retainer from its lower outboard contact area. After rotating the assembly users should clear the front fascia until they can pull the assembly out toward the vehicle. Disconnect the electrical connector of the headlamp before removing the assembly. First remove the headlamp bulb cover and the headlamp bulb socket attached to the assembly before you take off the headlamp bulb from its place. The next step involves disconnecting the side marker bulb socket combined with bulb which faces outward on the headlamp assembly before proceeding to remove the parking lamp bulb socket with bulb from the inner side of the lamp unit. The installation process begins with putting the headlamp bulb inside its socket followed by placing the socket into the headlamp assembly and then secure the headlamp bulb cover in place. Proceed by installing the side marker bulb in its socket before placing the socket in position while the process is repeated for the parking lamp bulb and socket. Connect the headlamp electrical connector before repositioning the assembly into place while verifying the bolt holes match properly and the snap-in retainer securely locks into position. After properly placing the headlamp assembly bolt at the bottom inboard side you should install the top push-pin retainer which connects to the upper tie bar before finally tightening all bolts to 6 n.m (53 lb in). Complete the procedure by putting back the push-pin retainers for the upper fascia and grille assembly followed by hood closure.

Related Cadillac SRX Parts
 Cadillac SRX Headlight
 Cadillac SRX Tail Light
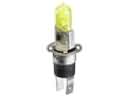 Cadillac SRX Fog Light Bulb
 Cadillac SRX Back Up Light
 Cadillac SRX Fog Light
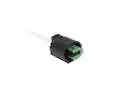 Cadillac SRX Forward Light Harness Connector
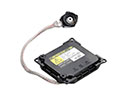 Cadillac SRX Hid Bulb Ballast
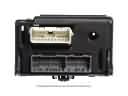 Cadillac SRX Light Control Module
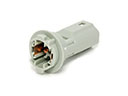 Cadillac SRX Light Socket
 Cadillac SRX Rear Light Harness Connector
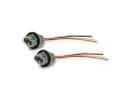 Cadillac SRX Turn Signal Light Connector