ChevyParts
My Garage
My Account
Cart
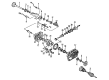
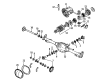
OEM Chevrolet Avalanche 2500 Universal Joint
U-Joint- Select Vehicle by Model
- Select Vehicle by VIN
Select Vehicle by Model
orMake
Model
Year
Select Vehicle by VIN
For the most accurate results, select vehicle by your VIN (Vehicle Identification Number).
4 Universal Joints found


Chevrolet Avalanche 2500 Universal Joints Part Number: 23104840
$36.45 MSRP: $88.98You Save: $52.53 (60%)


Chevrolet Avalanche 2500 Universal Joints Part Number: 89040245
$107.41 MSRP: $180.82You Save: $73.41 (41%)Ships in 1-2 Business Days
Chevrolet Avalanche 2500 Universal Joints Part Number: 89040243
$112.32 MSRP: $189.10You Save: $76.78 (41%)Ships in 1-2 Business Days


Chevrolet Avalanche 2500 Universal Joints Part Number: 88964413
$196.62 MSRP: $328.19You Save: $131.57 (41%)Ships in 1-2 Business Days
Chevrolet Avalanche 2500 Universal Joint
Want to cut long-term maintenance and repair costs? Choose OEM Universal Joint. Those parts deliver top durability you can trust. On our site, you'll find a huge catalog of genuine Chevrolet Avalanche 2500 parts. Prices are unbeatable, so you can keep more in your pocket. Every OEM Chevrolet Avalanche 2500 Universal Joint includes a manufacturer's warranty. You can also get an easy return policy that keeps buying risk free. Fast delivery, get your car on the road quickly. It's simple to search, compare, and order. Stop guessing about quality or fit. Order today and save with parts that last.
Chevrolet Avalanche 2500 Universal Joint Parts Questions & Experts Answers
- Q: What tools are needed to service and repair the universal joint with a nylon injected ring on Chevrolet Avalanche 2500?A:Repair or service the universal joint containing a nylon ring by using tool set J 9522-3 and J 9522-5. Two necessary tools include U Joint Bearing Separator (J 9522-3) and U Joint Bearing Spacer Remover (J 9522-5). The first step should include supporting the propeller shaft horizontally on a press but avoid clamping the tubing in a vise because this could cause damage. Record clear markings at both ends of the propeller shaft to maintain the correct orientation. Set the universal joint within the lower yoke ear on a 30 mm (1 1/8 inch) socket. Proceed by using the U Joint Bearing Separator (J 9522-3) to divide the plastic retaining ring on the bearing cup before pressing the lower bearing cup out of the yoke ear. The U Joint Bearing Spacer Remover (J 9522-5) allows users to press out remaining bearing cups by placing it between the seal and the cup. The propeller shaft rotation will force the opposite bearing cup to exit before removing the cross piece as well as any leftover universal joint elements. Check the retaining ring grooves together with bearing cup bores for any signs of damage before cleaning them both. To assemble the yoke you must first drive a bearing cup into one yoke side while you position the cross to accept the trunnion without restriction. Pressibrate the bearing cup until it fully masters the yoke ear then perform these steps for the other side making sure trunnions maintain correct alignment. Check the needle bearings for misalignment in case binding takes place. Use the press tool to drive the bearing retainer groove out of the yoke before installing the retainer snap ring. A dead blow hammer can help you set the retainer correctly if required. Application of chassis grease to the snap ring may help its correct positioning within the bearing cup groove.

Related Chevrolet Avalanche 2500 Parts
 Chevrolet Avalanche 2500 Differential
 Chevrolet Avalanche 2500 Differential Bearing
 Chevrolet Avalanche 2500 Differential Cover
 Chevrolet Avalanche 2500 Differential Seal
 Chevrolet Avalanche 2500 Driveshaft Yokes
 Chevrolet Avalanche 2500 Pinion Bearing
 Chevrolet Avalanche 2500 Pinion Washer
 Chevrolet Avalanche 2500 Slip Yoke
 Chevrolet Avalanche 2500 Wheel Seal