ChevyParts
My Garage
My Account
Cart
OEM Chevrolet Blazer Universal Joint
U-Joint- Select Vehicle by Model
- Select Vehicle by VIN
Select Vehicle by Model
orMake
Model
Year
Select Vehicle by VIN
For the most accurate results, select vehicle by your VIN (Vehicle Identification Number).
7 Universal Joints found


Chevrolet Blazer Universal Joints Part Number: 88964413
$196.62 MSRP: $328.19You Save: $131.57 (41%)Ships in 1-2 Business Days


Chevrolet Blazer Universal Joints Part Number: 23104840
$36.45 MSRP: $88.98You Save: $52.53 (60%)


Chevrolet Blazer Universal Joints Part Number: 89059111
$163.83 MSRP: $273.43You Save: $109.60 (41%)Ships in 1-2 Business Days
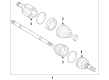
Chevrolet Blazer Inner CV Joint Part Number: 84443364
$77.63 MSRP: $121.61You Save: $43.98 (37%)Ships in 1-3 Business Days
Chevrolet Blazer Inner CV Joint Part Number: 84666185
$79.35 MSRP: $124.29You Save: $44.94 (37%)Ships in 1-3 Business Days
Chevrolet Blazer Inner CV Joint Part Number: 84666171

Chevrolet Blazer Universal Joints Part Number: 7849090
Chevrolet Blazer Universal Joint
Want to cut long-term maintenance and repair costs? Choose OEM Universal Joint. Those parts deliver top durability you can trust. On our site, you'll find a huge catalog of genuine Chevrolet Blazer parts. Prices are unbeatable, so you can keep more in your pocket. Every OEM Chevrolet Blazer Universal Joint includes a manufacturer's warranty. You can also get an easy return policy that keeps buying risk free. Fast delivery, get your car on the road quickly. It's simple to search, compare, and order. Stop guessing about quality or fit. Order today and save with parts that last.
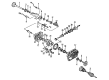
The Universal Joint in Chevrolet Blazer vehicles has the primary function of coupling the driveshaft to differential in order to facilitate some required movement given the inevitable movement of the suspension system over the road. This joint allows the driveshaft to rotate, so that it can manage changes in the relative angle of joining components. Usually, a Universal Joint comprises a cross that contains needle bearings that are sheltered in steel cups, which are held by clips. Across models, Blazer variants have used factory greaseable U Joints and U Joints with the grease zerks for ease of relubrication. Worn U Joints present major problems, and this include presence of staking noises while shifting gears, and vibrations at considerable velocities, and therefore they must be inspected and probably replaced. Whenever possible, signs of wear should be looked for such as cracked seals, play noticed in the joint, in order to sustain the standard performance of vehicles.
Chevrolet Blazer Universal Joint Parts Questions & Experts Answers
- Q: How to replace the universal joint with an external snap ring on Chevrolet Blazer?A:Start your universal joint replacement project by getting both the J9522-3 U-Joint Bearing Separator and J9522-5 U-Joint Bearing Spacer Remover tools. Position the propeller shaft horizontally and steer clear of tube contact that can hurt the parts. Note the propeller shaft ends before you take it apart. Use pliers to take apart snap rings and work the cup end with a tap if the joint does not release pressure. Place the U-Joint Bearing Separator (J9522-3) between open horizontal bearing cups then apply it to the lower yoke ear's support surface while using a 30 mm or 27 mm socket head. When the first bearing cup fails to extract push the U-Joint Bearing Spacer Remover (J9522-5) between the seal and the cup. Keep pushing to push out the besing cup. When rotating the propeller shaft you push one bearing cup toward the slip yoke position to determine tube fitting with the yoke. Examine all bearing cup grooves and bores inside the yoke for any signs of damage before processing the parts for reassembly. Place one bearing cup into the yoke opening so its trunnion fit smoothly before pushing it until flush with the ear surface. Press the other bearing cup into position while keeping trunnion alignment right and verifying its movement. Check if the needle bearings face each other properly when unsatisfactory movement occurs during assembly. After seeing the bearing cup retainer groove you must add the bearing retainer blocks and keep pushing until they snap into position. A dead blow hammer works well to fully install the retainer. Apply chassis grease over the snap ring to simplify its placement within the bearing cup groove.

Related Chevrolet Blazer Parts
 Chevrolet Blazer Differential
 Chevrolet Blazer Axle Shaft Retainer
 Chevrolet Blazer Differential Bearing
 Chevrolet Blazer Differential Cover
 Chevrolet Blazer Differential Seal
 Chevrolet Blazer Driveshaft Yokes
 Chevrolet Blazer Pinion Bearing
 Chevrolet Blazer Pinion Washer
 Chevrolet Blazer Slip Yoke
 Chevrolet Blazer Wheel Seal