ChevyParts
My Garage
My Account
Cart
OEM Chevrolet Cavalier Control Arm
Suspension Arm- Select Vehicle by Model
- Select Vehicle by VIN
Select Vehicle by Model
orMake
Model
Year
Select Vehicle by VIN
For the most accurate results, select vehicle by your VIN (Vehicle Identification Number).
11 Control Arms found

Chevrolet Cavalier Lower Control Arm, Driver Side Part Number: 22603949
$163.46 MSRP: $259.53You Save: $96.07 (38%)Ships in 1-2 Business Days
Chevrolet Cavalier Lower Control Arm, Passenger Side Part Number: 15217439
$163.46 MSRP: $259.53You Save: $96.07 (38%)Ships in 1-2 Business DaysChevrolet Cavalier Lower Control Arm, Driver Side Part Number: 15217438
$163.46 MSRP: $259.53You Save: $96.07 (38%)Ships in 1-2 Business Days
Chevrolet Cavalier Control Arm Part Number: 22548678
Chevrolet Cavalier Control Arm Part Number: 22548677


Chevrolet Cavalier Control Arm, Passenger Side Part Number: 14026620
Chevrolet Cavalier Control Arm, Driver Side Part Number: 14026619
Chevrolet Cavalier Control Arm
Want to cut long-term maintenance and repair costs? Choose OEM Control Arm. Those parts deliver top durability you can trust. On our site, you'll find a huge catalog of genuine Chevrolet Cavalier parts. Prices are unbeatable, so you can keep more in your pocket. Every OEM Chevrolet Cavalier Control Arm includes a manufacturer's warranty. You can also get an easy return policy that keeps buying risk free. Fast delivery, get your car on the road quickly. It's simple to search, compare, and order. Stop guessing about quality or fit. Order today and save with parts that last.
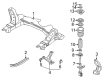
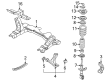
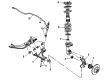
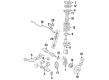
The Chevrolet Cavalier Control Arm is a part of a car and which represents the worth of Chevrolet for bringing compact car with its highly reliable and performance based car part. Being a part of suspension system, the Control Arm connects the frame of the vehicle to the wheels which require the pivotal movement to enable the wheels to adapt to the irregularities of the road. This functionality is quite crucial in ensuring that the car wheels are correctly aligned with a view of improving efficiency and safety when driving. There have been many changes in the material of Manufacture Control Arm through the generation of Chevrolet Cavalier, which has seen the move from the common stamped steel type, cast iron or aluminum type with better attribute of high strength, light in weight. Stamped steel Control Arms are, however, very strong, though they are somewhat prone to rust, which may affect their strength. Newer designs of this car was built to be more durable and the new material such as DOM tubular steel and chrome moly is incorporated in the car to enable the car to be used in aggressive driving styles. This Chevrolet Cavalier Control Arm suits all generations of the Cavalier models; thus, drivers get to enjoy excellent handling and staking. This aspect alone determines the comfort or roughness of the ride and is also exceedingly important in the staking control of the car model Chevrolet Cavalier. Designed in such a way and made to accommodate global clients, the Chevrolet Cavalier Control Arm portrays all what car lovers admire about this production brand with regard to its efficiency and reliability in the current market.
Chevrolet Cavalier Control Arm Parts and Q&A
- Q: How to replace the lower control arm on Chevrolet Cavalier?A:The lower Control Arm replacement process begins by lifting the vehicle onto a hoist while removing both tire and wheel units. Begin stabilizer shaft replacement by detaching the link if your vehicle is equipped with one. The engine mount strut needs two retaining bolts removed before pulling out the engine mount strut. Start by removing the front suspension support brace mounting bolts followed by the front suspension support brace for the left lower Control Arm installation. Begin by taking out the Ball Joint from the Steering Knuckle and disconnecting the wiring harness from the lower Control Arm and removing the front and rear lower Control Arm mounting bolts to extract the lower Control Arm from the front suspension crossmember. Start by positioning the Control Arm into the front suspension crossmember then tighten the lower Control Arm mounting bolts at front and rear locations by hand. Reinstall the lower Control Arm wiring harness then connect the Ball Joint stud to the Steering Knuckle. Proceed by installing the stabilizer shaft link then the engine mount strut for the right lower Control Arm before securing the retaining bolts at 100 n.m (74 lb ft). The front suspension support brace and its mounting bolts (2, 4) require installation to a torque of 72 n.m (53 lb ft). Secure the tire and wheel assembly to the vehicle then drop it to the ground before torqueing the front bushing Control Arm Bolt to 100 n.m plus 90 degrees rotation (74 lb ft) and tightening the rear vertical bushing Control Arm Bolt to 170 n.m (125 lb ft). Complete the inspection by checking the wheel alignment of the front.

Related Chevrolet Cavalier Parts
 Chevrolet Cavalier Axle Beam Mount
 Chevrolet Cavalier Axle Support Bushings
 Chevrolet Cavalier Ball Joint
 Chevrolet Cavalier Coil Spring Insulator
 Chevrolet Cavalier Coil Springs
 Chevrolet Cavalier Control Arm Bushing
 Chevrolet Cavalier Shock Absorber
 Chevrolet Cavalier Shock And Strut Mount
 Chevrolet Cavalier Steering Knuckle
 Chevrolet Cavalier Sway Bar Bushing
 Chevrolet Cavalier Sway Bar Kit
 Chevrolet Cavalier Wheel Seal