ChevyParts
My Garage
My Account
Cart
OEM Chevrolet Express 1500 Oil Cooler Hose
Oil Cooler Line- Select Vehicle by Model
- Select Vehicle by VIN
Select Vehicle by Model
orMake
Model
Year
Select Vehicle by VIN
For the most accurate results, select vehicle by your VIN (Vehicle Identification Number).
10 Oil Cooler Hoses found


Chevrolet Express 1500 Inlet Hose Part Number: 15052181
$55.37 MSRP: $90.66You Save: $35.29 (39%)

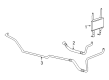
Chevrolet Express 1500 Outlet Pipe Part Number: 20985357
$79.03 MSRP: $134.54You Save: $55.51 (42%)Ships in 1-2 Business Days

Chevrolet Express 1500 Inlet Pipe Part Number: 15808251
$40.38 MSRP: $69.35You Save: $28.97 (42%)Ships in 1 Business Day
Chevrolet Express 1500 Lower Hose Part Number: 25849126
$32.74 MSRP: $53.96You Save: $21.22 (40%)Ships in 1-2 Business DaysChevrolet Express 1500 Outlet Pipe, Lower Part Number: 25849124
$39.88 MSRP: $67.92You Save: $28.04 (42%)Ships in 1-2 Business Days
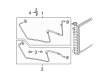
Chevrolet Express 1500 Upper Hose Part Number: 25849123
$56.11 MSRP: $96.30You Save: $40.19 (42%)Ships in 1 Business DayChevrolet Express 1500 Outlet Pipe, Lower Part Number: 15808430
$61.42 MSRP: $104.56You Save: $43.14 (42%)Ships in 1 Business DayChevrolet Express 1500 Outlet Pipe, Lower Part Number: 15808427
$38.13 MSRP: $62.81You Save: $24.68 (40%)Ships in 1 Business Day
Chevrolet Express 1500 Outlet Hose Part Number: 15052182
$97.69 MSRP: $235.54You Save: $137.85 (59%)Ships in 1 Business DayChevrolet Express 1500 Outlet Hose Part Number: 15024400
Chevrolet Express 1500 Oil Cooler Hose
Want to cut long-term maintenance and repair costs? Choose OEM Oil Cooler Hose. Those parts deliver top durability you can trust. On our site, you'll find a huge catalog of genuine Chevrolet Express 1500 parts. Prices are unbeatable, so you can keep more in your pocket. Every OEM Chevrolet Express 1500 Oil Cooler Hose includes a manufacturer's warranty. You can also get an easy return policy that keeps buying risk free. Fast delivery, get your car on the road quickly. It's simple to search, compare, and order. Stop guessing about quality or fit. Order today and save with parts that last.
Chevrolet Express 1500 Oil Cooler Hose Parts and Q&A
- Q: How to replace the Engine Oil Cooler Hose/Pipe on Chevrolet Express 1500?A:Serviceable cooler lines and hoses exist as part of an oil cooler system which could either integrate with the Radiator or act as an independent unit placed in front. The Engine Oil Cooler hose/pipe replacement should begin with cooler line disconnection and opening the Oil Cooler Hose clip on the lower Fan Shroud before extracting the oil cooler hoses from their clip. Complete the Radiator quick-connect fittings before extracting the oil cooler pipe fittings normally after you support the vehicle properly. Start by unbolting the Oil Cooler Hose bracket then remove the Oil Cooler Hose adapter bolts before completely disassembling the hose assembly that you must discard afterward. Examine the fittings along with connectors and all cooler hoses for signs of structural change or physical damage. An audible snap from the hose tube assembly during their insertion into quick connectors confirms proper insertion requiring a firm pull to verify complete insertion. Fit together the Oil Cooler Hose assembly with a fresh gasket before torquing the cooler hose adapter bolts to 12 nm (106 inch lbs.) then twisting the outer Oil Cooler Hose bracket bolt to 25 nm (18 ft. Lbs.). Fasten the oil cooler hoses through their designated clip on the Fan Shroud before closing the hose clip mechanism. Make sure both the new oil cooler line and its quick connect end possess an attached plastic cap before connection. Obtain a new plastic cap if one is lost or damaged and install it before fitting the cooler lines but never use the cap to connect the lines. Carefully join the oil cooler lines before pulling the line back hard to verify proper fitting in the quick connect connector.

Related Chevrolet Express 1500 Parts
 Chevrolet Express 1500 A/C Condenser Fan
 Chevrolet Express 1500 Automatic Transmission Oil Cooler Line
 Chevrolet Express 1500 Coolant Pipe
 Chevrolet Express 1500 Coolant Reservoir Cap
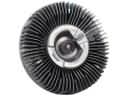 Chevrolet Express 1500 Cooling Fan Clutch
 Chevrolet Express 1500 Cooling Hose
 Chevrolet Express 1500 Fan Shroud
 Chevrolet Express 1500 Oil Cooler
 Chevrolet Express 1500 Radiator Cap
 Chevrolet Express 1500 Thermostat
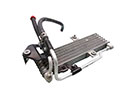 Chevrolet Express 1500 Transmission Oil Cooler
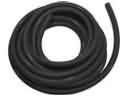 Chevrolet Express 1500 Transmission Oil Cooler Hose