ChevyParts
My Garage
My Account
Cart
OEM Chevrolet K3500 Slip Yoke
Transmission Slip Yoke- Select Vehicle by Model
- Select Vehicle by VIN
Select Vehicle by Model
orMake
Model
Year
Select Vehicle by VIN
For the most accurate results, select vehicle by your VIN (Vehicle Identification Number).
8 Slip Yokes found


Chevrolet K3500 Companion Flange Part Number: 12470387
$142.82 MSRP: $245.28You Save: $102.46 (42%)

Chevrolet K3500 Slip Yoke Part Number: 7848635
$224.12 MSRP: $381.56You Save: $157.44 (42%)Ships in 1-2 Business Days

Chevrolet K3500 Companion Flange Part Number: 88967027
$74.62 MSRP: $118.46You Save: $43.84 (38%)

Chevrolet K3500 Slip Yoke, Front Part Number: 23251196
$223.22 MSRP: $547.98You Save: $324.76 (60%)Ships in 1-2 Business Days
Chevrolet K3500 Slip Yoke Part Number: 15153615

Chevrolet K3500 Companion Flange Part Number: 15634021
$87.96 MSRP: $137.79You Save: $49.83 (37%)
Chevrolet K3500 Companion Flange Part Number: 26016668

Chevrolet K3500 Slip Yoke Part Number: 15582090
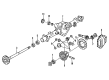
Chevrolet K3500 Slip Yoke
Want to cut long-term maintenance and repair costs? Choose OEM Slip Yoke. Those parts deliver top durability you can trust. On our site, you'll find a huge catalog of genuine Chevrolet K3500 parts. Prices are unbeatable, so you can keep more in your pocket. Every OEM Chevrolet K3500 Slip Yoke includes a manufacturer's warranty. You can also get an easy return policy that keeps buying risk free. Fast delivery, get your car on the road quickly. It's simple to search, compare, and order. Stop guessing about quality or fit. Order today and save with parts that last.
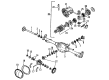
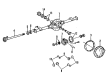
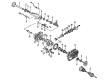
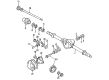
The Chevrolet K3500 Slip Yoke enables years of dependable operation throughout the Chevrolet K3500 model range from 1988 to 2002. A vital linkage between the driveshaft system and transmission or transfer case the Slip Yoke enables axle movement dynamics to ensure smooth vehicle operation in any driving scenario. The Slip Yoke features internal splines that connect perfectly to an output shaft which allows adjustments necessary during driving over different terrain types. The Slip Yoke which Chevrolet produces for K3500 vehicles works with multiple K3500 models through its effective speed fluctuation and torsional vibration control mechanism to boost available operational efficiency and safety. Heavy-duty Chevrolet K3500 drivers must prioritize the use of this component because it guarantees safe operation during their tasks. The Slip Yoke maintains durability well but requires proper maintenance to stop possible damage resulting in clunking sounds and fluid leaks. The Chevrolet K3500 Slip Yoke wins market attention because of its sturdy design together with its strength to resist environmental conditions thus becoming a dependable solution for long-lasting vehicles. The Slip Yoke improves both Chevrolet model driving quality and performance through its combination of cross and roller U-joints with double cardan U-joints which makes it a reliable flagship of the full-size pickup market.
Chevrolet K3500 Slip Yoke Parts and Q&A
- Q: How to service and repair the slip yoke on Chevrolet K3500?A:There are two essential tools required to service and repair the Slip Yoke: u joint bearing separator (J9522-3) and u joint bearing spacer remover (J9522-5). The replacement of a propeller shaft Slip Yoke demands replacing the adjacent Universal Joint for protecting the components from damage. Begin by removing the propeller shaft from its location while placing it horizontally on a clamp at a yoke instead of using a vise clamp for tubing. Apply marks to the propeller shaft for determining its transmission interface and its rear axle interface. The snap rings can be removed using plier pressure on their ends while a gentle tap on the bearing cup helps reduce the pressure inside. Workers should use a 30 mm (1 1/8 inch) socket to support the lower propeller shaft yoke for removing the bearing cup with the u joint bearing separator (J9522-3). The u joint bearing spacer remover (J9522-5) must be inserted between the seal and the bearing cup when the cup fails to come out fully, then the user should continue pressing. Press the opposite bearing cup out of the propeller shaft by rotating the propeller shaft with the intention to discard all reinstallation of Universal Joint components. The cross and Slip Yoke should be removed from the propeller shaft yoke to check for burrs or imperfections in the bearing cup bores. During installation, lubricate each needle bearing before placing one bearing cup half into the propeller shaft yoke. Pass the yoke ear down before inserting the crosspiece along with pressing the bearing cup until it matches the yoke ear position. Complete the same process for the other bearing cup by keeping trunnions facing forward. A technician should press the bearing cup into the yoke ear through the cross while performing installation checks to confirm proper unbinding function. After pressing until the groove of the bearing retainer appears you should place the bearing retainer. Adding chassis grease during installation may help the retainer seating process. To assist retainer seating use a dead blow hammer to apply gentle force on the yoke slightly. The installation process should be performed again for attaching the Universal Joint to the Slip Yoke.


