ChevyParts
My Garage
My Account
Cart
OEM Chevrolet Lumina Door Moldings
- Select Vehicle by Model
- Select Vehicle by VIN
Select Vehicle by Model
orMake
Model
Year
Select Vehicle by VIN
For the most accurate results, select vehicle by your VIN (Vehicle Identification Number).
58 Door Moldings found


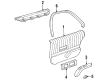
Chevrolet Lumina Body Side Molding, Driver Side Part Number: 10134631

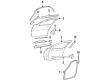
Chevrolet Lumina Window Trim, Passenger Side Part Number: 10226093
Chevrolet Lumina Body Side Molding, Driver Side Part Number: 10134635

Chevrolet Lumina Molding, Rear Passenger Side Part Number: 14107988
Chevrolet Lumina Molding, Rear Driver Side Part Number: 14107989

Chevrolet Lumina Body Side Molding Part Number: 88959069
| Page 1 of 3 |Next >
1-20 of 58 Results
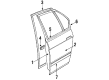
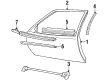
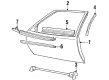
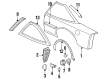
Chevrolet Lumina Door Moldings
Want to cut long-term maintenance and repair costs? Choose OEM Door Moldings. Those parts deliver top durability you can trust. On our site, you'll find a huge catalog of genuine Chevrolet Lumina parts. Prices are unbeatable, so you can keep more in your pocket. Every OEM Chevrolet Lumina Door Moldings includes a manufacturer's warranty. You can also get an easy return policy that keeps buying risk free. Fast delivery, get your car on the road quickly. It's simple to search, compare, and order. Stop guessing about quality or fit. Order today and save with parts that last.
Door Moldings are items that beautify the cars while at the same time serve as a safety feature in Chevrolet Lumina cars. High quality and durable the Door Moldings are made from plastic material or stainless or chrome plated material depending on the specific design to ensure it provides a right protection to the sheet metal part of the car against dings and dents. Chevrolet Lumina comes with different Door Moldings: the side moldings, door edge moldings, and belt moldings that serve different protective purpose, but also complement the car's design to a great extent. The fitting of these Door Moldings has been found suitable for use with different Lumina types across five generations that span between 1989 and 2013. Chevrolet employs them to improve Lumina's functionality by performing shock absorbing and damage reducing functions as well as maintaining the car's integrity. Also, some models of Lumina may be equipped with either body colored rocker panel moldings or optional lower door moldings to provide further protection against dirt. That's why Door Moldings are among the constituent elements of the car that can be considered exclusive, as well as functional in the automotive market. All in all, the Door Moldings are a representation of the company's dedication to superior workmanship, guaranteeing that each Chevrolet Lumina drives home the outstanding quality that customer seek.
Chevrolet Lumina Door Moldings Parts and Q&A
- Q: How to replace the Front Side Door Moldings on Chevrolet Lumina?A:Start by removing the front door outer belt sealing strip before you can replace the front side door opening frame garnish molding. Begin by peeling front door frame molding from the pillar while applying heat to the applique until removal is possible. Dismantle all painted surfaces by rinsing away adhesive residue with a silicone, wax and grease remover. Start by cleaning the surface with a silicone, wax, grease remover followed by application of a 50-50 isopropyl alcohol water mixture then strike the panel with a clean cloth when solvents are still wet before allowing the surface to dry. Placing the front door frame molding facing downward enables access to remove the backing material while you align its opening with the hole at the beltline pillar. The top edge must stay parallel to the door's perimeter. A foaming-type window solution free of ammonia-based wetting substances should provide positioning ease when installing the molding. After setting the molding on the pillar begin from the middle to position it through squeegeeing and maintain additional wetting solution when needed for easier setup. Solutions with soap water applied to the molding's top surface will protect it from damage when using a squeegee tool. Heat gun application for a short time on the molding's top corners along with vertical edges should precede premask removal. Prepare the molding to arch around the pillar's hem flange and front section while heating it until the bonding stays strong. You should complete installation of the front door outer belt sealing strip as your final step.

Related Chevrolet Lumina Parts
 Chevrolet Lumina Door Hinge
 Chevrolet Lumina Door Latch Assembly
 Chevrolet Lumina Door Lock Cylinder
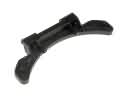 Chevrolet Lumina Fuel Door Hinge
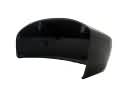 Chevrolet Lumina Mirror Cover
 Chevrolet Lumina Tailgate Lock
 Chevrolet Lumina Trunk Latch
 Chevrolet Lumina Weather Strip
 Chevrolet Lumina Window Channel
 Chevrolet Lumina Window Crank Handles
 Chevrolet Lumina Window Motor
 Chevrolet Lumina Window Regulator