ChevyParts
My Garage
My Account
Cart
OEM Chevrolet Lumina Trunk Latch
Rear Trunk Latch- Select Vehicle by Model
- Select Vehicle by VIN
Select Vehicle by Model
orMake
Model
Year
Select Vehicle by VIN
For the most accurate results, select vehicle by your VIN (Vehicle Identification Number).
5 Trunk Latches found


Chevrolet Lumina Door Jamb Switch Part Number: 25664288
$85.37 MSRP: $128.76You Save: $43.39 (34%)Ships in 1-2 Business Days
Chevrolet Lumina Lock Cylinder Part Number: 12330124
$13.11 MSRP: $18.75You Save: $5.64 (31%)
Chevrolet Lumina Lock, Rear Passenger Side Part Number: 16636578
$91.52 MSRP: $132.09You Save: $40.57 (31%)Ships in 1-3 Business Days


Chevrolet Lumina Lock, Rear Driver Side Part Number: 16636579


Chevrolet Lumina Lock Cylinder, Black, Rear Part Number: 20513755
$35.28 MSRP: $52.51You Save: $17.23 (33%)
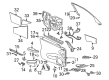
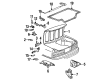
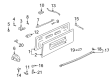
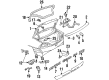
Chevrolet Lumina Trunk Latch
Want to cut long-term maintenance and repair costs? Choose OEM Trunk Latch. Those parts deliver top durability you can trust. On our site, you'll find a huge catalog of genuine Chevrolet Lumina parts. Prices are unbeatable, so you can keep more in your pocket. Every OEM Chevrolet Lumina Trunk Latch includes a manufacturer's warranty. You can also get an easy return policy that keeps buying risk free. Fast delivery, get your car on the road quickly. It's simple to search, compare, and order. Stop guessing about quality or fit. Order today and save with parts that last.
The Chevrolet Lumina Trunk Latch is a part that characterizes the sturdiness and efficiency vital in Chevrolet Lumina range of cars, manufactured between 1989 and 2013. This Trunk Latch attaches to the trunk lid while the check arm holds the trunk closed during a car trip, therefore safeguarding items kept in the trunk from thieves or the harsh weather. This Chevrolet Lumina trunk latch is manufactured with top-tier quality stainless steel material that can endure extremities of weather including stormy winds that could potentially unlock the trunk spoiler and cause your goods to spill over. That is why compatibility with different Lumina models by five generations underlines its role in increasing productivity as well as security. Another innovation that the Chevrolet Lumina has that is similar to a seat belt is that to open the trunk lid, one has to unlock it by pulling the handle that engaged it, making it almost impossible to open from the outside by a determined burglar. Duly, this part has the nomenclature of the Trunk Latch and is imperative to practice routine upkeep of the similar, and in case of early wear and tear, the replacements should also be as soon as possible in order to prevent any mishappenings with the trunk and the belongings inside it. Specifically, the Chevrolet Lumina Trunk Latch can be described as a unique automotive product in the market since it is more reliable in construction and long-lasting compared to other companies' latches used in automobiles, and this is why Lumina car owners trust it. Being one of the significant components of the Chevrolet Lumina, the Trunk Latch plays a signaling role for improving not only the vehicle's driving performance, but also the safety of passengers and their belongings. Altogether, the Chevrolet Lumina Trunk Latch is an irreplaceable detail of the Chevrolet Lumina, being at the same time sturdy, effective, and safe in one simple operating part.
Chevrolet Lumina Trunk Latch Parts Questions & Experts Answers
- Q: How to replace the rear trunk latch on Chevrolet Lumina?A:Begin replacing the rear compartment lid latch by opening the rear area and taking out the rear compartment lock actuator. Mark proper installation points on the rear compartment lid with a grease pencil. Take off the rear compartment bolts and disconnect the electric connector before transferring the lid latch. Reinsert the lid ajar wire and put the rear compartment bolt in place by lining up its locks with the previous marks. Fasten the rear compartment latch bolts at 10 N.m using an accurate torque tool. Complete the job by putting in and locking the rear compartment actuator (Power Trunk / Liftgate Lock Actuator/Service and Repair).

Related Chevrolet Lumina Parts
 Chevrolet Lumina Door Handle
 Chevrolet Lumina Door Lock
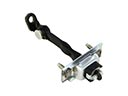 Chevrolet Lumina Door Check
 Chevrolet Lumina Door Latch Assembly
 Chevrolet Lumina Door Lock Actuator
 Chevrolet Lumina Door Moldings
 Chevrolet Lumina Door Striker
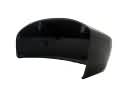 Chevrolet Lumina Mirror Cover
 Chevrolet Lumina Tailgate Latch
 Chevrolet Lumina Tailgate Lock
 Chevrolet Lumina Window Channel
 Chevrolet Lumina Window Regulator