ChevyParts
My Garage
My Account
Cart
OEM Chevrolet Monte Carlo Fan Shroud
Radiator Fan Shroud- Select Vehicle by Model
- Select Vehicle by VIN
Select Vehicle by Model
orMake
Model
Year
Select Vehicle by VIN
For the most accurate results, select vehicle by your VIN (Vehicle Identification Number).
6 Fan Shrouds found


Chevrolet Monte Carlo Fan Shroud Part Number: 89018697
$159.42 MSRP: $304.10You Save: $144.68 (48%)Ships in 1-3 Business Days


Chevrolet Monte Carlo Fan Shroud Part Number: 89019107

Chevrolet Monte Carlo Fan Shroud Part Number: 89018447

Chevrolet Monte Carlo Fan & Motor Part Number: 19130419

Chevrolet Monte Carlo Fan Shroud Part Number: 14013237

Chevrolet Monte Carlo Fan Shroud Part Number: 14013236
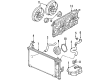
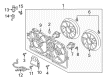
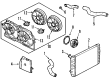
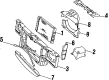
Chevrolet Monte Carlo Fan Shroud
Want to cut long-term maintenance and repair costs? Choose OEM Fan Shroud. Those parts deliver top durability you can trust. On our site, you'll find a huge catalog of genuine Chevrolet Monte Carlo parts. Prices are unbeatable, so you can keep more in your pocket. Every OEM Chevrolet Monte Carlo Fan Shroud includes a manufacturer's warranty. You can also get an easy return policy that keeps buying risk free. Fast delivery, get your car on the road quickly. It's simple to search, compare, and order. Stop guessing about quality or fit. Order today and save with parts that last.
Fan Shroud is one of the vital parts, which makes the cooling system powerful and highly effective on numerous Monte Carlo car models. When employed, the Fan Shroud perfectly shields the blades within to enhance the flow of cold air while cooling the Chevrolet engine foe better efficiency and safety by continuing to run with the proper temperature. This component also safeguards the fan from debris, and this helps in increasing the durability of the cooling system. Over the years of manufacture of the Chevrolet Monte Carlo, it was also marked by the different styles of Fan Shroud according to the engine layout of V6 and V8 which has always been the power plant for the Monte Carlo since the early 1969 till the last model of the year 2007. The changes in the design of each Fan Shroud are a perfect example of adapting to the Monte Carlo's mechanical design, substrate changes in size, shape, and material to optimize air flow and cooling requirements. The Fan Shroud of the Chevrolet Monte Carlo, a car recognized for its luxury and sporting appearance, is one that has stood the test of time in the car market and is still regarded to be one of the best today. Thus, being a powerful part that optimizes the Chevrolet Monte Carlo performance and maintains main components secure from overheating- the Fan Shroud can be considered an essential component for Monte Carlo enthusiasts.
Chevrolet Monte Carlo Fan Shroud Parts Questions & Experts Answers
- Q: How to replace the fan shroud on Chevrolet Monte Carlo?A:The first step to replace the Fan Shroud consists of battery safety by unplugging the negative cable. The j 38185 hose clamp pliers should be used for right and left engine mount strut removal as well as for air cleaner assembly removal. Disconnect transmission oil cooler lines from the retainer clip by the cooling Fan Shroud bottom before removing and the bolt holding the Fan Shroud to the condenser hold down bracket. Remove the Fan Shroud electrical harness first by disconnecting the engine cooling Fan Motor electrical connector along with the bolts and upper support brackets of the radiator before extracting the Fan Shroud from clips on its peripheral wire harness. Begin by extracting the cooling Fan Shroud before proceeding to detach the engine cooling fan heat shield, engine cooling Fan Blade nut, then finally take out the blade itself. Check each cooling Fan Blade to detect bending or cracking while confirming they have no irregularities during smooth surface inspection. First remove the engine cooling Fan Motor bolts before pulling out the Fan Motor from its shroud position. The installation begins with attaching the engine cooling Fan Motor to the Fan Shroud and fastening its bolts to 6 nm (53 inch lbs.) torque settings while the windmill blade needs its nut tightened to exactly 6 nm (53 inch lbs.). The installation process requires the lower edge of the Fan Shroud to lock into the radiator base clip before completing assembly with bolts that need tightening to 10 nm (89 inch lbs.). Cable the cooling fan electrical harness then join the engine cooling Fan Motor electrical connector followed by attaching the Fan Shroud bolt into the condenser hold down bracket (6 Nm torque). Reinstall the upper radiator support brackets and bolts while tightening them to 10 nm (89 inch lbs.), connect the transmission oil cooler lines and replace the air cleaner assembly before reattaching the left and right engine mount struts for closing the negative battery connection and performing a full functional check.

Related Chevrolet Monte Carlo Parts
 Chevrolet Monte Carlo A/C Condenser Fan
 Chevrolet Monte Carlo Coolant Pipe
 Chevrolet Monte Carlo Coolant Reservoir Cap
 Chevrolet Monte Carlo Fan Blade
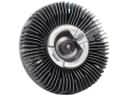 Chevrolet Monte Carlo Fan Clutch
 Chevrolet Monte Carlo Fan Motor
 Chevrolet Monte Carlo Radiator fan
 Chevrolet Monte Carlo Thermostat
 Chevrolet Monte Carlo Thermostat Gasket
 Chevrolet Monte Carlo Water Pump
 Chevrolet Monte Carlo Water Pump Gasket
 Chevrolet Monte Carlo Water Pump Pulley