ChevyParts
My Garage
My Account
Cart
OEM Chevrolet S10 Rocker Arm
Engine Rocker Arm- Select Vehicle by Model
- Select Vehicle by VIN
Select Vehicle by Model
orMake
Model
Year
Select Vehicle by VIN
For the most accurate results, select vehicle by your VIN (Vehicle Identification Number).
8 Rocker Arms found


Chevrolet S10 Rocker Arms Part Number: 10089648
$27.98 MSRP: $43.85You Save: $15.87 (37%)Ships in 1-2 Business Days
Chevrolet S10 Rocker Arms Part Number: 14002446
$13.11 MSRP: $15.11You Save: $2.00 (14%)
Chevrolet S10 Rocker Arms Part Number: 12599650
$57.50 MSRP: $90.07You Save: $32.57 (37%)Ships in 1-3 Business Days
Chevrolet S10 Rocker Arms Part Number: 12510801
$15.11 MSRP: $23.67You Save: $8.56 (37%)Ships in 1-3 Business Days
Chevrolet S10 Rocker Arms Part Number: 94102416

Chevrolet S10 Rocker Arms Part Number: 24575302

Chevrolet S10 Rocker Arms Part Number: 12522105

Chevrolet S10 Rocker Arms Part Number: 10121095
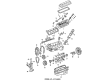
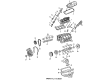
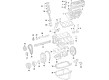
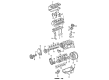
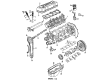
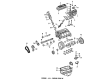
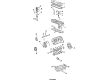
Chevrolet S10 Rocker Arm
Want to cut long-term maintenance and repair costs? Choose OEM Rocker Arm. Those parts deliver top durability you can trust. On our site, you'll find a huge catalog of genuine Chevrolet S10 parts. Prices are unbeatable, so you can keep more in your pocket. Every OEM Chevrolet S10 Rocker Arm includes a manufacturer's warranty. You can also get an easy return policy that keeps buying risk free. Fast delivery, get your car on the road quickly. It's simple to search, compare, and order. Stop guessing about quality or fit. Order today and save with parts that last.
Chevrolet S10 vehicles work through a part called the Rocker Arm that has the responsibility of transferring motion from the pushrod to the intake or exhaust valves which in turn open and shut them. Usually fabricated from stamped steel or aluminum, these forms are vital in transferring the general movement from vertical to the kind of down movement. Various kinds of Rocker Arms, including roller rockers and needle bearings are being used where a minimal amount of friction and wear is desirable, as in high RPM engines. The rocker ratio that specifies the relation between the valve movement and the pushrod movement may be from 1.5/1 to 1.8/1 in modern engines, affecting the engine power. Better fulcrum bearings are also essential for dealing with higher stress in high RPM engines contributing both to power and longevity.
Chevrolet S10 Rocker Arm Parts Questions & Experts Answers
- Q: How to replace the valve rocker arm and push rods on Chevrolet S10?A:Start by removing the valve Rocker Arm cover before replacing the valve Rocker Arm along with push rods. Keep all components organized for future assembly operations while placing appropriate marks on them. After removing the valve rocker arms you should proceed to take out the Rocker Arm supports together with the valve Pushrods while labeling components for reinstallation. Pass all components through cleaning solvent before using compressed air to dry them. Check the valve Pushrod socket contact area for smooth motion and wear near the contact surface together with the roller pivot for damage and binding situations while also verifying the valve stem contact surface and bolt thread conditions. The end surfaces of valve pushrods must undergo inspection for limitations in oil flow and end surface deterioration and bending through flat surface rolling activities. Temporarily check the valve rocker support to identify cases of excessive wear or damage. Installation procedures require parts maintenance of original locations while keeping a logical sequence for their assembly. Operating procedure starts with valve Pushrod installation where you need to align the valve Rocker Arm support arrow in an upward direction before adding the valve Rocker Arm supports. We need to apply prelube gm p/n 12345501 or its equivalent to all three components: the valve Pushrod socket and roller pivot and valve stem tip. Install the valve Rocker Arm assemblies by gently starting the bolts which should be at locations , , , and the remaining bolts. Adjust the crankshaft balancer until the alignment mark reaches 5763 degrees toward the clockwise or counterclockwise direction from the front cover alignment tab. After installing and correctly torquing the valve Rocker Arm assemblies you do not require any further adjustment of valve lash. Complete the procedure by fastening valve Rocker Arm bolts to 30 nm (22 ft. Lbs.) before reinstalling the valve Rocker Arm cover.

Related Chevrolet S10 Parts
 Chevrolet S10 Oil Filter
 Chevrolet S10 Head Gasket
 Chevrolet S10 Valve Cover Gasket
 Chevrolet S10 Balance Shaft Gear
 Chevrolet S10 Camshaft Bearing
 Chevrolet S10 Crankshaft Seal
 Chevrolet S10 Exhaust Valve
 Chevrolet S10 Intake Valve
 Chevrolet S10 Lash Adjuster
 Chevrolet S10 Rocker Shaft Spring Kit
 Chevrolet S10 Rod Bearing
 Chevrolet S10 Timing Cover