ChevyParts
My Garage
My Account
Cart
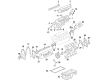
OEM Chevrolet SSR Crankshaft Gear
Crankshaft Timing Gear- Select Vehicle by Model
- Select Vehicle by VIN
Select Vehicle by Model
orMake
Model
Year
Select Vehicle by VIN
For the most accurate results, select vehicle by your VIN (Vehicle Identification Number).
1 Crankshaft Gear found

Chevrolet SSR Timing Gear Part Number: 12556582
$32.07 MSRP: $52.83You Save: $20.76 (40%)Ships in 1-2 Business Days
Chevrolet SSR Crankshaft Gear
Want to cut long-term maintenance and repair costs? Choose OEM Crankshaft Gear. Those parts deliver top durability you can trust. On our site, you'll find a huge catalog of genuine Chevrolet SSR parts. Prices are unbeatable, so you can keep more in your pocket. Every OEM Chevrolet SSR Crankshaft Gear includes a manufacturer's warranty. You can also get an easy return policy that keeps buying risk free. Fast delivery, get your car on the road quickly. It's simple to search, compare, and order. Stop guessing about quality or fit. Order today and save with parts that last.
Chevrolet SSR Crankshaft Gear Parts Questions & Experts Answers
- Q: How to replace the Crankshaft Gear and timing chain sprockets on Chevrolet SSR?A:Begin by eliminating the Oil Pump followed by Crankshaft rotation for alignment with Crankshaft and camshaft sprocket timing marks before performing any further work since post-Timing Chain removal Crankshaft movement endangers piston assemblies and valves. Start by removing the camshaft sprocket bolts then move to disconnect the camshaft sprocket and Timing Chain. A three-jaw puller (J 8433) along with a Crankshaft end protector (J 41816-2) and Crankshaft sprocket remover (J 41558) should be used to detach the Crankshaft sprocket. After sprocket removal, remove the Crankshaft sprocket key if present. A thorough cleaning process should precede sprocket inspecting before you install either component. Index the Crankshaft key in its keyway before tapping both ends to proper position. Position the Crankshaft sprocket at the Crankshaft front by matching the Crankshaft key with the sprocket keyway before fully locking it into position using the j 41665 Crankshaft balancer and sprocket installer (J 41665). Rotate the Crankshaft sprocket until the alignment mark is at the 12 o'clock position, ensuring the camshaft sprocket locating pin aligns with the camshaft sprocket alignment hole, and that the sprocket teeth mesh with the Timing Chain. Align the camshaft and Crankshaft sprocket marks by positioning the camshaft sprocket alignment mark at the 6 o'clock position before installing both sprocket and Timing Chain. Before tightening the camshaft sprocket bolts to 35 nm (26 ft. Lbs.), users can rotate the camshaft or Crankshaft sprockets to achieve proper timing mark alignment. Finally, reinstall the Oil Pump.

Related Chevrolet SSR Parts
 Chevrolet SSR Cam Gear
 Chevrolet SSR Engine Mount
 Chevrolet SSR Engine Mount Bracket
 Chevrolet SSR Fuel Filter
 Chevrolet SSR Intake Valve
 Chevrolet SSR Motor And Transmission Mount
 Chevrolet SSR Oil Pan
 Chevrolet SSR Oil Pan Gasket
 Chevrolet SSR Piston Ring
 Chevrolet SSR Rod Bearing
 Chevrolet SSR Timing Cover Gasket
 Chevrolet SSR Variable Timing Sprocket