ChevyParts
My Garage
My Account
Cart
OEM Chevrolet Suburban 1500 Coil Springs
Strut Spring- Select Vehicle by Model
- Select Vehicle by VIN
Select Vehicle by Model
orMake
Model
Year
Select Vehicle by VIN
For the most accurate results, select vehicle by your VIN (Vehicle Identification Number).
17 Coil Springs found


Chevrolet Suburban 1500 Coil Spring, Front Part Number: 25876860
$70.63 MSRP: $209.04You Save: $138.41 (67%)

Chevrolet Suburban 1500 Coil Spring, Rear Part Number: 25783732
$47.10 MSRP: $139.42You Save: $92.32 (67%)Ships in 1-2 Business Days
Chevrolet Suburban 1500 Coil Spring, Rear Part Number: 22811848
$36.28 MSRP: $69.78You Save: $33.50 (49%)Ships in 1-2 Business Days

Chevrolet Suburban 1500 Coil Spring, Rear Part Number: 25783731


Chevrolet Suburban 1500 Coil Spring, Front Part Number: 20842478


Chevrolet Suburban 1500 Coil Spring, Rear Part Number: 15182555


Chevrolet Suburban 1500 Coil Spring, Front Part Number: 25876854
$95.85 MSRP: $171.17You Save: $75.32 (44%)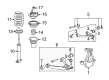
Chevrolet Suburban 1500 Spring, Front Part Number: 25909347
Chevrolet Suburban 1500 Coil Spring, Front Part Number: 25871192
Chevrolet Suburban 1500 Coil Spring, Rear Part Number: 25783733
Chevrolet Suburban 1500 Coil Spring, Rear Part Number: 22811849
Chevrolet Suburban 1500 Coil Spring, Front Part Number: 20842477

Chevrolet Suburban 1500 Coil Spring, Front Part Number: 15760837
Chevrolet Suburban 1500 Coil Spring, Rear Part Number: 15182561
Chevrolet Suburban 1500 Coil Spring, Rear Part Number: 15182557
Chevrolet Suburban 1500 Coil Spring, Rear Part Number: 15115209

Chevrolet Suburban 1500 Coil Spring, Front Part Number: 15032653
Chevrolet Suburban 1500 Coil Springs
Want to cut long-term maintenance and repair costs? Choose OEM Coil Springs. Those parts deliver top durability you can trust. On our site, you'll find a huge catalog of genuine Chevrolet Suburban 1500 parts. Prices are unbeatable, so you can keep more in your pocket. Every OEM Chevrolet Suburban 1500 Coil Springs includes a manufacturer's warranty. You can also get an easy return policy that keeps buying risk free. Fast delivery, get your car on the road quickly. It's simple to search, compare, and order. Stop guessing about quality or fit. Order today and save with parts that last.
Chevrolet Suburban 1500 Coil Springs Parts and Q&A
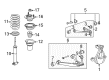
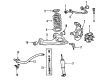
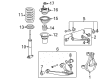
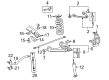
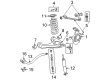
- Q: How to replace the front coil springs on Chevrolet Suburban 1500?A:To replace the front Coil Springs, raise and support the vehicle first. Stated differently, remove the engine protection shield, frame cross bar, tire and wheel assembly, shock absorber, and front stabilizer shaft link. Use the outboard locating tab (15 Series) and the inboard locating tab (25 Series) in order to install the coil spring remover and installer (J23028-15). Put an attachment of retaining hook to the Control Arm and adjust the wing nut till freeplay is reduced for both series. Position the coil spring remover and installer (J23028-01) securely to a suitable transmission jack, raise it so that the yokes found on j23028-01 are aligned with the notches found on j23028-15. Relieve spring tension from the lower Control Arm pivot bolts back by using the two tools and the transmission jack, then the nuts for the lower Control Arm pivot bolts 15 series, then the rear pivot bolt and the front pivot bolt then the same for the 25 self. Pry off the coil spring and lower the transmission jack slightly to unload the front coil spring. Then take off the coil spring and insulator. For installing, please mount the coil spring and insulator to the lower Control Arm, lift up the transmission jack to compress the spring, and use a pry bar to keep the lower Control Arm in place. Perform the installation of the front and rear pivot bolts for both series, then you perform the installation of the lower Control Arm pivot nuts by tightening them to 145 nm (107 ft. Lbs.). Pull the jack down and take off j23028-15 off the Control Arm. The front stabilizer shaft link, the shock absorber, and the tire and wheel assembly will have to be reinstalled. For the 25 series, replace the frame cross bar by tightening the nuts at 100 nm (74 ft. Lbs.) with the engine protection shield. Lastly, remove the safety stands and put the vehicle back down.
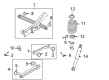
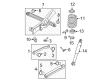
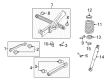
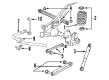
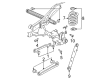
- Q: How to replace the rear coil springs on Chevrolet Suburban 1500?A:First prepare to replace the rear coil spring by supporting the vehicle with stands while also suspending the rear axle. If your vehicle contains a real time damping (RTD) sensor you should disconnect it before continuing. The installation starts by removing the stabilizer shaft link retaining nut from the stabilizer shaft and next taking out the lower shock absorber retaining nut and bolt from the rear axle assembly. Lower the rear axle so springs lose their tension before removing the coil spring together with the upper insulator. Take the following steps to install: position the coil spring and upper insulator followed by axle lift. Tighten the rear axle lower shock absorber retaining nut and bolt to a torque of 95 nm (70 ft. Lbs.). Secure the stabilizer shaft link to its shaft while making sure the inner jam nut reaches maximum contact on its ball stud after applying torque to the lower link nut. The stabilizer shaft link retaining nut requires tightening to 65 nm (48 ft. Lbs.). Lower the vehicle before removing the rear axle support and reconnecting any rtd sensor.


Related Chevrolet Suburban 1500 Parts
 Chevrolet Suburban 1500 Alignment Bolt
 Chevrolet Suburban 1500 Control Arm
 Chevrolet Suburban 1500 Control Arm Bushing
 Chevrolet Suburban 1500 Lateral Arm
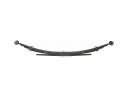 Chevrolet Suburban 1500 Leaf Spring
 Chevrolet Suburban 1500 Leaf Spring Shackle
 Chevrolet Suburban 1500 Ride Height Sensor
 Chevrolet Suburban 1500 Shock Absorber
 Chevrolet Suburban 1500 Suspension Strut Rod
 Chevrolet Suburban 1500 Sway Bar Bushing
 Chevrolet Suburban 1500 Sway Bar Kit
 Chevrolet Suburban 1500 Sway Bar Link