ChevyParts
My Garage
My Account
Cart
OEM Chevrolet Suburban 1500 Oil Pan
Oil Drain Pan- Select Vehicle by Model
- Select Vehicle by VIN
Select Vehicle by Model
orMake
Model
Year
Select Vehicle by VIN
For the most accurate results, select vehicle by your VIN (Vehicle Identification Number).
3 Oil Pans found


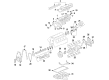
Chevrolet Suburban 1500 Oil Pan Part Number: 12640746
$225.02 MSRP: $383.11You Save: $158.09 (42%)Ships in 1-2 Business Days


Chevrolet Suburban 1500 Oil Pan Part Number: 12609074
$216.08 MSRP: $367.87You Save: $151.79 (42%)Ships in 1-2 Business Days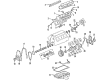
Chevrolet Suburban 1500 Oil Pan Part Number: 12579273
$313.43 MSRP: $538.29You Save: $224.86 (42%)Ships in 1-2 Business Days
Chevrolet Suburban 1500 Oil Pan
Want to cut long-term maintenance and repair costs? Choose OEM Oil Pan. Those parts deliver top durability you can trust. On our site, you'll find a huge catalog of genuine Chevrolet Suburban 1500 parts. Prices are unbeatable, so you can keep more in your pocket. Every OEM Chevrolet Suburban 1500 Oil Pan includes a manufacturer's warranty. You can also get an easy return policy that keeps buying risk free. Fast delivery, get your car on the road quickly. It's simple to search, compare, and order. Stop guessing about quality or fit. Order today and save with parts that last.
Chevrolet Suburban 1500 Oil Pan Parts and Q&A
- Q: How to remove and reinstall the oil pan on Chevrolet Suburban 1500?A:First off remove the left and right closeout covers and bolts and oil level sensor if needed, then remove the Oil Pan. Next, remove Oil Pan by unscrewing Oil Pan bolts and take Oil Pan out carefully, so that no foreign material enter the oil passes and avoid damaging the sealing surface. If necessary, drill out Oil Pan Gasket retaining rivets and remove the gasket, disposed of with the rivets. In the case that the Oil Pan baffle had been removed, insert it and tighten the baffle bolts to 12 nm (106 lb in). Apply a 5 mm (0.2 in) bead of sealant gm p/n 12378521 (Canadian P/N 88901148) to the engine block on tab portions of front and rear cover gaskets which enter the Oil Pan. Accurate the relinquished kinds of the oil gallery passages with the Oil Pan Gasket afterward pre-assemble the gasket to the pan and impose the Oil Pan, gasket, and bolts to the engine cornerstone, and bolt the bolts with your fingers tight. Use a straight edge to make sure that the rear of the engine block and the Oil Pan are flush before tightening the bolts of the Oil Pan-to-block, Oil Pan-to-front cover, bolts at 25 nm (18 lb ft), and the Oil Pan-to-rear cover bolts at 12 nm (106 lb in). Check the alignment of the Oil Pan and engine block, which needs not more than 0,1 mm (0,004 in) gap. If aligning is off-remove Oil Pan-again repeat the process. Lastly, fix the oil level sensor with the help of a wrench, using torque of 13 nm (115 lb in).

Related Chevrolet Suburban 1500 Parts
 Chevrolet Suburban 1500 Camshaft
 Chevrolet Suburban 1500 Crankshaft Gear
 Chevrolet Suburban 1500 Crankshaft Thrust Washer Set
 Chevrolet Suburban 1500 Cylinder Head
 Chevrolet Suburban 1500 Dipstick Tube
 Chevrolet Suburban 1500 Intake Valve
 Chevrolet Suburban 1500 Piston
 Chevrolet Suburban 1500 Piston Ring
 Chevrolet Suburban 1500 Pushrod
 Chevrolet Suburban 1500 Rocker Arm
 Chevrolet Suburban 1500 Valve Cover Gasket
 Chevrolet Suburban 1500 Variable Timing Sprocket