ChevyParts
My Garage
My Account
Cart
OEM Chevrolet Timing Belt Tensioner
Engine Timing Belt Tensioner- Select Vehicle by Model
- Select Vehicle by VIN
Select Vehicle by Model
orMake
Model
Year
Select Vehicle by VIN
For the most accurate results, select vehicle by your VIN (Vehicle Identification Number).
78 Timing Belt Tensioners found


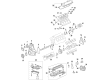
Chevrolet Tensioner Part Number: 12656081
$49.35 MSRP: $83.99You Save: $34.64 (42%)Ships in 1-2 Business DaysProduct Specifications- Other Name: Tensioner Assembly-Timing Chain
- Replaced by: 12636527


Chevrolet Tensioner Part Number: 12363192
$20.26 MSRP: $33.36You Save: $13.10 (40%)Product Specifications- Other Name: Tensioner, Engine Timing
- Replaces: 14062704, 12363155


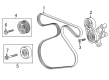
Chevrolet Belt Tensioner Part Number: 12627119
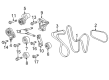
$63.68 MSRP: $109.37You Save: $45.69 (42%)Ships in 1-2 Business DaysProduct Specifications- Other Name: Tensioner Assembly-Drive Belt; Accessory Drive Belt Tensioner Assembly; Serpentine Belt Drive Kit; Serpentine Tensioner; Tensioner, Engine Cooling


Chevrolet Damper Part Number: 12600695
$29.06 MSRP: $47.82You Save: $18.76 (40%)Ships in 1-2 Business DaysProduct Specifications- Other Name: Tensioner, Engine Timing; Timing Chain Tensioner; Belt Tensioner; Tensioner


Chevrolet Timing Tensioner Part Number: 12627109
$43.24 MSRP: $74.26You Save: $31.02 (42%)Ships in 1-2 Business DaysProduct Specifications- Other Name: Tensioner Assembly-Timing Chain; Tensioner; Tensioner, Engine Timing


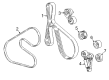
Chevrolet Belt Tensioner Part Number: 10229114
$55.12 MSRP: $93.86You Save: $38.74 (42%)Ships in 1-2 Business DaysProduct Specifications- Other Name: Tensioner, Drive Belt; Serpentine Belt Drive Kit; Fan Belt; Serpentine Tensioner; Tensioner; Tensioner, Engine Cooling

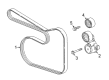
Chevrolet Belt Tensioner Part Number: 12691804
$28.34 MSRP: $44.39You Save: $16.05 (37%)Ships in 1-3 Business DaysProduct Specifications- Other Name: Tensioner Assembly-Drive Belt; Serpentine Belt Drive Kit; Serpentine Tensioner; Tensioner, Engine Cooling

Chevrolet Belt Tensioner Part Number: 25203697
$24.73 MSRP: $38.72You Save: $13.99 (37%)Product Specifications- Other Name: Tensioner, Engine Timing
- Replaced by: 25205813

Chevrolet Tensioner Part Number: 12713640
$46.27 MSRP: $72.47You Save: $26.20 (37%)Ships in 1-3 Business DaysProduct Specifications- Other Name: Tensioner Assembly-Timing Chain; Tensioner, Engine Timing
- Replaces: 12674625

Chevrolet Tensioner Part Number: 91177214
$37.88 MSRP: $60.14You Save: $22.26 (38%)Ships in 1-2 Business DaysProduct Specifications- Other Name: Tensioner, Engine Timing
Chevrolet Timing Tensioner Part Number: 14062704
$20.26 MSRP: $33.36You Save: $13.10 (40%)Ships in 1-2 Business DaysProduct Specifications- Other Name: Tensioner Assembly-Timing Chain; Tensioner
- Replaced by: 12363192

Chevrolet Chain Guide Part Number: 12713639
$39.67 MSRP: $67.54You Save: $27.87 (42%)Ships in 1-3 Business DaysProduct Specifications- Other Name: Tensioner Assembly-Timing Chain; Timing Chain Tensioner; Timing Chain Guide; Tensioner; Tensioner, Engine Timing
- Replaces: 12674624

Chevrolet Timing Tensioner Part Number: 24575512
$29.67 MSRP: $47.59You Save: $17.92 (38%)Ships in 1-2 Business DaysProduct Specifications- Other Name: Tensioner, Engine Timing; Timing Chain Tensioner; Drive Chain Tensioner; Tensioner

Chevrolet Belt Tensioner Part Number: 12693089
$37.31 MSRP: $61.06You Save: $23.75 (39%)Product Specifications- Other Name: Tensioner Assembly-Drive Belt; Serpentine Belt Drive Kit; Serpentine Tensioner; Tensioner, Engine Cooling
- Replaced by: 12735189

Chevrolet Belt Tensioner Part Number: 12678001
$77.59 MSRP: $133.24You Save: $55.65 (42%)Ships in 1-2 Business DaysProduct Specifications- Other Name: Tensioner Assembly-Drive Belt; Serpentine Belt Drive Kit; Serpentine Tensioner; Tensioner, Engine Cooling
- Replaces: 12671629

Chevrolet Belt Tensioner Part Number: 55570067
$46.16 MSRP: $72.31You Save: $26.15 (37%)Product Specifications- Other Name: Tensioner Assembly-Drive Belt; Serpentine Belt Drive Kit; Serpentine Tensioner
- Replaced by: 55517140
Chevrolet Tensioner Part Number: 12673070
$21.55 MSRP: $33.76You Save: $12.21 (37%)Ships in 1-3 Business DaysProduct Specifications- Other Name: Tensioner Kit-Timing Chain (Oil Pump Drive); Tensioner Kit, Engine Timing

Chevrolet Belt Tensioner Part Number: 55504513
$23.02 MSRP: $36.04You Save: $13.02 (37%)Product Specifications- Other Name: Tensioner Assembly-Drive Belt; Serpentine Belt Drive Kit; Serpentine Tensioner; Tensioner, Engine Cooling

Chevrolet Belt Tensioner Part Number: 12708931
$45.28 MSRP: $70.93You Save: $25.65 (37%)Ships in 1-3 Business DaysProduct Specifications- Other Name: Tensioner Assembly-Drive Belt; Serpentine Tensioner; Tensioner, Engine Cooling

Chevrolet Belt Tensioner Part Number: 55516895
$22.89 MSRP: $35.85You Save: $12.96 (37%)Ships in 1-3 Business DaysProduct Specifications- Other Name: Tensioner Assembly-Drive Belt; Serpentine Tensioner; Tensioner, Engine Cooling
- Replaces: 55509808
| Page 1 of 4 |Next >
1-20 of 78 Results
Chevrolet Timing Belt Tensioner
Want to cut long-term maintenance and repair costs? Choose OEM Timing Belt Tensioner. Those parts deliver top durability you can trust. On our site, you'll find a huge catalog of genuine Chevrolet parts. Prices are unbeatable, so you can keep more in your pocket. Every OEM Chevrolet Timing Belt Tensioner includes a manufacturer's warranty. You can also get an easy return policy that keeps buying risk free. Fast delivery, get your car on the road quickly. It's simple to search, compare, and order. Stop guessing about quality or fit. Order today and save with parts that last.
Chevrolet Timing Belt Tensioner Parts Questions & Experts Answers
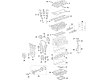
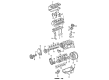
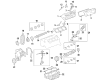
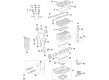
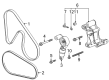
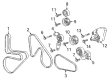
- Q: How to service and repair the timing belt tensioner on Chevrolet Metro?A:The whole sequence to service and repair the Timing Belt tensioner starts with the removal of the Crankshaft Pulley along with its retaining clips and engine wiring harness from the Timing Belt cover and then the coolant pump pulley. Separate the eight bolts and one nut which attach the Timing Belt cover to the vehicle then remove it completely. Rotate the crankshaft by clockwise motion until the alignment appears between timing marks on camshaft gear (1,4) and Crankshaft Gear (2,3). Perform disassembly only when these marks align. You must never operate the camshaft or crankshaft separately when the Timing Belt is removed to avoid causing any harm. First loosen the tensioner bolt with the attached stud before removing the belt from both the crankshaft timing gear and the camshaft timing gear by pressing the tensioner plate upward. The work begins by removing the tensioner plate together with the tensioner then continuing with the removal of tensioner spring and spring damper. Check the Timing Belt for both cracks and signs of wear and do a replacement when necessary while verifying that the Timing Belt tensioner spins smoothly. Secure the tensioner plate to the Timing Belt tensioner before putting the tensioner plate lug into the Timing Belt tensioner hole. Attach the Timing Belt tensioner and tensioner plate to the cylinder block by using one bolt and one stud but do not fully tighten them. The timing plate must run in sync with the tensioner plate movement unless readjusting the tensioner plate lug. Install the Timing Belt by correctly positioning the camshaft timing gear v mark on the cylinder head cover and crankshaft timing gear punch mark on the oil pump case which should match with the arrow mark. Install the Timing Belt by lining up the arrow mark to the crankshaft rotation direction while the number one piston remains at top dead center compression position. The tensioner plate requires upward pressure while you begin installing the Timing Belt on both pulleys by keeping the drive side slack-free. Fit both the tensioner spring and spring damper onto the drive pulley before securing the tensioner stud with hand torque only. The Timing Belt needs to absorb one rotation with clockwise crankshaft motion followed by tightening the Timing Belt tensioner stud to 11 nm (97 inch lbs.) and the Timing Belt tensioner bolt to 27 nm (20 ft. Lbs.). A clockwise half rotation of the crankshaft should validate the positioning of marks number 1 and 2 on both the camshaft and crankshaft. Placing the seal correctly between the coolant pump and oil pump case requires the Timing Belt cover to receive eight bolts and one nut which need tightening to 11 nm (97 inch lbs.). Put on the coolant pump pulley while tightening four bolts to 24 nm (18 ft. Lbs.) and place back the Crankshaft Pulley.
- Q: How to service and repair the timing belt tensioner on Chevrolet Tracker?A:The first step of servicing and repairing the Timing Belt Tensioner requires a negative Battery Cable disconnect. Put on safety equipment before starting the procedure by removing the Crankshaft Pulley then moving to the Timing Belt. First disconnect the Timing Belt Tensioner stud and the Timing Belt Tensioner bolt before extracting the tensioner plate and Timing Belt Tensioner. Install the Timing Belt properly before tightening both the Timing Belt Tensioner stud and bolt according to specification. Fix the Timing Belt Tensioner plate and tensioner to the engine and fasten each component with the Timing Belt Tensioner stud and bolt . The next step after installing the Timing Belt Tensioner plate and bolt should be to install the Timing Belt and Crankshaft Pulley. The Timing Belt installation becomes easier by pushing the Timing Belt Tensioner plate upwards. The process ends with reattaching the negative Battery Cable followed by tightening it to 15 nm (11 ft. Lbs.).


Related Chevrolet Parts
 Chevrolet Crankshaft
 Chevrolet Oil Filler Cap
 Chevrolet Oil Pump Gasket
 Chevrolet Head Gasket
 Chevrolet Camshaft Seal
 Chevrolet Coolant Filter
 Chevrolet Crankshaft Gear
 Chevrolet Engine Torque Strut Mount
 Chevrolet Exhaust Valve
 Chevrolet Piston Ring
 Chevrolet Rocker Guide
 Chevrolet Rocker Shaft Spring Kit
Browse Chevrolet Timing Belt Tensioner by Models
S10 Colorado Tahoe Cruze Malibu Camaro Equinox Impala SS Silverado 1500 Silverado 2500 HD Caprice Cobalt Suburban Traverse Blazer HHR Sonic Tracker Volt Spark Trax Trailblazer Astro Cavalier Corvette Aveo Beretta C1500 C2500 C3500 City Express Corsica Express 1500 Express 2500 Express 3500 G10 G20 G30 K1500 K2500 K3500 Lumina Metro Monte Carlo P30 Prizm S10 Blazer Sprint Lumina APV Trailblazer EXT Aveo5 C1500 Suburban C2500 Suburban Captiva Sport Cruze Limited Impala Limited K1500 Suburban K2500 Suburban Malibu Limited P20 Silverado 1500 LD Silverado 1500 LTD Silverado 3500 HD