ChevyParts
My Garage
My Account
Cart
OEM Chevrolet Metro Timing Belt Tensioner
Engine Timing Belt Tensioner- Select Vehicle by Model
- Select Vehicle by VIN
Select Vehicle by Model
orMake
Model
Year
Select Vehicle by VIN
For the most accurate results, select vehicle by your VIN (Vehicle Identification Number).
2 Timing Belt Tensioners found

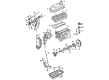
Chevrolet Metro Tensioner Part Number: 96068592

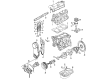
Chevrolet Metro Belt Tensioner Part Number: 91172368
Chevrolet Metro Timing Belt Tensioner
Want to cut long-term maintenance and repair costs? Choose OEM Timing Belt Tensioner. Those parts deliver top durability you can trust. On our site, you'll find a huge catalog of genuine Chevrolet Metro parts. Prices are unbeatable, so you can keep more in your pocket. Every OEM Chevrolet Metro Timing Belt Tensioner includes a manufacturer's warranty. You can also get an easy return policy that keeps buying risk free. Fast delivery, get your car on the road quickly. It's simple to search, compare, and order. Stop guessing about quality or fit. Order today and save with parts that last.
The Timing Belt Tensioner is a part famous for its reliability and performance; it is an essential part of Chevrolet Metro vehicles, determining their efficiency and safety. This tensioner keeps the timing belt tight so it does not slip, and keeps the necessary timing for the proper functioning of the engine. The Timing Belt Tensioner is suitable for Chevrolet Metro various models; it can be sold separately or bundled with comprehensive kits, which are applicable to the fan, the alternator belt, and the air conditioning belt. Initiated in 1998, the Chevrolet Metro is set-apart from proportional autos since it can handle approximately twenty-eight mpg through the city, it has compact design adored by drivers. The Timing Belt Tensioner contributes specifically to the performance of the automobile since the Metro's efficiency mainly depends on the ability of the engine to run without failure. Interestingly, the Timing Belt Tensioner still prevails in the market having a rather substantial pattern known for the greater toughness and suitability for various Metro setups. This component apart from, extending the engine life also minimizes the chances of timing belt failure thus increasing safety. As you would expect with the Timing Belt Tensioner, this is dependable as Chevrolet Metro owners have come to expect form their automobiles.
Chevrolet Metro Timing Belt Tensioner Parts Questions & Experts Answers
- Q: How to service and repair the timing belt tensioner on Chevrolet Metro?A:Service operations for the Timing Belt tensioner start with similar steps involving Crankshaft timing pulley removal together with a complete air cleaner disassembly. You must start by removing the Timing Belt cover through its eight bolts and one nut before taking out the cover. Ariston professional sequence demands that you align both timing marks (1, 2) on the Crankshaft before taking away the Timing Belt. Use your finger to fully elevate the tensioner plate before you disengage the Timing Belt from both the Crankshaft and camshaft Timing Belt pulleys. You should first loosen the belt tensioner's bolt and stud. After removing the Timing Belt it is essential to refrain from turning the camshaft or Crankshaft separately in order to protect the components from damage. Remove the tensioner mechanism together with the plate, spring, and damper while inspecting both the belt and tensioner for replacement criteria. Check their smooth functioning. Install the tensioner plate to the Timing Belt tensioner by placing its lug into the hole of the tensioner. Securing the Timing Belt tensioner and tensioner plate to the cylinder block should be done through one bolt and one stud without complete tightening. The plate must follow the tensioner in motion while checking mark alignment between the camshaft Timing Belt pulley v mark on Timing Belt cover and punch mark on Crankshaft Timing Belt pulley pointing to the arrow on oil pump case. To install the Timing Belt position the arrow mark so it matches the moving direction of the Crankshaft before making sure all timing points align. Set the tensioner plate into position before applying the tensioner spring without Timing Belt slack and tightening its stud manually. The procedure for tensioning the Timing Belt requires rotating the Crankshaft two turns clockwise followed by torquing the tensioner stud to 11 nm (97 inch lbs) and the tensioner bolt to 25 nm (18 ft. Lbs.). The correct alignment of both sets of timing marks must be confirmed along with inspecting the coolant pump-to-oil case seals. Reinstall the Timing Belt cover by inserting eight bolts with one nut then tightening all to 11 nm (97 inch lbs.). Replug the Crankshaft pulley along with the air cleaner assembly.

Related Chevrolet Metro Parts
 Chevrolet Metro Crankshaft Gear
 Chevrolet Metro Crankshaft Seal
 Chevrolet Metro Cylinder Head
 Chevrolet Metro Dipstick
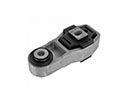 Chevrolet Metro Engine Mount Torque Strut
 Chevrolet Metro Oil Filter
 Chevrolet Metro Oil Pan
 Chevrolet Metro Piston
 Chevrolet Metro Rocker Arm
 Chevrolet Metro Timing Cover
 Chevrolet Metro Timing Cover Gasket
 Chevrolet Metro Valve Stem Oil Seal