ChevyParts
My Garage
My Account
Cart
OEM Chevrolet Metro Piston
Engine Pistons- Select Vehicle by Model
- Select Vehicle by VIN
Select Vehicle by Model
orMake
Model
Year
Select Vehicle by VIN
For the most accurate results, select vehicle by your VIN (Vehicle Identification Number).
3 Pistons found

Chevrolet Metro Piston Part Number: 91177398

Chevrolet Metro Piston Part Number: 91173870

Chevrolet Metro Piston Part Number: 91173869
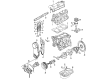
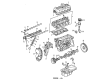
Chevrolet Metro Piston
Want to cut long-term maintenance and repair costs? Choose OEM Piston. Those parts deliver top durability you can trust. On our site, you'll find a huge catalog of genuine Chevrolet Metro parts. Prices are unbeatable, so you can keep more in your pocket. Every OEM Chevrolet Metro Piston includes a manufacturer's warranty. You can also get an easy return policy that keeps buying risk free. Fast delivery, get your car on the road quickly. It's simple to search, compare, and order. Stop guessing about quality or fit. Order today and save with parts that last.
In Chevrolet Metro vehicles, the Piston plays an important function which change the heat energy produced during the combustion process in to the mechanical force requirant to move the car. An important component of internal combustion engine it transmits force due to expanding gases to the crankshaft so that vehicles may move efficiently. Chevrolet Metro Pistons are ordinarily supplied in aluminum alloys so that they are light, strong and durable and there are special high performance versions available that have either forged or billet pistons. There has been the usage of varied type of Pistons in Chevrolet Metro vehicles in the course of the years. Trunk pistons used both in petrol and in diesel engines help to cope side forces and are equipped with oil rings located below the gudgeon pin. In high-speed moving and petrol engines, slipper pistons are utilized to minimal weight, this gives a great balance and efficiency. For this reason, these variations in Piston design assists Chevrolet Metro to deliver enhanced performance and durability in different driving conditions.
Chevrolet Metro Piston Parts Questions & Experts Answers
- Q: How to replace the piston and rod bearing in an engine on Chevrolet Metro?A:The first step when replacing a piston along with connecting rod and bearing starts with fuel pressure relief and negative Battery Cable removal. Once you lift the vehicle with support you must drain all engine coolant along with engine oil into a drain pan. You must take out the front Exhaust Pipe together with sixteen bolts and two nuts along with the crankshaft sensor and the engine Oil Pan. The replacement process begins with bracket bolt removal from the oil pump strainer followed by removing the oil pump strainer and its bolt component and finally extracting the oil pump strainer seal. Start by lowering the vehicle then remove the Timing Belt accompanied by the Intake Manifold and Exhaust Manifold together with the Cylinder Head. Write down cylinder numbers on the piston set, connecting rods and bearing caps before breaking down all engine parts by their cylinder order. Fitting a hose piece over rod bolts threads ensures prevention of damage before removing rod bearing caps. The cylinder bore top surface should be decarbonized before taking out the piston assembly with connecting rod. The j 8037 ring compressor (J 8037) enables installation while engine oil should be applied throughout the process to pistons and rings as well as cylinder walls and connecting rod bearings and crankshaft. Icipants must check that the piston arrow mark should face toward the crankshaft timing pulley section during installation. Use the j 8037 ring compressor to guide the connecting rod into position by inserting it into the cylinder bore using the j 8037. Gently tap the piston head while aligning it with the rest of the components before attaching the lower connecting rod bearing to the connecting rod cap. Together secure the connecting rod cap through two nuts before tightening them to 35 nm (26 ft. Lbs.). The replacement begins with positioning the new Cylinder Head gasket where the word top marks face the Cylinder Head. Installation continues with the Cylinder Head followed by Timing Belt then Intake Manifold and Exhaust Manifold and concluding with oil pump strainer and engine Oil Pan. Place the engine oil Drain Plug gaskets followed by tightening the Drain Plug at 35 nm (26 ft. Lbs.). The procedure concludes with attaching the negative battery wire followed by engine oil refilling to recommended levels and beginning the engine while inspecting for exhaust leaks along with oil pressure control.

Related Chevrolet Metro Parts
 Chevrolet Metro Crankshaft Pulley
 Chevrolet Metro Engine Mount
 Chevrolet Metro Exhaust Valve
 Chevrolet Metro Harmonic Balancer
 Chevrolet Metro Lash Adjuster
 Chevrolet Metro Motor And Transmission Mount
 Chevrolet Metro Oil Filter
 Chevrolet Metro Oil Pump
 Chevrolet Metro Rocker Shaft Spring Kit
 Chevrolet Metro Timing Belt
 Chevrolet Metro Timing Belt Tensioner
 Chevrolet Metro Valve Stem Oil Seal