ChevyParts
My Garage
My Account
Cart
OEM Chevrolet Tracker Camshaft
Cam- Select Vehicle by Model
- Select Vehicle by VIN
Select Vehicle by Model
orMake
Model
Year
Select Vehicle by VIN
For the most accurate results, select vehicle by your VIN (Vehicle Identification Number).
9 Camshafts found


Chevrolet Tracker Idler Gear Shaft Part Number: 91174419

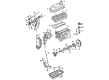
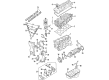
Chevrolet Tracker Camshaft Part Number: 96068589

Chevrolet Tracker Camshaft Part Number: 91177427

Chevrolet Tracker Camshaft Part Number: 91177426

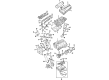
Chevrolet Tracker Camshaft Part Number: 91177425

Chevrolet Tracker Camshaft Part Number: 91177424
Chevrolet Tracker Camshaft Part Number: 91177423
Chevrolet Tracker Camshaft Part Number: 91177422


Chevrolet Tracker Camshaft Part Number: 91174414
Chevrolet Tracker Camshaft
Want to cut long-term maintenance and repair costs? Choose OEM Camshaft. Those parts deliver top durability you can trust. On our site, you'll find a huge catalog of genuine Chevrolet Tracker parts. Prices are unbeatable, so you can keep more in your pocket. Every OEM Chevrolet Tracker Camshaft includes a manufacturer's warranty. You can also get an easy return policy that keeps buying risk free. Fast delivery, get your car on the road quickly. It's simple to search, compare, and order. Stop guessing about quality or fit. Order today and save with parts that last.
Camshaft on the Chevrolet Tracker helps it to control the intake and exhaust valves directing airflow into the cylinder matter for combustion. OHV is used in some motorcycle engines, some motorcycle engines have SOHC, and others have DOHC to provide more varieties for the desired engine performance. With the help of such parameters as lift, duration or separation angle of the lobe, camshaft can control the power and RPM. There are superior performance camshafts that can be installed to improve engine capacity with regard to the desired level of performance and other alterations. All in all, the camshaft is the essential part, responsible for directly delivering the overall output and effectiveness of a Chevrolet Tracker vehicle.
Chevrolet Tracker Camshaft Parts Questions & Experts Answers
- Q: How to replace the intake camshaft and lash adjusters on Chevrolet Tracker?A:The replacement process for the intake camshaft with lifters requires users to start by disconnecting the negative Battery Cable. The technique includes removing the Timing Chain housing together with the camshaft Timing Chain as well as the intake camshaft sprocket. The 90-degree Crankshaft rotation helps avoid interference then workers need to unscrew each intake camshaft bearing cap before extracting them sequentially with the intake camshaft. Staff should store the valve lifters with engine oil on the camshaft bottom side until installation while avoiding any disassembly or forced manipulation. In order to evaluate camshaft lobe height use combimike micrometer (J 26900-2) and replace the camshaft if any lobe measurement falls below 40.202 mm (1.5827 inch). The dial indicator set (J 8001) along with magnetic indicator base (J 26900-13) must measure runout on v-blocks placed camshaft. Additional replacement of the camshaft should happen when runout measures beyond 0.10 mm (0.0039 inch). The analysis of bearing caps and journals indicates that replacing the Cylinder Head with bearing caps must occur when significant wear appears. Insert the camshaft in position without rotation when using the gauging plastic. After tightening the camshaft bearing cap bolts to 11 nm (97 inch lbs.) in three successive steps measure the gauging plastic to check oil clearance. The measurement of the journal outside diameter with combimike micrometer (J 26900-2) should be done after removing the camshaft when the gauging plastic indicates oil clearance goes beyond maximum specifications. Determine which worn-out part needs replacement from the damaged components. Check the valve lifters using the combimike micrometer (J 26900-2) to determine their wear condition before measuring the lifter-to-bore clearance against specified measurements. The presence of excessive oil clearance requires either replacement of the lifters or the Cylinder Head according to need. The oil control valve in the Cylinder Head must remain completely clean. Before valve lifter installation apply engine oil inside the bore while placing lifters back into their original positions with Crankshaft keyway at the timing mark. The camshaft needs engine oil applications on its journals and lobes before installation during the next step along with bearing cap tightening to 11 nm (97 inch lbs.) in stages. The first step is placing the intake camshaft sprocket alongside the Timing Chain. Then install the Timing Chain housing. When operating the valves following installation users must wait 30 minutes until the values settle before starting the engine at 2000 rpm to remove trapped air from the lifters. Reconnect the negative battery terminal before inspecting the timing of the ignition system (if needed).

Related Chevrolet Tracker Parts
 Chevrolet Tracker Harmonic Balancer
 Chevrolet Tracker Cam Gear
 Chevrolet Tracker Crankshaft Gear
 Chevrolet Tracker Crankshaft Seal
 Chevrolet Tracker Crankshaft Thrust Washer Set
 Chevrolet Tracker Cylinder Head
 Chevrolet Tracker Engine Mount Bracket
 Chevrolet Tracker Intake Valve
 Chevrolet Tracker Oil Pump
 Chevrolet Tracker Oil Pump Rotor Set
 Chevrolet Tracker Rocker Shaft Spring Kit
 Chevrolet Tracker Timing Chain Tensioner