ChevyParts
My Garage
My Account
Cart
OEM Chevrolet Tracker Rod Bearing
Engine Connecting Rod Bearing- Select Vehicle by Model
- Select Vehicle by VIN
Select Vehicle by Model
orMake
Model
Year
Select Vehicle by VIN
For the most accurate results, select vehicle by your VIN (Vehicle Identification Number).
2 Rod Bearings found

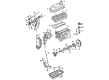
Chevrolet Tracker Connecting Rod Bearing Part Number: 96063386
$8.61 MSRP: $49.26You Save: $40.65 (83%)Ships in 1-2 Business Days
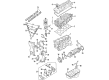
Chevrolet Tracker Bearings Part Number: 91177272
Chevrolet Tracker Rod Bearing
Want to cut long-term maintenance and repair costs? Choose OEM Rod Bearing. Those parts deliver top durability you can trust. On our site, you'll find a huge catalog of genuine Chevrolet Tracker parts. Prices are unbeatable, so you can keep more in your pocket. Every OEM Chevrolet Tracker Rod Bearing includes a manufacturer's warranty. You can also get an easy return policy that keeps buying risk free. Fast delivery, get your car on the road quickly. It's simple to search, compare, and order. Stop guessing about quality or fit. Order today and save with parts that last.
Chevrolet Tracker Rod Bearing Parts Questions & Experts Answers
- Q: How to replace the rod bearing in an engine on Chevrolet Tracker?A:To remove the Piston, connecting rod, and bearing, start with the removal of the Cylinder Head from the cylinder block, the Oil Pan, and the oil pump strainer. With a ridge reamer, get rid of any ridge and carbon on the top of the cylinder bore to avoid damage on the Piston Ring lands. Mark the cylinder number on the pistons, on the connecting rods, and connecting Rod Bearing caps. Take off the twc nuts and the connecting Rod Bearing cap and place a piece of hose over connecting rod studs to prevent damage to the Crankshaft and cylinder wall with the Piston and connecting rod pulling out of the cylinder bore. Then break down and examine Piston and connecting rod assembly, followed by choosing a corresponding connecting Rod Bearing and Piston. Paint a thin layer of clean engine oil on the pistons, rings, cylinder walls along with the connecting rod bearings, and the crank pins. Attach a hose piece again over the connecting rod studs to avoid slinging while mounting. Make sure the arrow mark on the top side of the Piston is aimed at the Crankshaft pulley side. Use a j 8037 ring compressor (J 8037) for compressing the Piston rings and the installation of Piston and connecting rod into the cylinder bore. Tap the Piston head with hammer handle while keeping on pressing the j 8037 firmly against the top of the cylinder block until all Piston rings are seated in the cylinder bore. Demount the hose pieces from the bolt of the connecting rod and then mount the connecting Rod Bearing cap then secure the twc nuts, to tighten to 35nm (26 ft. Lb.). In conclusion, replace the engine Oil Pan and the Cylinder Head onto the cylinder block.

Related Chevrolet Tracker Parts
 Chevrolet Tracker Timing Chain
 Chevrolet Tracker Dipstick
 Chevrolet Tracker Coolant Filter
 Chevrolet Tracker Crankshaft
 Chevrolet Tracker Crankshaft Gear
 Chevrolet Tracker Crankshaft Seal
 Chevrolet Tracker Engine Mount
 Chevrolet Tracker Oil Filler Cap
 Chevrolet Tracker Oil Pump
 Chevrolet Tracker Timing Belt
 Chevrolet Tracker Timing Cover Gasket
 Chevrolet Tracker Variable Timing Sprocket