ChevyParts
My Garage
My Account
Cart
OEM Chevrolet Tracker Piston
Engine Pistons- Select Vehicle by Model
- Select Vehicle by VIN
Select Vehicle by Model
orMake
Model
Year
Select Vehicle by VIN
For the most accurate results, select vehicle by your VIN (Vehicle Identification Number).
6 Pistons found

Chevrolet Tracker Piston Part Number: 91177383
$5.68 MSRP: $130.17You Save: $124.49 (96%)Ships in 1-2 Business Days
Chevrolet Tracker Piston Part Number: 91177380
$14.99 MSRP: $114.41You Save: $99.42 (87%)Ships in 1-2 Business Days
Chevrolet Tracker Piston Part Number: 91173287
$8.49 MSRP: $121.59You Save: $113.10 (94%)Ships in 1-2 Business Days
Chevrolet Tracker Piston Part Number: 91177384
Chevrolet Tracker Piston Part Number: 91177381

Chevrolet Tracker Piston Part Number: 91173286
Chevrolet Tracker Piston
Want to cut long-term maintenance and repair costs? Choose OEM Piston. Those parts deliver top durability you can trust. On our site, you'll find a huge catalog of genuine Chevrolet Tracker parts. Prices are unbeatable, so you can keep more in your pocket. Every OEM Chevrolet Tracker Piston includes a manufacturer's warranty. You can also get an easy return policy that keeps buying risk free. Fast delivery, get your car on the road quickly. It's simple to search, compare, and order. Stop guessing about quality or fit. Order today and save with parts that last.
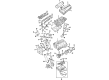
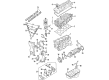
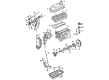
Piston in Chevrolet Tracker is a part of the internal combustion engines which is very effective in the transformation of combustion power into the energy needed to power the vehicle. It functions by transmitting power from the expanding gases to the crankshaft for a proper running of the engine. Conventionally made from aluminum alloys, for their strength and low weight, the blown design incorporates gas-tight piston rings. Various piston styles have been used in Tracker vehicles over the years these include trunk pistons for both petrol and diesel engines which provide side force and features oil rings. Also, racing pistons have more protection with lightweight and high strength to achieve required RPM. There are also certain adaptations such as cross head and slipper piston that are also used in some special applications since owing to their special design they facilitate better lubrication and lesser friction which is quite effective for a vehicle.
Chevrolet Tracker Piston Parts and Q&A
- Q: How to service and repair the piston on Chevrolet Tracker?A:One must acquire a Piston Ring compressor (J8037) as the initial tool before commencing Piston maintenance. Begin your repair work by taking off the Cylinder Head from the cylinder block before proceeding to remove the Oil Pan together with the oil pump strainer. A ridge reamer should remove ridges along with carbon deposits from the cylinder bore top to avoid harming Piston Ring lands. Draw a cylinder label directly on each Piston and connecting rod and connecting Rod Bearing cap. Use hose pieces wrapped over connecting rod studs to shield the Crankshaft and cylinder wall while extracting the Piston and connecting rod from the cylinder bore. After this detach the two nuts and the connecting Rod Bearing cap. The mechanic should take apart the Piston and connecting rod components for inspection before picking the right connecting Rod Bearing along with Piston. Use clean engine oil to coat the components including pistons and rings and cylinder walls as well as connecting rod bearings and crank pins. An additional hose must cover the connecting rod studs when you install them to protect against potential installation damage. Position the arrow mark located on top of the Piston towards the Crankshaft Pulley direction. The Piston Ring compressor (J8037) should be utilized to compress Piston rings followed by Piston and connecting rod installation into the cylinder bore. Strike the Piston head with a hammer handle while holding the Piston Ring compressor (J8037) on top of the cylinder block until all Piston rings locate correctly. Screw the connecting rod bolts to the rod cap while using two nuts that need tightening to 35 nm (26 ft. Lbs.). The last part involves installing the engine Oil Pan along with the Cylinder Head onto the cylinder block.
- Q: How to replace the piston, connecting rod, and bearing in an engine on Chevrolet Tracker?A:After removing the Cylinder Head from the cylinder block maintain this order: Oil Pan removal and oil pump strainer removal. An appropriate tool known as the ridge reamer removes top cylinder bore carbon to eliminate ridges which prevents ring land damage. Write down the cylinder identifier on all three parts including connecting Rod Bearings and connecting Rod Bearing caps. During Piston and connecting rod removal from the cylinder bore protect the components by placing a hose over the connecting rod studs after removing twc nuts and the connecting Rod Bearing cap. Examine the Piston and connecting rod assembly before picking the correct connecting Rod Bearing while also selecting the suitable Piston. Clean engine oil receives a thin layer application on pistons rings cylinder walls connecting rod bearings and crank pins. Put another piece of hose over the connecting rod studs before putting the rod in place to reduce installation-related damage. Check that the arrow mark on the Piston's top faces toward the Crankshaft pulley position. The j 8037 ring compressor (J 8037) assists in compressing Piston Rings before you place the Piston and connecting rod inside the cylinder bore. Use a hammer handle to tap the Piston as you smoothly push the j 8037 against the cylinder block's top until all rings reach the cylinder bore position. For connecting rod bolt removal, fasten the Rod Bearing cap to the assembly with twc nuts after wiping off the hose pieces. Tighten these nuts to 35 nm (26 ft. Lbs.). After completing these steps install both the engine Oil Pan and the Cylinder Head onto the cylinder block.

Related Chevrolet Tracker Parts
 Chevrolet Tracker Timing Chain
 Chevrolet Tracker Cam Gear
 Chevrolet Tracker Camshaft
 Chevrolet Tracker Coolant Filter
 Chevrolet Tracker Crankshaft Seal
 Chevrolet Tracker Crankshaft Thrust Washer Set
 Chevrolet Tracker Engine Mount
 Chevrolet Tracker Intake Valve
 Chevrolet Tracker Motor And Transmission Mount
 Chevrolet Tracker Oil Pan Baffle
 Chevrolet Tracker Rod Bearing
 Chevrolet Tracker Timing Cover Gasket