ChevyParts
My Garage
My Account
Cart
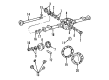
OEM Chevrolet Trailblazer Differential
Front Differential- Select Vehicle by Model
- Select Vehicle by VIN
Select Vehicle by Model
orMake
Model
Year
Select Vehicle by VIN
For the most accurate results, select vehicle by your VIN (Vehicle Identification Number).
11 Differentials found


Chevrolet Trailblazer Differential Case, Front Rear Part Number: 19244836
$734.50 MSRP: $1160.91You Save: $426.41 (37%)

Chevrolet Trailblazer Differential Assembly Part Number: 42789511
$1420.18 MSRP: $1827.77You Save: $407.59 (23%)Ships in 1-3 Business Days
Chevrolet Trailblazer Differential Case Part Number: 84554713
$601.40 MSRP: $1023.90You Save: $422.50 (42%)


Chevrolet Trailblazer Differential Case Part Number: 19256751

Chevrolet Trailblazer Carrier Case, Front Part Number: 19153444

Chevrolet Trailblazer Differential Case Part Number: 12479123


Chevrolet Trailblazer Differential Case Part Number: 12479021

Chevrolet Trailblazer Differential Case Part Number: 19208896

Chevrolet Trailblazer Axle Assembly Part Number: 15931325
Chevrolet Trailblazer Axle Assembly, Front Part Number: 15931324
Chevrolet Trailblazer Axle Assembly, Front Part Number: 15931322
Chevrolet Trailblazer Differential
Want to cut long-term maintenance and repair costs? Choose OEM Differential. Those parts deliver top durability you can trust. On our site, you'll find a huge catalog of genuine Chevrolet Trailblazer parts. Prices are unbeatable, so you can keep more in your pocket. Every OEM Chevrolet Trailblazer Differential includes a manufacturer's warranty. You can also get an easy return policy that keeps buying risk free. Fast delivery, get your car on the road quickly. It's simple to search, compare, and order. Stop guessing about quality or fit. Order today and save with parts that last.
The Chevrolet Trailblazer has an application of a differential which is an essential part of the vehicle's drive train system with responsibility of distributing power from the engine to the driving wheels. This mechanism is important for enabling the wheels to rotate at different speeds, as is very necessary during turning where the inner wheel should rotate faster than the outside wheel to ensure that the car is well grounded. The various kinds of differentials that have been used in Chevrolet Trailblazer models for the years are open and limited slip differential (LSD). Open differential allows for different wheels' rotational speed and distributes the torque on both wheels evenly. On the other hand, the LSD, applied to some Chevrolet Trailblazer versions, distributes torque not equally, but distributes it to the wheel with the better purchase, which improves the car's handling on slippery surface. Just like any other differential type the Chevrolet Trailblazer has its strengths and weaknesses for the various types of d differentials. The open differential is premier on the smooth roads but it can be difficult on the muddy areas as the power will be transferred to the wheel with the least traction. In the Chevrolet Trailblazer, the LSD will be able to enhance the grip of drive by increasing power to a single wheel with more grip but it may lack when it comes to moving out on slippery roads. It is recommended that the Chevrolet Trailblazer's differential is serviced and checked on a regular basis to enhance its durability and efficiency no matter the kind of differential used to avoid typical problems like for instance the depletion of the fluid or maybe general wearing off of of its parts.
Chevrolet Trailblazer Differential Parts Questions & Experts Answers
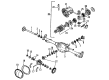
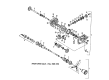
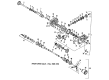
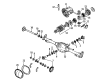
- Q: How to disassemble the differential carrier assembly on Chevrolet Trailblazer?A:In order to disassemble the Differential carrier assembly, first remove the drain from the axle and drain the axle lubricant, check the oil and case for metal chips to identify where the problems are. Use an inch-pound torque wrench to measure the rotating torque of the pinion and Differential case. Start the disassembly process by installing the j 29369-1/ j 02619-1/ to the inboard side seal and remove the seal by pulling the j 02619-1. Repeating the same process for the outboard side seal using the j 29369-2 and ja 02619-1. Then unbolt the half for the Differential carrier and take the halves off to get to the Differential case assembly. Remove the left side Differential bearing adjuster using the tool j 42213 (Adjuster Sleeve Socket) labeling it, followed by the removal of the left side Differential bearing cup. Do the same for the right side with j 45224 (Side Bearing Adjustment Wrench) to unbolt the right side of the Differential bearing adjuster and cup. Take the rotating torque of the drive pinion and note it down. Attach the j 8614-01 (Flange and Pulley Holding Tool) unto the pinion yoke and unfasten the pinion nut while gripping it. Remove the pinion yoke, washer, and the drive pinion using the j 45234, (Pinion Remover). Carefully remove the dust deflator from the pinion yoke and pinion oil seal along with the outer Pinion Bearing incident to the removal. First, install the j 22912-01 (Split-Plate Bearing Puller) between the Pinion Bearing and pinion gear and remove the inner Pinion Bearing using the j 22912-01 and h bundle hydraulic press. Take out the pinion gear selectable shim and install the j 45228-4 (Pinion Bearing Cup Remover/Installer) to the Pinion Bearing cup. Remove the outer Pinion Bearing cup with the help of the j 45228-1 and j 45228-5 by turning the latter clockwise. Lastly install the j 45228-4 on the inner Pinion Bearing cup and with the help of j 45228-1 and j 45228-5 to remove the outer Pinion Bearing cup rotating the j45228-5 clockwise.

Related Chevrolet Trailblazer Parts
 Chevrolet Trailblazer Differential Bearing
 Chevrolet Trailblazer Differential Cover
 Chevrolet Trailblazer Differential Seal
 Chevrolet Trailblazer Driveshaft Yokes
 Chevrolet Trailblazer Pinion Bearing
 Chevrolet Trailblazer Pinion Washer
 Chevrolet Trailblazer Slip Yoke
 Chevrolet Trailblazer Universal Joint
 Chevrolet Trailblazer Wheel Seal