ChevyParts
My Garage
My Account
Cart
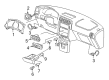
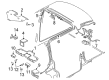
OEM Chevrolet Venture A/C Switch
Air Conditioning Switch- Select Vehicle by Model
- Select Vehicle by VIN
Select Vehicle by Model
orMake
Model
Year
Select Vehicle by VIN
For the most accurate results, select vehicle by your VIN (Vehicle Identification Number).
10 A/C Switches found

Chevrolet Venture Heater Control Part Number: 10338468
$162.05 MSRP: $479.66You Save: $317.61 (67%)

Chevrolet Venture Heater Control Part Number: 10338466

Chevrolet Venture Control Module Part Number: 10414420
Chevrolet Venture Heater Control Part Number: 9364251
Chevrolet Venture Heater Control Part Number: 9364241

Chevrolet Venture Blower Motor Switch Part Number: 19131601

Chevrolet Venture Temperature Control Switch Part Number: 16203804
Chevrolet Venture Heater Control Part Number: 10448415
Chevrolet Venture Heater Control Part Number: 10448412

Chevrolet Venture Control Module Part Number: 10312688
Chevrolet Venture A/C Switch
Want to cut long-term maintenance and repair costs? Choose OEM A/C Switch. Those parts deliver top durability you can trust. On our site, you'll find a huge catalog of genuine Chevrolet Venture parts. Prices are unbeatable, so you can keep more in your pocket. Every OEM Chevrolet Venture A/C Switch includes a manufacturer's warranty. You can also get an easy return policy that keeps buying risk free. Fast delivery, get your car on the road quickly. It's simple to search, compare, and order. Stop guessing about quality or fit. Order today and save with parts that last.
Chevrolet Venture A/C Switch Parts Questions & Experts Answers
- Q: How to replace the A/C Switch control assembly on Chevrolet Venture?A:Begin HVAC control assembly replacement by removing the instrument panel accessory trim plate followed by removal of screws that secure the HVAC control assembly. The HVAC control assembly needs to be first pulled towards the instrument panel opening before the vacuum and electrical connections are detached to proceed with removal. Follow the Fastener Notice in Service Precautions while installing by attaching vacuum and electrical connectors to the FAAHV control assembly and pushing the assembly into the dash opening. Install retaining screws that hold the HVAC control assembly while tightening them to 2.5 N.m (22 lb in) before installing the instrument panel accessory trim plate.

Related Chevrolet Venture Parts
 Chevrolet Venture Heater Core
 Chevrolet Venture A/C Clutch
 Chevrolet Venture A/C Compressor
 Chevrolet Venture A/C Compressor Cut-Out Switches
 Chevrolet Venture A/C Expansion Valve
 Chevrolet Venture A/C Hose
 Chevrolet Venture A/C Idler Pulley
 Chevrolet Venture A/C System Valve Core
 Chevrolet Venture Ambient Temperature Sensor
 Chevrolet Venture Blend Door Actuator
 Chevrolet Venture Blower Control Switches
 Chevrolet Venture Blower Motor Resistor