ChevyParts
My Garage
My Account
Cart
OEM GMC C2500 A/C Hose
Air Conditioning Hose- Select Vehicle by Model
- Select Vehicle by VIN
Select Vehicle by Model
orMake
Model
Year
Select Vehicle by VIN
For the most accurate results, select vehicle by your VIN (Vehicle Identification Number).
32 A/C Hoses found

GMC C2500 A/C Line Part Number: 15599094

GMC C2500 A/C Hose Part Number: 15630344
GMC C2500 A/C Line Part Number: 15551630
GMC C2500 A/C Line Part Number: 15669969

GMC C2500 A/C Tube Part Number: 15568998
GMC C2500 A/C Hose Part Number: 15630345

GMC C2500 A/C Hose Part Number: 15551664
GMC C2500 A/C Hose Part Number: 15551667
GMC C2500 A/C Hose Part Number: 15630346
GMC C2500 A/C Hose Part Number: 15992158
GMC C2500 A/C Hose Part Number: 15691941

GMC C2500 A/C Hose Part Number: 15551671
GMC C2500 A/C Hose Part Number: 15551668
GMC C2500 A/C Hose Part Number: 15630343
GMC C2500 A/C Hose Part Number: 15646383
GMC C2500 A/C Hose Part Number: 15691884
GMC C2500 A/C Hose Part Number: 15551665
GMC C2500 A/C Hose Part Number: 15691882
GMC C2500 A/C Hose Part Number: 15693716
GMC C2500 A/C Hose Part Number: 15987794
| Page 1 of 2 |Next >
1-20 of 32 Results
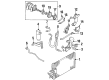
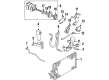
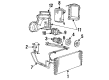
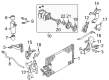
GMC C2500 A/C Hose
Want to cut long-term maintenance and repair costs? Choose OEM A/C Hose. Those parts deliver top durability you can trust. On our site, you'll find a huge catalog of genuine GMC C2500 parts. Prices are unbeatable, so you can keep more in your pocket. Every OEM GMC C2500 A/C Hose includes a manufacturer's warranty. You can also get an easy return policy that keeps buying risk free. Fast delivery, get your car on the road quickly. It's simple to search, compare, and order. Stop guessing about quality or fit. Order today and save with parts that last.
The GMC C2500 A/C Hose is a crucial piece in the effectiveness of the air conditioner system in the GMC C2500 since it is used to transport refrigerants from the compressor to other areas of the A/C system. This a/c hose specialized in it's reliability and performance, utilizing hard fitting made of aluminum, which complements the high pressured beat carried by refrigerant in gaseous form to avoid leakage and capable of efficient functionality. The General Motors or GMC C2500 was manufactured from 1960 to 1998 and is a full-size truck characterized by high holiness; the A/C Hose is compatible with many C2500 models, trims Base, Deluxe, Custom, Sierra, and Sierra Grande. This compatibility improves the performance and reliability of the vehicle, and ensures that the occupants' environment inside the cabin is well regulated no matter the prevailing conditions. The GMC C2500 A/C Hose enjoy a highly rated reputation for manufacture and durability in relation to the automotive market because it plays a pivotal role in enhancing the durability of the air conditioning system needed in today's vehicles. Thus, it can be added that A/C Hose effectively controls the flow of refrigerant and, therefore, is critical for the operation of the GMC C2500: every owner should attend to this component to ensure that the truck remains functional and comfortable. Thanks to this, the C2500 A/C Hose is a true masterpiece of the GMC brand showing how innovative and durable it can be in the segment of vehicles.
GMC C2500 A/C Hose Parts Questions & Experts Answers
- Q: How to replace the A/C Hose Assembly on GMC C2500?A:The process to replace the compressor hose assembly begins by recovering all refrigerant material. The first step to replace the compressor hose assembly requires removal of the securing bolt on the refrigerant hose which precedes disconnecting the hose from both the compressor and accumulator through the nut. The procedure starts with removing the upper radiator baffle then removing the condenser nut before disconnecting the condenser hose. The air conditioning compressor/condenser hose assembly requires removal as you disconnect the automatic recirculation electrical connector from the compressor/condenser hose and discard the old sealing washers and secure system openings with caps. You should start by mounting the a/c compressor/condenser hose assembly before connecting the automatic recirculation electrical connector to the compressor/condenser hose. The condenser hose installation requires new sealing washers before attaching the hose and torquing the condenser nut to 16 n.m (12 lb ft). Install the upper radiator baffle before you attach the hose to the accumulator with new sealing washers and secure the nut at the accumulator by tightening it to 16 n.m (12 lb ft). The last step involves inserting the refrigerant hose mounting bolt while torquing it to 34 n.m (25 lb ft) before performing a/c system recharge inspections for leaks.

Related GMC C2500 Parts
 GMC C2500 A/C Accumulator
 GMC C2500 A/C Compressor
 GMC C2500 A/C Condenser
 GMC C2500 A/C Idler Pulley
 GMC C2500 A/C Switch
 GMC C2500 A/C System Valve Core
 GMC C2500 Blend Door Actuator
 GMC C2500 Blower Motor
 GMC C2500 Evaporator
 GMC C2500 HVAC Pressure Switch
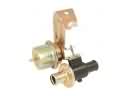 GMC C2500 Heater Control Valve
 GMC C2500 Heater Core