ChevyParts
My Garage
My Account
Cart
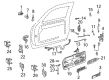
OEM GMC C3500 Door Handle
Inside Door Handle- Select Vehicle by Model
- Select Vehicle by VIN
Select Vehicle by Model
orMake
Model
Year
Select Vehicle by VIN
For the most accurate results, select vehicle by your VIN (Vehicle Identification Number).
30 Door Handles found


GMC C3500 Handle Part Number: 15991785
$89.47 MSRP: $128.03You Save: $38.56 (31%)


GMC C3500 Handle, Inside, Passenger Side Part Number: 15708052
$51.70 MSRP: $74.61You Save: $22.91 (31%)Ships in 1-2 Business Days


GMC C3500 Handle, Inside, Driver Side Part Number: 15708047
$66.84 MSRP: $99.49You Save: $32.65 (33%)Ships in 1-2 Business Days


GMC C3500 Handle, Outside, Driver Side Part Number: 15968163
$64.06 MSRP: $92.45You Save: $28.39 (31%)Ships in 1-2 Business Days
GMC C3500 Pull Handle Part Number: 15023776
$15.57 MSRP: $44.02You Save: $28.45 (65%)Ships in 1-2 Business Days


GMC C3500 Handle, Outside, Driver Side Part Number: 6272581


GMC C3500 Handle, Outside, Passenger Side Part Number: 6272582


GMC C3500 Assist Strap Part Number: 15023778

GMC C3500 Pull Handle Part Number: 15641483

GMC C3500 Pull Strap, Passenger Side Part Number: 15734612

GMC C3500 Grip Handle Part Number: 15023784
GMC C3500 Grip Handle Part Number: 15023786

GMC C3500 Lock Assembly, Front Part Number: 15617125

GMC C3500 Lock Assembly, Front Part Number: 15617126
GMC C3500 Pull Strap, Driver Side Part Number: 15734611
GMC C3500 Handle, Outside, Driver Side Part Number: 15742233

GMC C3500 Handle Part Number: 15569031
| Page 1 of 2 |Next >
1-20 of 30 Results
GMC C3500 Door Handle
Want to cut long-term maintenance and repair costs? Choose OEM Door Handle. Those parts deliver top durability you can trust. On our site, you'll find a huge catalog of genuine GMC C3500 parts. Prices are unbeatable, so you can keep more in your pocket. Every OEM GMC C3500 Door Handle includes a manufacturer's warranty. You can also get an easy return policy that keeps buying risk free. Fast delivery, get your car on the road quickly. It's simple to search, compare, and order. Stop guessing about quality or fit. Order today and save with parts that last.
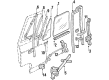
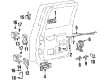
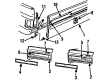
Generally the GMC C3500 Door Handle is one of the significant half that depicts reliability and performance not only to open the car doors but also give reach to the drivers and passengers. Made for everyday and intense weather conditions, this door handle is made of plastic or metal to increase the life-span of the product. Specially manufactured to fit GMC C3500 series revamped since 1991, the Door Handle is instrumental in increasing both convenience and security by enabling the occupants easy and rapid access to and from the vehicle. To construct it, it has a solid door that opens after being pulled by a metal rod that locks the door thus gain access without necessarily bending the door. The characteristics that distinguish the GMC C3500 Door Handle in the automotive market are the durability and operability of its structure since the performance of these trucks often takes place in severe conditions. Also, there is an ergonomic design of the Door Handle that provides a better user-friendly experience as well as adds to the impressive outlook of the GMC C3500. This particular GMC C3500 Door Handle is vital in the car hence the company's reinforcement of the importance of high quality and efficient performance of the product. From city roads to hilly tracks for towing, the GMC C3500 Door Handle meets the driver's needs and safety of the car; and therefore is considered to be one of the major features in the GMC series.
GMC C3500 Door Handle Parts Questions & Experts Answers
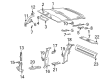
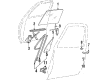
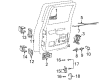
- Q: How to replace the rear side inner door handle on GMC C3500?A:The first step to replace the rear side door inside handle includes removing both trim panel and water deflector. The inside door handle assembly can be removed through drilling of the rivet heads using a 1/4-inch drill bit followed by sliding the door handle toward the front. However, start working by breaking the connection between the inside handle control rod and the inside lock control rod which are both attached to the handle and lock lever assembly. When installing both controls you should place the inside handle control rod while connecting it to the handle and lock lever assembly. Repurpose the handle assembly into the slot followed by sliding it toward the back. Install the handle rivets through the Rivet Gun (J 34940). The last step involves reinstalling the water deflector followed by the trim panel.

Related GMC C3500 Parts
 GMC C3500 Door Armrest
 GMC C3500 Door Hinge
 GMC C3500 Door Latch Assembly
 GMC C3500 Door Lock
 GMC C3500 Door Lock Cylinder
 GMC C3500 Door Moldings
 GMC C3500 Door Striker
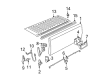
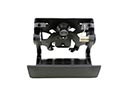 GMC C3500 Tailgate Handle
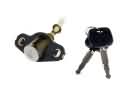 GMC C3500 Trunk Lock Cylinder
 GMC C3500 Window Channel
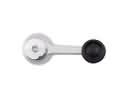 GMC C3500 Window Crank Handles
 GMC C3500 Window Motor