ChevyParts
My Garage
My Account
Cart
OEM GMC Radiator Cap
Cooling Radiator Cap- Select Vehicle by Model
- Select Vehicle by VIN
Select Vehicle by Model
orMake
Model
Year
Select Vehicle by VIN
For the most accurate results, select vehicle by your VIN (Vehicle Identification Number).
16 Radiator Caps found


GMC Radiator Cap Part Number: 15042975
$10.21 MSRP: $20.28You Save: $10.07 (50%)Product Specifications- Other Name: Cap, Radiator Tank; Reservoir Cap; Filler Cap


GMC Reservoir Cap Part Number: 13502353
$9.15 MSRP: $19.64You Save: $10.49 (54%)Product Specifications- Other Name: Cap Assembly-Radiator Surge Tank; Radiator Cap; Cap; Cap, Engine Coolant Recovery; Cap, Radiator Tank
- Replaced by: 13545896


GMC Radiator Cap Part Number: 15989074
$12.23 MSRP: $22.82You Save: $10.59 (47%)Ships in 1-2 Business DaysProduct Specifications- Other Name: Cap, Engine Coolant Recovery; Reservoir Cap; Tank Cap; Recovery Tank Cap; Cap
- Replaces: 15695491, 14094966


GMC Reservoir Cap Part Number: 13502354
$7.31 MSRP: $13.71You Save: $6.40 (47%)Ships in 1-2 Business DaysProduct Specifications- Other Name: Cap, Radiator Tank; Cap, Engine Coolant Recovery


GMC Radiator Cap Part Number: 25730221
$13.24 MSRP: $24.86You Save: $11.62 (47%)Ships in 1-2 Business DaysProduct Specifications- Other Name: Cap Assembly-Radiator Surge Tank; Reservoir Cap; Tank Cap; Recovery Tank Cap; Cap; Cap, Engine Coolant Recovery; Cap, Radiator Tank
- Replaces: 25713159, 25723953, 25697430


GMC Radiator Cap Part Number: 15982188
$11.60 MSRP: $21.78You Save: $10.18 (47%)Ships in 1-2 Business DaysProduct Specifications- Other Name: Cap, Radiator Tank; Filler Cap; Cap, Heater Coolant Tank


GMC Radiator Cap Part Number: 15075565
$12.68 MSRP: $23.82You Save: $11.14 (47%)Ships in 1-3 Business DaysProduct Specifications- Other Name: Cap, Radiator Tank; Filler Cap


GMC Radiator Cap, Green Line Part Number: 15075118
$13.60 MSRP: $25.54You Save: $11.94 (47%)Ships in 1-2 Business DaysProduct Specifications- Other Name: Cap, Engine Coolant Recovery; Reservoir Cap; Recovery Tank Cap; Cap; Cap, Radiator Tank
- Replaces: 15066786, 22671020, 22652695

GMC Radiator Cap Part Number: 13502509
$11.77 MSRP: $22.11You Save: $10.34 (47%)Ships in 1-2 Business DaysProduct Specifications- Other Name: Cap, Radiator Tank; Reservoir Cap; Filler Cap; Cap; Cap, Engine Coolant Recovery
- Replaces: 92205634


GMC Radiator Cap, Black Part Number: 10409635
$12.08 MSRP: $21.59You Save: $9.51 (45%)Ships in 1-2 Business DaysProduct Specifications- Other Name: Cap, Radiator Filler *Black; Filler Cap; Cap; Filler, Engine Coolant; Cap, Radiator Tank
- Replaces: 6410785, 06410785, 10283897, 15953298

 Product Specifications
- Other Name: Cap, Radiator Filler; Radiator Cap; Washer, Engine Air Coolant Fan; Cap, Radiator Tank
GMC Radiator Cap Part Number: 6410785
$12.08 MSRP: $21.59You Save: $9.51 (45%)Ships in 1-3 Business DaysProduct Specifications- Other Name: Cap Assembly-Radiator Filler (Package); Cap, Radiator Filler
- Replaced by: 10409635

GMC Reservoir Cap Part Number: 25738039
$4.75 MSRP: $8.59You Save: $3.84 (45%)Ships in 1-3 Business DaysProduct Specifications- Other Name: Cap, Engine Coolant Recovery; Radiator Cap
- Replaced by: 85666316
GMC Radiator Cap Part Number: 15064718
$11.74 MSRP: $20.95You Save: $9.21 (44%)Ships in 1-2 Business DaysProduct Specifications- Other Name: Cap, Radiator Tank


GMC Reservoir Cap Part Number: 15630112
Product Specifications- Other Name: Cap, Engine Coolant Recovery; Radiator Cap; Filler Cap; Reservoir Tank Cap; Recovery Tank Cap; Cap

GMC Reservoir Cap Part Number: 15588032
Product Specifications- Other Name: Cap, Engine Coolant Recovery; Radiator Cap; Recovery Tank Cap; Cap
GMC Radiator Cap
Choose OEM Radiator Cap, you're making the optimal decision for superior quality and perfect performance. You can feel confident because each component goes through stringent quality checks. Every part is carefully built to comply with GMC's factory specifications. You'll enjoy a smooth, worry-free installation that fits just right. At ChevyPartsGiant.com, you'll find it easy to get top-quality OEM GMC Radiator Cap. You can shop at highly competitive prices and protect your budget. All our genuine GMC parts include a dependable manufacturer's warranty. You'll also appreciate our straightforward return policy and swift delivery services for extra convenience.
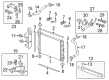
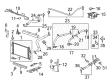
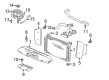
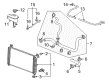
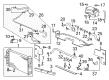
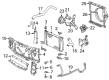
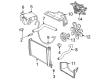
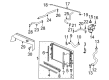
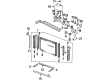
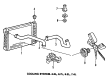
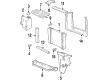
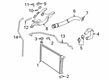
The GMC Radiator Cap closes the coolant at the optimal pressure, preventing boil-over and protecting horsepower of the engine during towing or daily driving throughout the entire year. Started in 1901, GMC currently manufactures trucks and SUVs that are industrial strength and family comfortable. These vehicles can tow boats, climb mountain passes and shake off washboard roads with thick hydroformed frames, assured V8 or turbo diesel engines, and adaptive suspensions. Interior features are laminated glass with active noise canceling that combines to create a hushed cabin, surround view cameras, blind zone alerts and hitch guidance make tight turns easier. MultiPro tailgate is clever with six positions to load or seat, and bed liners can withstand dents, as well as built in tie downs to ensure that the gear stays in place on the dirty trails. GMC also exposes all chassis to extreme lab tests that punish and keeps updating software to shift smoother and have better fuel economy and long term durability which proves that the ability can also be updated with technology. Park, place car in parking brake prior to installation of new Radiator Cap, turn off the ignition and allow engine to cool until upper hose is at room temperature. Take a piece of thick rag, and cover the already existing cap, and cut it upside down, and then turn it a quarter turn to relieve it of all the pressure, and then take it off very much. Examine the filler neck and look for any nicks, rust flakes or gasket debris and wipe the surface until the new seal lies flat. Interlock the tabs, squeeze the tab, twist, until the arrows touch, reconnect the hoses, restart the engine, let the fans run one complete cycle, and observe the presence of leaks.
Related GMC Parts
 GMC Radiator
 GMC Thermostat
 GMC A/C Condenser Fan
 GMC Coolant Reservoir
 GMC Fan Blade
 GMC Fan Motor
 GMC Fan Shroud
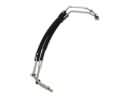 GMC Oil Cooler Hose
 GMC Thermostat Housing
 GMC Transmission Oil Cooler
 GMC Transmission Oil Cooler Hose
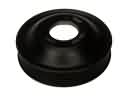 GMC Water Pump Pulley
Browse GMC Radiator Cap by Models
Acadia Sierra 1500 Yukon Canyon Sierra 2500 HD Terrain Envoy Sonoma Typhoon Syclone Caballero C1500 Envoy XL Envoy XUV Jimmy K1500 S15 S15 Jimmy Safari Savana 2500 Savana 3500 Sierra 2500 Sierra 3500 Yukon XL Acadia Limited C2500 C3500 G2500 K2500 K3500 P3500 Savana 1500 Yukon XL 1500 C1500 Suburban C2500 Suburban G1500 G3500 K1500 Suburban K2500 Suburban P2500 R1500 R1500 Suburban R2500 R2500 Suburban R3500 Sierra 1500 Classic Sierra 1500 HD Sierra 1500 HD Classic Sierra 1500 Limited Sierra 2500 HD Classic Sierra 3500 Classic Sierra 3500 HD V1500 V1500 Suburban V2500 V2500 Suburban V3500 Yukon XL 2500