ChevyParts
My Garage
My Account
Cart
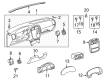
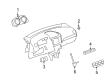
OEM Saturn Dimmer Switch
Light Dimmer Switch- Select Vehicle by Model
- Select Vehicle by VIN
Select Vehicle by Model
orMake
Model
Year
Select Vehicle by VIN
For the most accurate results, select vehicle by your VIN (Vehicle Identification Number).
13 Dimmer Switches found


Saturn Turn Signal Switch, Green Line Part Number: 20940369
$49.03 MSRP: $100.77You Save: $51.74 (52%)Ships in 1-2 Business DaysProduct Specifications- Other Name: Switch, Turn Signal Lamp; Multi Purpose Switch; Multifunction Switch; Signal Switch; Switch, Headlamp Dimmer
- Replaces: 15840243, 21994378, 15913467


Saturn Turn Signal Switch Part Number: 20940099
$41.69 MSRP: $85.66You Save: $43.97 (52%)Ships in 1-2 Business DaysProduct Specifications- Other Name: Switch Assembly-Turn Signal & Headlamp Dimmer; Multi Purpose Switch; Combination Switch; Signal Switch; Switch, Turn Signal Lamp; Switch, Headlamp Dimmer
- Replaces: 10362761, 15258881, 15841544, 15915857


Saturn Headlamp Switch, Red Line Part Number: 19299458
$60.71 MSRP: $114.00You Save: $53.29 (47%)Ships in 1-2 Business DaysProduct Specifications- Other Name: Switch, Headlamp Dimmer; Multi Purpose Switch; Combination Switch; Switch, Headlamp/Fog Lamp/Turn Signal; Switch, Turn Signal Lamp
- Replaces: 22734364

Saturn Dimmer Switch, Gray; Titanium Part Number: 25873731
$48.62 MSRP: $78.63You Save: $30.01 (39%)Ships in 1-2 Business DaysProduct Specifications- Other Name: Switch, Headlamp & Instrument Panel Lamp Dimmer & Fog Lamp; Multi Purpose Switch; Headlamp Switch; Switch, Headlamp/Fog Lamp/Turn Signal
Saturn Dimmer Switch, Tan Part Number: 25873729
$34.55 MSRP: $52.11You Save: $17.56 (34%)Ships in 1-2 Business DaysProduct Specifications- Other Name: Switch, Headlamp & Instrument Panel Lamp Dimmer & Fog Lamp; Multi Purpose Switch; Headlamp Switch; Switch, Headlamp/Fog Lamp/Turn Signal

Saturn Headlamp Switch, Red Line Part Number: 25866788
$28.20 MSRP: $44.13You Save: $15.93 (37%)Ships in 1-2 Business DaysProduct Specifications- Other Name: Switch, Headlamp & Instrument Panel Lamp Dimmer & Fog Lamp; Multi Purpose Switch; Switch, Headlamp/Fog Lamp/Turn Signal

Saturn Turn Signal Switch Part Number: 25811970
$41.49 MSRP: $64.52You Save: $23.03 (36%)Ships in 1-2 Business DaysProduct Specifications- Other Name: Switch Assembly-Turn Signal & Headlamp Dimmer; Multi Purpose Switch; Multifunction Switch; Combination Switch; Switch, Turn Signal Lamp; Switch, Headlamp Dimmer
- Replaces: 15899024


Saturn Turn Signal Switch Part Number: 15251096
Product Specifications- Other Name: Switch, Headlamp Dimmer; Multi-Function Switch; Multi Purpose Switch; Headlamp Switch; Combination Switch; Signal Switch; Switch, Headlamp/Fog Lamp/Turn Signal; Switch, Turn Signal Lamp
- Replaces: 22729563
Saturn Dimmer Switch, Black; Red Line Part Number: 25858768
Product Specifications- Other Name: Multi Purpose Switch; Headlamp Switch
Saturn Dimmer Switch, Gray; Titanium Part Number: 25873732
Product Specifications- Other Name: Switch, Headlamp & Instrument Panel Lamp Dimmer & Fog Lamp; Multi Purpose Switch; Headlamp Switch; Switch, Headlamp/Fog Lamp/Turn Signal
Saturn Dimmer Switch Part Number: 25873730
Product Specifications- Other Name: Switch, Headlamp & Instrument Panel Lamp Dimmer & Fog Lamp; Switch, Headlamp/Fog Lamp/Turn Signal
Saturn Headlamp Switch Part Number: 19299457
Product Specifications- Other Name: Switch, Headlamp Dimmer; Multi Purpose Switch; Combination Switch; Switch, Headlamp/Fog Lamp/Turn Signal; Switch, Turn Signal Lamp
- Replaces: 22734363

Saturn Multifunction Switch, Green Line Part Number: 15908975
Product Specifications- Other Name: Switch, Headlamp/Fog Lamp/Turn Signal; Windshield Washer Switch; Multi Purpose Switch; Air Bag Clockspring; Combination Switch; Wiper, Signal, and Headlamp Dimmer Switch; Clockspring
- Replaces: 01999388, 01999390, 15274610, 1999388, 10400127, 15897617, 1999390
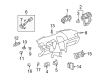
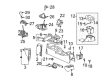
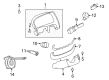
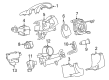
Saturn Dimmer Switch
Choose OEM Dimmer Switch, you're making the optimal decision for superior quality and perfect performance. You can feel confident because each component goes through stringent quality checks. Every part is carefully built to comply with Saturn's factory specifications. You'll enjoy a smooth, worry-free installation that fits just right. At ChevyPartsGiant.com, you'll find it easy to get top-quality OEM Saturn Dimmer Switch. You can shop at highly competitive prices and protect your budget. All our genuine Saturn parts include a dependable manufacturer's warranty. You'll also appreciate our straightforward return policy and swift delivery services for extra convenience.
Saturn Dimmer Switch is able to provide easy fingertip control of headlight beam and instrument glow to enable the driver to adjust to night roads with a minimum of effort. Launched by General Motors in 1985, Saturn was initiated to re-invent the process of car building on new grounds and by 1991 it was already making cars in its own factory which displayed its independent traits. The favorite feature of the owners was the dent resistant plastic body panels which bounced back dents in the parking lots a feature which served to make Saturn cars appear fresh even after a long period. Also applied by the company is lost foam casting which was applied to form lighter but precise engine parts to increase performance without increasing bulk and the tougher paint process that preserved its lustre and which prevented chipping. These brilliant decisions made Saturn special and a stable fan base that associated with durability, efficiency, and style. To anyone who is changing a new Dimmer Switch, the trick is to park on a flat surface and pull the battery negative cable to cut off the power. Disassemble the steering column shroud or dash trim, and find the original Dimmer Switch and record the position of the wiring plug. Loosen the screws or clips, move the unit outwards and snap the harness. Install such a replacement, screw-clamp the Dimmer Switch in place, and press the connector until it clips. Install the trim again, reconnect the battery and cycle the high and low beam lights as well as the gauge lights; to allow a check of smooth operation.
Related Saturn Parts
 Saturn Body Control Module
 Saturn Brake Light Switch
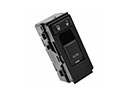 Saturn Door Lock Switch
 Saturn Neutral Safety Switch
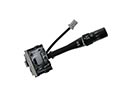 Saturn Wiper Switch
 Saturn Air Bag Clockspring
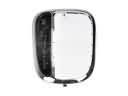 Saturn Automatic Transmission Shift Indicator
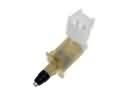 Saturn Door Jamb Switch
 Saturn Fuel Pump Driver Module
 Saturn Headlight Switch
 Saturn Shift Linkage Boot
 Saturn Speedometer