Make sure this part fits

GM 10359415
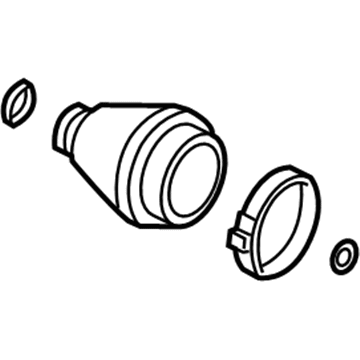
Outer Boot, Front

2005-2012 GM

Customer Questions & Expert Answers (5)
GM 10359415 Outer Boot, Front
  • Part Description
    Boot Kit, Front Axle; CV Boot
  • Position
    Front
  • Manufacturer
    General Motors
Make sure this part fits
$47.51 MSRP: $78.25
You Save: $30.74 (40%)
Ships in 1-2 Business Days
1
ADD TO CART
  • Related Parts
  • Product Specifications
  • Vehicle Fitment
  • Customer Questions & Expert Answers
  • Product Specifications

    BrandGenuine GM
    Manufacturer Part Number10359415
    Part DescriptionBoot Kit, Front Axle; CV Boot
    Other NamesBoots; Boot Kit, Front Wheel Drive Axle Shaft
    Item Dimensions7.5 x 7.0 x 6.6 inches
    Item Weight1.50 Pounds
    PositionFront
    ConditionNew
    Fitment TypeDirect Replacement
    ManufacturerGeneral Motors
    SKU10359415
    WarrantyThis genuine GM part is guaranteed by GM's factory warranty.
    Shipping & ReturnShipping Policy Return Policy
    Warning: California's Proposition 65
  • Vehicle Fitment

    Year Make Model Trim Engine
    2005-2010 Chevrolet CobaltBase, LS, LT, LTZ, Sport, SS4 Cyl 2.0 L GAS, 4 Cyl 2.2 L GAS, 4 Cyl 2.4 L GAS
    2008-2012 Chevrolet MalibuLS, LT, LTZ4 Cyl 2.4 L FLEX, 4 Cyl 2.4 L GAS, 6 Cyl 3.5 L FLEX, 6 Cyl 3.5 L GAS, 6 Cyl 3.6 L GAS
    2007-2009 Pontiac G5Base, GT4 Cyl 2.2 L GAS, 4 Cyl 2.4 L GAS
    2008-2010 Pontiac G6Base, GT, GXP4 Cyl 2.4 L FLEX, 4 Cyl 2.4 L GAS, 6 Cyl 3.5 L FLEX, 6 Cyl 3.5 L GAS, 6 Cyl 3.6 L GAS, 6 Cyl 3.9 L GAS
  • Customer Questions & Expert Answers

    Q:
    Is this 10359415 designed for my car? Posted by ChevyPartsGiant Specialist
    A:
    Please Select Your Vehicle model to see if part number 10359415 is suitable before ordering.
    Posted by ChevyPartsGiant Specialist
    Q:
    How to replace the outer CV Boot and CV Joint on Chevrolet Malibu? Posted by Customer
    A:
    To replace the wheel drive shaft outer joint and boot, start by to using a side cutter to remove the large seal retaining clamp from the CV Joint and toss it away, taking care not to cut through the inboard or outboard boot and risk damaging the sealing surface. If there is a swage ring to a small size, cut through if without wrecking the halfshaft bar, with a hand grinder. Else cut the small seal retaining clamp out with a side cutter and throw it away. Remove the halfshaft outboard seal from the CV Joint outer race from the big diameter and slide the seal from the joint across the halfshaft bar. Remove grease from the face of the CV Joint inner race and properly spread the ears (on the race retaining ring) using j 8059 to remove the CV Joint assembly from the halfshaft bar. Detach and dispose of the old outboard seal, after which take a brass drift to lightly tap and tilt the CV Joint cage in order to eliminate the first chrome alloy ball and continue that process six times for all the balls respectively. Pivot the CV Joint cage and inner race 90 degrees toward the centerline of the outer race, align the cage windows with the lands of the outer race, and lift the cage and inner race. Lift off the inner race from the cage and clean the inner and outer race systems, CV Joint cage, and chrome alloy balls carefully with cleaning solvent until you have removed the old grease and contaminants and dry them thoroughly. Inspect the CV Joint assembly for abnormal wear, cracks, or defects, replace the defective parts and clean with the use of a wire brush in the seal mounting area for rust. For installation, insert the halfshaft in a vise, install a new small eared clamp on the neck of the outboard seal without crimping, slide the outboard seal on to the halfshaft bar and fit it in the seal groove. Take a crimper for the eared clamp and use it with a breaker bar, j 35910, and a torque wrench while hanging up to 136 nm (100 lb ft), measuring the gap dimension and crimping as required. Use a light coat of grease from the service kit in the grooves on the ball of the inner and outer races spin the inner race 90 to the center line of the cage and insert it into the cage. Even up the cage and inner race with the outer race and make sure the retaining ring side of the inner race is put towards the halfshaft bar; then have them inside of the outer race. Put the first chrome ball, tip the cage to get the second one and continue by doing this until all 6 have all balls in place. Pack the CV Joint with grease from the service kit and push CV Joint unto the halfshaft until the retaining ring is seated; ensure that the outboard seal is not dimpled or stretched and reshape as necessary. Pry out the bearing assembly locking pin, and slide the heavy diameter of the outboard seal with the heavy seal retaining clamp over the CV Joint outer race, find that the seal lip falls into the groove, crimp the seal retaining clamp with j 35910 to 174 nm (130 lb ft). At the same time, check the gap dimension of the clamp ear, tighten until the gap dimension of 1.9 mm (5/64 in) is achieved.
    Posted by ChevyPartsGiant Specialist
    Q:
    How to replace the outer CV Boot and CV Joint on the wheel drive shaft on Chevrolet Cobalt? Posted by Customer
    A:
    To remove the wheel drive shaft outer joint and boot, remove the wheel drive shaft and place it in a soft jawed vice trying not to cut into the inboard or outboard boot to cause damage to the sealing surface and prematurely wear out. Clear the boot clamp from the constant velocity (CV) joint and the boot with a flat-bladed tool and use side cutters to remove and throw away the boot clamp from the boot and the wheel drive shaft and put on new ones. Next is applying wood block and hammer to remove the CV joint from wheel drive shaft, then apply wheel drive shaft but replace it with a boot. Check the outer CV joint for damages and wear. For assembling, mount the boot onto the wheel drive shaft with proper fitting into the groove of the wheel drive shaft . Put about half of the lubricant in the CV joint boot and the other half into the CV joint and attach the CV joint to the wheel drive shaft with a block of wood and a hammer. Mount the boot clamp on the boot and the wheel drive shaft, followed by mounting the boot clamp on the boot and the CV joint housing in right order so everything is mounted all around the circumference of the boot. Close the clamp using the J 35910 - pliers until the gap will be 2.15 mm (0.85 in), then close the boot clamp until the gap measures 1.9 mm (0.070 in). Remove the wheel drive shaft from the bench vise; to spread the lubricant, move the CV joint in a circular motion 4 to 5 times; and finally, to install the wheel drive shaft back in the vehicle.
    Posted by ChevyPartsGiant Specialist
    Q:
    What tools are required for servicing and repairing the CV Boot and CV Joint, and what are the steps involved on Chevrolet Malibu? Posted by Customer
    A:
    To service and repair the constant velocity joint boot, for the wheel drive shaft inner joint and boot replacement, the following tools are used. It includes: snap ring pliers (J 8059), drive axle seal clamp pliers (J 35910). Start by making certain that you do not sever inboard boot of wheel drive shaft, since this could damage sealing surface and cause vehicle wear-in to occur quickly. If there is present a small swage ring, then use a hand grinder to remove it, cutting it carefully, without damaging the halfshaft bar; otherwise strip off small seal retaining clamp using side cutters and throw it away. Next, pull out the big seal retaining clamp from the tripot joint off by using side cutters and throwing it away. Remove the inboard seal from the trilobal tripot bushing at the large diameter and push seal off the join from the half shaft bar. Take off the housing from the tripot joint spider and the halfshaft bar. Remove the spacer ring using snap ring pliers (J 8059) and spread the spider assembly as well as the tripot boot, discarding the boot and rings. Clean the halfshaft bar with use of the wire brush to eliminate the rust in boot mounting region and establish a damage of needle rollers, needle bearing and examining trunnion for damages if any before putting on the acceptable kit for a damaged range. Mount the halfshaft into a vise with a towel for protection. After washing its hands with water and soap, the patient should place the new small eared clamp onto the small end of the joint seal and slide it both onto the halfshaft bar; the small end of the joint seal now lies in the groove. Crimp the clamp eared with the use of drive axle seal clamp pliers (J 35910), torque wrench, and breaker bar. After being equipped, push the spacer ring in the groove at the halfshaft bar using snap ring pliers (J 8059), and slide the tripot joint spider assembly onto the halfshaft bar (E). Add grease from the service kit to the halfshaft inboard seal and repack the housing making sure the trilobal tripot bushing is flush with the face of the housing. Put in the trilobal tripot bushing into the housing and mount the larger new seal retaining clamp toward the inboard part on the halfshaft. Push the housing onto the tripot joint spider arrangement and align the lip of the seal with the groove. Place the joint assembly at a correct vehicle dimension of 106 mm (4.00 in) and make use of a thin flat blunt tool to even out force from the large seal opening for the trilobal tripot bushing. Register the inboard halfshaft o-ring, tripot structure, and big seal hold down clamp; crimp the clamp with drive axle seal clamp pliers (J 35910) and tighten to 176 n.m (130 lb ft), using the breaker bar and torque wrench if needed. Examine the gap dimension in clamp ear and tighten up until it is 2.6 mm (0.102 in) bigger if greater. Lastly, fully stroke the joint multiple times to spread out the grease.
    Posted by ChevyPartsGiant Specialist
    Q:
    What should be done to ensure the retaining ring engages the inner race for the 2008 Chevrolet Cobalt? Posted by Customer
    A:
    Use an arbor press to ensure the retaining ring engages the inner race without exceeding 1,779 N (4,000 lb) press load.
    Posted by ChevyPartsGiant Specialist
    See expert answers on similar CV Boot
    If you have any questions about this product, please don't hesitate to ask us. We will be happy to help you!

OEM GM 10359415, Excellent Performance and Perfect Fitment

To ensure reliability, purchase GM part # 10359415 Outer Boot, Front. It is sometimes referred to as GM CV Boot. Choosing OEM parts is the optimal decision for guaranteeing superior quality and perfect performance. These components undergo stringent quality checks and are carefully constructed to comply with GM's factory specifications, ensuring a smooth installation process.

ChevyPartsGiant.com is a leading supplier of genuine GM parts such as GM 10359415 Outer Boot, Front. Our website boasts an extensive inventory of OEM GM parts, available at highly competitive prices in the market. Should you require any new genuine GM parts, rest assured we will deliver them swiftly and efficiently to your doorstep. Furthermore, all our parts come with the assurance of a manufacturer's warranty. For detailed Chevy parts information, click here.
Choose ChevyPartsGiant for discounted prices, exceptional service and fast delivery