Make sure this part fits

GM 15885076
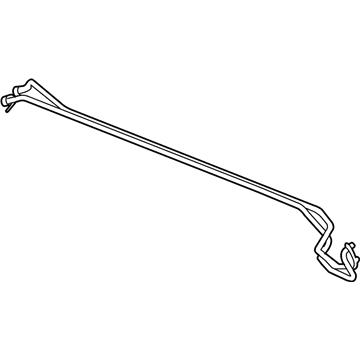
Oil Cooler Pipe

2006-2009 Cadillac XLR

Customer Questions & Expert Answers (8)
GM 15885076 Oil Cooler Pipe
  • Part Description
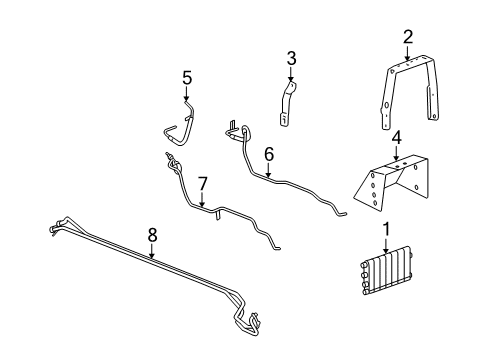
    Pipe Assembly-Transmission Fluid Cooler
  • Replaces
    10346016
  • Manufacturer
    General Motors
  • Manufacturer's Notes
    This part is discontinued.
Make sure this part fits
  • Vehicle Fitment

    Year Make Model Trim Engine
    2006-2009 Cadillac XLRV8 Cyl 4.4 L GAS
    Warning: California's Proposition 65
  • Customer Questions & Expert Answers

    Q:
    Is this 15885076 designed for my car? Posted by ChevyPartsGiant Specialist
    A:
    Please Select Your Vehicle model to see if part number 15885076 is suitable before ordering.
    Posted by ChevyPartsGiant Specialist
    Q:
    How to replace the Engine Oil Cooler Hose/Pipe on Cadillac XLR? Posted by Customer
    A:
    Vehicle elevation and support are necessary before beginning the replacement of engine Oil Cooler Hose/pipe. Begin by removing the wheelhouse panel followed by installation of an oil drain pan beneath the vehicle. The engine Oil Cooler Hose/pipe requires detachment from its external oil cooler position while you disconnect the clips that hold it to both Fan Shroud and engine before removing this external engine Oil Cooler Hose/pipe from the vehicle. Remove all existing seals. Attach the external engine Oil Cooler Hose/pipe to the vehicle first by pushing the quick connect fitting until full engagement then perform a quick pull-back verification test. After attaching the hose/pipe to the engine proceed with installing clips at both the engine and Fan Shroud and test the quick connect fitting. After connecting the engine Oil Cooler Hose to the external unit remove the drain pan then replace the wheelhouse panel and add engine oil while verifying there are no leaks.
    Posted by ChevyPartsGiant Specialist
    Q:
    How to replace the rear Transmission Oil Cooler Hose on Cadillac XLR? Posted by Customer
    A:
    The first step to change the rear Transmission Oil Cooler (TOC) pipe requires appropriately elevating and supporting the vehicle. First separate the driveline tunnel closeout panel before cutting the front TOC inlet and outlet lines away from the rear TOC inlet and outlet lines and using caps or plugs to prevent contamination through the open TOC pipes. The TOC block fitting bolt should be removed from the transmission housing so the operator can rotate the block fitting to expose the upper TOC pipe. Disconnect both TOC pipes from the transmission while cap or plug the TOC pipes before releasing the transmission fittings. Extract the forward and rear TOC pipe bracket bolts together with their brackets before pulling out the TOC pipes from the vehicle. Install the TOC pipes into proper position before fastening the rear TOC pipe bracket bolt to 12 N.m (9 lb ft). Fasten the forward TOC pipe bracket together with its bolt after tightening them to 12 N.m (9 lb ft). Attach upper and lower TOC pipes to the transmission after removing their caps or plugs and rotatate the TOC block fitting to fasten the upper pipe. Fasten the TOC block fitting bolt to the transmission housing while torquing it to 25 N.m (18 lb ft). After restoring the driven front TOC inlet and outlet connections to the back inlets and outlets, install the driveline closeout panel before lowering the car and inspecting its transmission fluid level for necessary additions.
    Posted by ChevyPartsGiant Specialist
    Q:
    How to address issues with the Transmission Oil Cooler Hose on Cadillac XLR? Posted by Customer
    A:
    The procedure for replacing the rear transmission fluid cooler pipe begins with proper vehicle elevation along with suitable support. Cut away the reinforcement panels that relate to the floor and tunnel areas. It is essential to cap or plug the open transmission fluid cooler pipes immediately because the front toc lines connect to rear toc lines near the engine Starter motor. This sealing prevents structural contamination. Drain the transmission oil cooler pipes at their rear connections by removing both lines from the inlet and outlet fittings. Secure the drain points with caps or plugs. The transmission housing gets its toc block fitting bolt removed before rotating the block fitting to disconnect the upper toc pipe. The transmission releases the upper and lower toc pipes for capping or plumbing their ends. Start by removing the forward toc pipe bracket bolt after which you must detach the forward toc pipe bracket followed by the rear toc pipe bracket bolt and its bracket before taking out the toc pipes from the vehicle. Users must first secure both toc pipes in location and after that should install the rear toc pipe bracket using a torque of 12 nm (9 lb ft). Screw in the forward toc pipe bracket bolt to 12 nm (9 lb ft). First detach the caps from toc pipes and transmission fittings before connecting both upper and lower toc pipes to the transmission while turning the toc block fitting until the upper toc pipe secures properly. Screw the toc block fitting bolt to the transmission housing then tighten it to 25 nm (18 lb ft). The toc pipes require unincapsulation before running the front toc inlet and outlet lines through to the rear toc inlet and outlet lines. Replace the floor panel tunnel panel reinforcement while lowering the vehicle before checking the transmission fluid level with an addition of fluid when needed.
    Posted by ChevyPartsGiant Specialist
    Q:
    What should be removed after raising the 2009 Cadillac XLR? Posted by Customer
    A:
    Remove the wheelhouse panel, disconnect and remove the lower transmission oil cooler (TOC) line from the radiator, and then remove the A/C compressor.
    Posted by ChevyPartsGiant Specialist
    See expert answers on similar Transmission Oil Cooler Hose
    Q:
    What should be removed after raising the 2007 Cadillac XLR? Posted by Customer
    A:
    The left lower front bumper close out panel.
    Posted by ChevyPartsGiant Specialist
    See expert answers on similar Oil Cooler Hose
    Q:
    What brackets need to be removed during the process for the 2008 Cadillac XLR? Posted by Customer
    A:
    Remove the forward TOC pipe bracket bolt and the forward TOC pipe bracket, followed by the rear TOC pipe bracket bolt and the rear TOC pipe bracket.
    Posted by ChevyPartsGiant Specialist
    See expert answers on similar Transmission Oil Cooler Hose
    Q:
    What needs to be detached from the external oil cooler for the 2008 Cadillac XLR? Posted by Customer
    A:
    Detach the engine oil cooler hose/pipe.
    Posted by ChevyPartsGiant Specialist
    See expert answers on similar Oil Cooler Hose
    If you have any questions about this product, please don't hesitate to ask us. We will be happy to help you!

OEM GM Oil Cooler Pipe 15885076 Designed for Proper Fit and Performance

Original OEM GM parts deliver superior quality and meet all performance standards needed for optimal automotive operation. The authentic part identified by 15885076 Oil Cooler Pipe is available in the market under the name GM Cooling Hose, Oil Cooler Hose, Automatic Transmission Oil Cooler Line, Transmission Oil Cooler Hose. This genuine product has a full warranty coverage from the manufacturer available at all authorized GM dealers throughout the United States. This part 15885076 Oil Cooler Pipe fits certain Cadillac XLR models.
The original GM component designated by manufacturer part number 15885076 maintains top performance when functioning as the Pipe Assembly-Transmission Fluid Cooler unit. The component 15885076 is constructed from durable material and its dimensions span 8.2 x 67.6 x 4.2 inches while weighing 2.30 Pounds. The Direct Replacement component is ready in New condition to ensure full compatibility with your vehicle system. This component receives the designation of Pipe, Transmission Oil Cooler. The part 15885076 has available replacement options 10346016. GM manufacturer provides a warranty that ensures reliable operation of this product. The Shipping Policy and Return Policy pages outline complete details regarding shipping procedures and return processes.
If you want to save money in the long run on maintenance and repairs, you should choose OEM products because they're of the top level of durability. Are you on the quest of finding GM parts, our site is worth a visit. We stock an endless selection of high-quality GM components including things like ignition coils all the way through to fan shrouds and all at prices that can not be matched. You have nothing to worry about because all our OEM parts are covered with a manufacturer warranty, which guarantees superior quality and value.