ChevyParts
My Garage
My Account
Cart
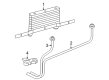
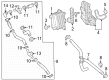
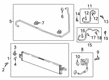
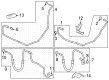
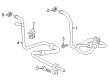
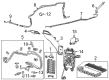
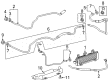
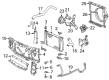
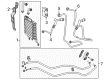
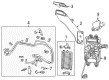
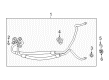
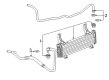
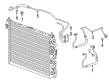
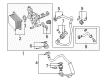
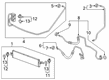
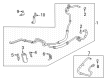
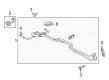
OEM Chevrolet Automatic Transmission Oil Cooler Line
AT Oil Cooler Hose- Select Vehicle by Model
- Select Vehicle by VIN
Select Vehicle by Model
orMake
Model
Year
Select Vehicle by VIN
For the most accurate results, select vehicle by your VIN (Vehicle Identification Number).
200 Automatic Transmission Oil Cooler Lines found


Chevrolet Outlet Pipe, Upper Part Number: 25999415
$35.12 MSRP: $57.86You Save: $22.74 (40%)Ships in 1 Business DayProduct Specifications- Other Name: Pipe Assembly-Transmission Fluid Cooler Upper; Pipe, Transmission Oil Cooler
- Position: Upper
- Replaces: 25808930

Chevrolet Cooler Pipe Part Number: 86818095
$181.97 MSRP: $315.67You Save: $133.70 (43%)Ships in 1-2 Business DaysProduct Specifications- Other Name: Pipe, Transmission Oil Cooler; Line
- Replaces: 84651358, 84527053, 84846539, 84620868, 84885688, 84889805, 85532817

Chevrolet Inlet Pipe Part Number: 84350786
$22.65 MSRP: $37.90You Save: $15.25 (41%)Ships in 1-2 Business DaysProduct Specifications- Other Name: Pipe Assembly-Transmission Fluid Cooler; Transmission Oil Cooler Line; Cooler Pipe; Pipe, Transmission Oil Cooler
- Replaces: 23205070

Chevrolet Inlet Pipe Part Number: 84132343
$31.49 MSRP: $51.87You Save: $20.38 (40%)Ships in 1-2 Business DaysProduct Specifications- Other Name: Pipe Assembly-Transmission Fluid Auxiliary Cooler Inlet; Inlet Hose; Oil Feed Tube; Line; Pipe, Transmission Oil Cooler
- Replaces: 23119935

Chevrolet Outlet Pipe Part Number: 84664519
$34.84 MSRP: $54.56You Save: $19.72 (37%)Ships in 1-3 Business DaysProduct Specifications- Other Name: Pipe, Transmission Oil Cooler; Line
- Replaces: 22978056

Chevrolet Cooler Pipe Part Number: 84518997
$138.71 MSRP: $220.22You Save: $81.51 (38%)Ships in 1-2 Business DaysProduct Specifications- Other Name: Pipe, Transmission Oil Cooler; Transmission Oil Cooler Line; Line
- Replaces: 23307979, 23252365, 23370670

Chevrolet Outlet Pipe Part Number: 23280474
$88.71 MSRP: $151.03You Save: $62.32 (42%)Ships in 1-2 Business DaysProduct Specifications- Other Name: Pipe Assembly-Transmission Fluid Auxiliary Cooler Outlet; Pipe, Transmission Oil Cooler
- Replaces: 23464735, 22795974

Chevrolet Cooler Pipe, Lower Part Number: 15053317
$33.32 MSRP: $52.89You Save: $19.57 (37%)Ships in 1-2 Business DaysProduct Specifications- Other Name: Pipe, Transmission Fluid Cooler Lower; Pipe, Transmission Oil Cooler
- Position: Lower
- Replaces: 15737414

Chevrolet Cooler Pipe Part Number: 85532819
$99.52 MSRP: $170.90You Save: $71.38 (42%)Ships in 1-3 Business DaysProduct Specifications- Other Name: Pipe, Transmission Oil Cooler; Line
- Replaced by: 86584017

Chevrolet Rear Pipe Assembly Part Number: 92236246
$72.65 MSRP: $119.69You Save: $47.04 (40%)Ships in 1-2 Business DaysProduct Specifications- Other Name: Pipe, Transmission Oil Cooler

Chevrolet Cooler Pipe Part Number: 23212375
$110.98 MSRP: $173.81You Save: $62.83 (37%)Product Specifications- Other Name: Pipe, Transmission Oil Cooler; Transmission Oil Cooler Line

Chevrolet Cooler Line Part Number: 42439448
$52.35 MSRP: $89.06You Save: $36.71 (42%)Ships in 1-2 Business DaysProduct Specifications- Other Name: Pipe, Transmission Oil Cooler; Line
- Replaces: 42353337

Chevrolet Inlet Pipe, Upper Part Number: 20987030
$51.63 MSRP: $87.90You Save: $36.27 (42%)Ships in 1-3 Business DaysProduct Specifications- Other Name: Pipe Assembly-Transmission Fluid Cooler Upper; Pipe, Transmission Oil Cooler
- Position: Upper
- Replaces: 20877554

Chevrolet Pipe Assembly Part Number: 84467773
$47.69 MSRP: $78.56You Save: $30.87 (40%)Ships in 1-2 Business DaysProduct Specifications- Other Name: Pipe Assembly-Transmission Fluid Cooler; Pipe, Transmission Oil Cooler
- Replaces: 84114831, 84544494, 84311828


Chevrolet Inlet Tube Part Number: 85129499
$37.26 MSRP: $61.39You Save: $24.13 (40%)Product Specifications- Other Name: Pipe Assembly-Transmission Fluid Cooler Inlet; Line; Pipe, Transmission Oil Cooler
- Replaced by: 42864814

Chevrolet Line Part Number: 23465080
$28.60 MSRP: $45.40You Save: $16.80 (37%)Ships in 1-2 Business DaysProduct Specifications- Other Name: Pipe Assembly-Transmission Fluid Cooler; Pipe, Transmission Oil Cooler

Chevrolet Outlet Hose Part Number: 84389088
$57.11 MSRP: $90.63You Save: $33.52 (37%)Ships in 1-2 Business DaysProduct Specifications- Other Name: Pipe, Transmission Oil Cooler; Transmission Oil Cooler Line; Hose & Tube Assembly; Oil Outlet Tube; Line
- Replaced by: 86584621

Chevrolet Hose & Tube Assembly Part Number: 84974082
$128.19 MSRP: $201.66You Save: $73.47 (37%)Product Specifications- Other Name: Pipe, Transmission Oil Cooler; Line
- Replaced by: 86531996
Chevrolet Line Part Number: 84501968
$109.27 MSRP: $173.48You Save: $64.21 (38%)Ships in 1-2 Business DaysProduct Specifications- Other Name: Pipe, Transmission Oil Cooler; Transmission Oil Cooler Line
- Replaced by: 86531999
- Replaces: 84375051
Chevrolet Line Part Number: 84075819
$71.67 MSRP: $117.30You Save: $45.63 (39%)Product Specifications- Other Name: Pipe, Transmission Oil Cooler; Transmission Oil Cooler Line
| Page 1 of 10 |Next >
1-20 of 200 Results
Chevrolet Automatic Transmission Oil Cooler Line
Want to cut long-term maintenance and repair costs? Choose OEM Automatic Transmission Oil Cooler Line. Those parts deliver top durability you can trust. On our site, you'll find a huge catalog of genuine Chevrolet parts. Prices are unbeatable, so you can keep more in your pocket. Every OEM Chevrolet Automatic Transmission Oil Cooler Line includes a manufacturer's warranty. You can also get an easy return policy that keeps buying risk free. Fast delivery, get your car on the road quickly. It's simple to search, compare, and order. Stop guessing about quality or fit. Order today and save with parts that last.
Chevrolet Automatic Transmission Oil Cooler Line Parts Questions & Experts Answers
- Q: How to replace the Automatic Transmission Oil Cooler Line on Chevrolet Cavalier?A:The replacement of Automatic Transmission Oil Cooler Pipes must use double-wrapped and brazed steel pipe according to GM specification 123M or equivalent standards when employing double-flared connections. First raise the vehicle and position a drain pan before supportively placing it. The transaxle procedure begins with unthreading the transaxle oil cooler pipe then proceeding to unscrew fittings from the radiator before removing the clip bolt and finally extracting the pipes. Install the pipes by correctly mating threads since crossthreading could make the fittings leak. Secure the clip bolt to 4 Nm (27 inch lbs.), followed by the radiator fittings tightened to 45 Nm (33 ft. lbs.). The new pipes should be installed at this time. Protect the hoses while attaching them to pipes and lower your vehicle until you inspect the transaxle level to avoid overfilling because this might produce foam which results in fluid loss along with shifting problems and possible equipment damage. Conclude fluid level adjustment before inspecting the repair work and looking for leakages.
- Q: How to replace the auxiliary automatic transmission oil cooler line on Chevrolet Impala?A:The task to replace the auxiliary automatic transmission (AT) oil cooler hose begins with supporting and lifting the vehicle to establish adequate space around transaxle oil cooler pipes and hoses to prevent fluid leaks through wear or damage. First remove both auxiliary Transmission Oil Cooler lines from the support clip followed by detaching the inlet line from the transmission and the outlet line from the lower radiator side tank. As the next step remove all inlet and outlet Transmission Oil Cooler lines attached to the auxiliary system. After connecting the inlet and outlet lines to the auxiliary Transmission Oil Cooler users need to install their components to the support clip and . Proceed with reattaching the outlet line to the lower radiator side tank followed by the inlet line connection to the transmission. Then lower the vehicle. It is necessary to avoid filling the transaxle past its limit because excessive fluid will create foam and lead to fluid leakage and shift problems and subsequent damage. Set the fluid level after completion.
- Q: How to replace the Automatic Transmission Oil Cooler Line on Chevrolet Malibu?A:The automatic transmission oil cooler pipes must receive only double-wrapped and brazed steel pipe products that follow gm specification 123m or an equivalent standard with double-flare pipes. Start by raising the vehicle above the floor while supporting it and place a drain pan under it. First detach transaxle oil cooler hoses from the pipes before removing their fittings at the radiator and finally untightening the transaxle oil cooler pipe clip bolt. Detach the transaxle oil cooler pipes as the next step. Correct thread engagement at each step of installation protects against leaks that occur with cross-threaded connections. The transaxle oil cooler pipes require installation together with the transaxle oil cooler pipe clip bolt which needs to be tightened to 4 nm (27 inch lbs.). After attaching the transaxle oil cooler pipe fittings to the radiator use 45 nm (33 ft. Lbs.) torque followed by connecting the transaxle oil cooler hoses to the pipes. Set the vehicle at the proper height while monitoring the transmission fluid amount to prevent overfilling since excessive fluid leads to both foaming and shift complaints and hurts transaxle health. Finish your checks by evaluating the restoration work quality while conducting a search for fluid leakages.


Related Chevrolet Parts
 Chevrolet Radiator
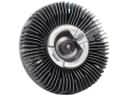 Chevrolet Fan Clutch
 Chevrolet Radiator fan
 Chevrolet Thermostat Gasket
 Chevrolet Water Pump Gasket
 Chevrolet A/C Condenser Fan
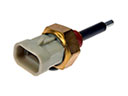 Chevrolet Coolant Level Sensor
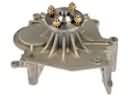 Chevrolet Cooling Fan Bracket
 Chevrolet Drive Belt
 Chevrolet Intercooler
 Chevrolet Transmission Oil Cooler
 Chevrolet Transmission Oil Cooler Hose
Browse Chevrolet Automatic Transmission Oil Cooler Line by Models
Colorado Tahoe Cruze Malibu Camaro Equinox Impala SS Avalanche Silverado 1500 Silverado 2500 HD Caprice Suburban Traverse Blazer Sonic Volt Spark Trax Trailblazer Astro Cavalier Corvette Aveo C1500 C2500 C3500 Express 1500 Express 2500 Express 3500 K1500 K2500 K3500 Lumina Monte Carlo P30 Silverado 2500 Venture Silverado 3500 Suburban 1500 Avalanche 1500 Avalanche 2500 Aveo5 Impala Limited Silverado 1500 Classic Silverado 1500 HD Silverado 1500 HD Classic Silverado 1500 LD Silverado 1500 LTD Silverado 2500 HD Classic Silverado 3500 Classic Silverado 3500 HD Suburban 2500