ChevyParts
My Garage
My Account
Cart
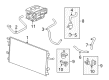
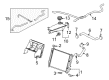
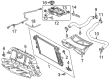
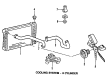
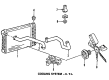
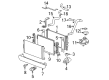
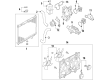
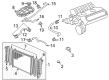
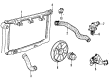
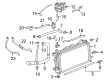
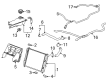
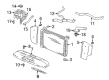
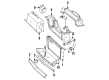
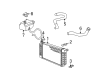
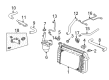
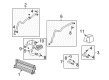
OEM Chevrolet Radiator
Cooling Radiator- Select Vehicle by Model
- Select Vehicle by VIN
Select Vehicle by Model
orMake
Model
Year
Select Vehicle by VIN
For the most accurate results, select vehicle by your VIN (Vehicle Identification Number).
369 Radiators found


Chevrolet Inverter Cooler Part Number: 25936904
$544.38 MSRP: $817.39You Save: $273.01 (34%)Product Specifications- Other Name: Radiator; Radiator, Radiator
- Replaces: 25867738


Chevrolet Radiator Part Number: 15145946
$336.39 MSRP: $476.75You Save: $140.36 (30%)Product Specifications- Other Name: Radiator Assembly; Radiator, Radiator


Chevrolet Radiator Part Number: 84356897
$297.71 MSRP: $511.30You Save: $213.59 (42%)Ships in 1-2 Business DaysProduct Specifications- Other Name: Radiator Assembly-Charging Air Cooler; Charge Air Cooler; Intercooler; Radiator, Turbocharger/Supercharger Cooling
- Replaces: 22799480


Chevrolet Intercooler Part Number: 23246141
$216.68 MSRP: $368.89You Save: $152.21 (42%)Ships in 1-2 Business DaysProduct Specifications- Other Name: Radiator Assembly-Charging Air Cooler
- Replaced by: 84507131


Chevrolet Radiator Part Number: 23267151
$322.94 MSRP: $482.72You Save: $159.78 (34%)Ships in 1-2 Business DaysProduct Specifications- Other Name: Radiator Assembly; Radiator, Radiator
- Replaces: 23217826, 20979405

Chevrolet Radiator Part Number: 3046774
$172.60 MSRP: $309.61You Save: $137.01 (45%)Ships in 1-3 Business DaysProduct Specifications- Other Name: Radiator Assembly
- Replaced by: 52470841

Chevrolet Radiator Part Number: 3043872
$172.60 MSRP: $309.61You Save: $137.01 (45%)Ships in 1-3 Business DaysProduct Specifications- Other Name: Radiator Assembly
- Replaced by: 52470841

Chevrolet Auxiliary Radiator Part Number: 22720231
$616.95 MSRP: $975.11You Save: $358.16 (37%)Ships in 1-3 Business DaysProduct Specifications- Other Name: Radiator, Turbocharger/Supercharger Cooling; Intercooler; Radiator

Chevrolet Radiator Part Number: 19316313
$297.91 MSRP: $573.18You Save: $275.27 (49%)Ships in 1-2 Business DaysProduct Specifications- Other Name: Radiator, Radiator


Chevrolet Radiator Part Number: 10449531
$289.94 MSRP: $433.40You Save: $143.46 (34%)Product Specifications- Other Name: Radiator Assembly; Radiator, Radiator
- Replaces: 89018594


Chevrolet Radiator Part Number: 52497687
Product Specifications- Other Name: Radiator Assembly; Radiator, Radiator
- Replaces: 52453958, 52455839, 52453812, 52453813


Chevrolet Radiator Part Number: 84164908
Product Specifications- Other Name: Radiator Assembly; Radiator, Radiator
- Replaces: 23404561

Chevrolet Radiator Part Number: 25999103
Product Specifications- Other Name: Radiator Assembly; Radiator, Radiator

Chevrolet Radiator Part Number: 15849617
Product Specifications- Other Name: Radiator Assembly; Radiator, Radiator
- Replaces: 15193113
Chevrolet Radiator Part Number: 52486601
Product Specifications- Other Name: Radiator Assembly T; Radiator, Radiator


Chevrolet Radiator Part Number: 22786864
Product Specifications- Other Name: Radiator Assembly; Radiator, Radiator

Chevrolet Radiator Part Number: 88959432
Product Specifications- Other Name: Radiator Assembly; Radiator, Radiator
- Replaces: 03055309, 3055309, 52453612, 52481572

Chevrolet Radiator Part Number: 52470426
Product Specifications- Other Name: Radiator Assembly; Radiator, Radiator

Chevrolet Radiator Part Number: 52487150
Product Specifications- Other Name: Radiator Assembly; Radiator, Radiator

Chevrolet Intercooler Part Number: 20759871
$65.51 MSRP: $102.62You Save: $37.11 (37%)Product Specifications- Other Name: Radiator Assembly-Charging Air Cooler; Radiator, Turbocharger/Supercharger Cooling
- Replaces: 15870557
| Page 1 of 19 |Next >
1-20 of 369 Results
Chevrolet Radiator
Want to cut long-term maintenance and repair costs? Choose OEM Radiator. Those parts deliver top durability you can trust. On our site, you'll find a huge catalog of genuine Chevrolet parts. Prices are unbeatable, so you can keep more in your pocket. Every OEM Chevrolet Radiator includes a manufacturer's warranty. You can also get an easy return policy that keeps buying risk free. Fast delivery, get your car on the road quickly. It's simple to search, compare, and order. Stop guessing about quality or fit. Order today and save with parts that last.
Chevrolet Radiator Parts Questions & Experts Answers
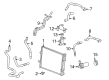
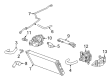
- Q: How to replace the radiator (LE5) in a 2.4L on Chevrolet Malibu?A:Before changing the Radiator (LE5) in a 2.4l automobile you need to remove the cooling fan and shroud assembly. Start by discarding the condenser mounting bolts then push both upward and downward on the condenser and Radiator until the condenser mounting tabs separate from the Radiator clips. Tear the Radiator free by removing the condenser mounting nuts before pulling out the Radiator from the car. Position the new Radiator into the vehicle by pressing the condenser up while applying downward pressure on the Radiator until all condenser mounting tabs fit into the Radiator clips. When installing the condenser mounting nuts and bolts tighten both components to 6 n.m (53 lb in). Finally replace the cooling fan assembly together with its shroud.
- Q: How to replace the radiator on Chevrolet Colorado?A:The procedure starts by eliminating the Fan Shroud followed by lifting the vehicle. J 38185 hose clamp pliers move the outlet hose clamp into the optimal position so you can take off the outlet Radiator Hose. Next step requires removal of transmission cooler lines from the Radiator while simultaneously lowering the vehicle before taking off the Radiator vent inlet hose. A necessary procedure for Radiator replacement involves detaching the condenser from the Radiator by removing the Radiator mounting bracket bolt, the Radiator mount, the grill, and the condenser mounting bolts to free the Radiator for removal. Start by placing the new Radiator and affixing the condenser while securing all condenser bolts to the Radiator at 28 nm (21 lb ft). Finish the installation by fitting the grille and mounting bracket for the Radiator with its bolt secured at 28 nm (21 lb ft). Use j 38185 (Hose Clamp Pliers) to attach the Radiator outlet hose and change the clamp position during the Radiator outlet hose reinstallation. After lowering the vehicle and finishing Radiator vent inlet hose installation the mechanic will return the transmission cooler lines along with reinstalling the Fan Shroud.
- Q: How to replace a radiator on Chevrolet Tracker?A:The first steps to replace the Radiator include disconnecting the negative Battery Cable as well as removing the Radiator Cap. Raise your vehicle properly and eliminate any safety hazards before removing all lower shroud clips. Drain the cooling system by opening the Drain Plug until the required fluid leaves the system. Keep the Drain Plug closed after the procedure. Automatic transmission operators should detach their transmission oil cooler lines located at the bottom of the Radiator before sealing open ends to block leakage. After lowering the vehicle you should disconnect the lower Radiator Hose before proceeding to take off the Radiator overflow hose then the upper Radiator Hose. Secure the Radiator by removing two upper Radiator shroud clips while removing one bolt from each Radiator side on the installation process without damaging the Radiator fan. The Fan Shroud needs to be leaned toward the engine while you lift the Radiator out of its position in the vehicle. To mount the Radiator position each bolt on both sides then put in the 2 upper Radiator shroud clips along with the upper Radiator Hose and Radiator overflow hose. Apply needed torque to the vehicle before mounting the lower Radiator Hose, transmission oil cooler lines and installing the 2 lower Radiator shroud clips. After vehicle position is lowered you must fill the cooling system before reconnecting the negative Battery Cable. The inspection process ends when you operate the engine while checking for coolant leaks and making sure the system has the right coolant level together with looking for automatic transmission fluid leaks and confirming correct fluid level.


Related Chevrolet Parts
 Chevrolet Thermostat
 Chevrolet Coolant Reservoir
 Chevrolet Fan Blade
 Chevrolet Fan Clutch
 Chevrolet Water Pump Gasket
 Chevrolet A/C Condenser Fan
 Chevrolet Automatic Transmission Oil Cooler Line
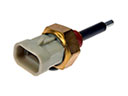 Chevrolet Coolant Level Sensor
 Chevrolet Coolant Pipe
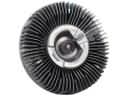 Chevrolet Cooling Fan Clutch
 Chevrolet Crossmember Bushing
 Chevrolet Fan Motor
Browse Chevrolet Radiator by Models
Nova S10 Colorado C10 Tahoe Cruze Malibu Camaro Equinox Impala SS SSR Avalanche Silverado 1500 Silverado 2500 HD Caprice Classic Cobalt Suburban Traverse Blazer HHR Sonic Tracker Volt El Camino K10 Spark Trax Trailblazer Astro Cavalier Corvette C20 Aveo Beretta Bolt EUV Bolt EV C1500 C2500 C30 C3500 Celebrity Chevette City Express Corsica Express 1500 Express 2500 Express 3500 G10 G20 G30 K1500 K20 K2500 K30 K3500 K5 Blazer Lumina Metro Monte Carlo P30 Prizm S10 Blazer Silverado 2500 Sprint Uplander Venture Lumina APV Silverado 3500 Suburban 1500 Trailblazer EXT Avalanche 1500 Avalanche 2500 Aveo5 C10 Suburban C1500 Suburban C20 Suburban C2500 Suburban Captiva Sport Citation II Cruze Limited Impala Limited K10 Suburban K1500 Suburban K20 Suburban K2500 Suburban Malibu Limited P20 R10 R10 Suburban R1500 Suburban R20 R20 Suburban R2500 R2500 Suburban R30 R3500 Silverado 1500 Classic Silverado 1500 HD Silverado 1500 HD Classic Silverado 1500 LD Silverado 1500 LTD Silverado 2500 HD Classic Silverado 3500 Classic Silverado 3500 HD Spark EV Spectrum Suburban 2500 Suburban 3500 HD V10 V10 Suburban V1500 Suburban V20 V20 Suburban V2500 Suburban V30 V3500