ChevyParts
My Garage
My Account
Cart
OEM Chevrolet Metro Radiator
Cooling Radiator- Select Vehicle by Model
- Select Vehicle by VIN
Select Vehicle by Model
orMake
Model
Year
Select Vehicle by VIN
For the most accurate results, select vehicle by your VIN (Vehicle Identification Number).
2 Radiators found

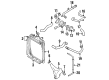
Chevrolet Metro Radiator Assembly Part Number: 91173912
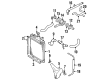
Chevrolet Metro Radiator Assembly Part Number: 91173911
Chevrolet Metro Radiator
Want to cut long-term maintenance and repair costs? Choose OEM Radiator. Those parts deliver top durability you can trust. On our site, you'll find a huge catalog of genuine Chevrolet Metro parts. Prices are unbeatable, so you can keep more in your pocket. Every OEM Chevrolet Metro Radiator includes a manufacturer's warranty. You can also get an easy return policy that keeps buying risk free. Fast delivery, get your car on the road quickly. It's simple to search, compare, and order. Stop guessing about quality or fit. Order today and save with parts that last.
Chevrolet Metro Radiator is one of the most important parts of automobile cooling systems that use an exchange mechanism to deliver heat from engine coolant and spread it to the air. Modern radiators have aluminium cores and plastic or aluminium tanks, but some are made of copper/brass. Commonly located at the front part, it is opposite to the airflow through the grille for heat exchange to occur. Here are some of the failures experienced on radiators They are leaks which can be fixed in so many techniques but replacement is most effective. performance radiators improve over factory ones, that consist of aluminum designing with more enhanced features for better cooling. These radiators use these bigger tubes and more fins per inches to allow better heat exchange and keep a cooler temperature on the engine. Some deluxe models have direct fit options to allow for an easy installation and universal radiators are for custom applications like street rods and race cars. In summary, the Chevrolet Metro Radiator is useful in regulating temperatures so that the engine is neither too hot nor too cold.
Chevrolet Metro Radiator Parts and Q&A
- Q: How to service and repair the radiator on Chevrolet Metro?A:Start with removing the negative Battery Cable and draining engine cooling system in order to service and repair the Radiator. Wipe out the old fluid; remove the pressure cap from the Radiator sump and drain it. This will depend depends on the Radiator and engines cooling system, since they vary. If yours is system, you may also need a wrench to remove the hoses: before beginning with the hose clamp to pull out the upper (inlet) hose from the Radiator , lift and make sure the vehicle. Remove the lower (outlet) hose from Radiator by undoing hose clamp, lower the vehicle and undo the hose clamp to remove overflow hose from Radiator. Next, unplug the Radiator cooling fan electrical connector, and take off the transaxle cooler hoses from the lower Radiator tank, if the vehicle is equipped with an automatic transaxle. Unscrew the two upper Radiator/fan mounting bolts; then pull out the fan and Radiator as a unit. Remove one lower mounting bolt to remove the fan from the Radiator. Tie the Radiator cooling fan to the Radiator attaching it with one of the lower bolts and securing it with 10 nm (89 inch lbs.). Ver501989811the Radiator will need to be replaced with the fan; it is to be installed along with the vehicle where it can be held to its core with two upper bolts, used as Radiator/fan mounting bolts, not apart from the core support but tightened at 10.0nm (89 inch lbs.). Reconnect the hoses with transaxle to the bottom Radiator tank and secure it with screws on the hose clamps, then you can connect the Radiator cooling fan's electrical connectors. Attach the overflow hose on the Radiator, and fit it with a hose clamp. Lift and support the vehicle well and attach the lower hose to the Radiator, placing a hose clamp on it, then drop the vehicle and hook the upper hose on the Radiator, clamp it with a hose clamp. Lastly, top up the engine cooling system and reconnect the negative Battery Cable.

Related Chevrolet Metro Parts
 Chevrolet Metro A/C Condenser Fan
 Chevrolet Metro Fan Blade
 Chevrolet Metro Fan Motor
 Chevrolet Metro Fan Shroud
 Chevrolet Metro Radiator Cap
 Chevrolet Metro Radiator Hose
 Chevrolet Metro Radiator fan
 Chevrolet Metro Thermostat
 Chevrolet Metro Thermostat Gasket
 Chevrolet Metro Water Pump
 Chevrolet Metro Water Pump Gasket
 Chevrolet Metro Water Pump Pulley